Thursday, December 29, 2011

Feiyue Shoes: The Poor Man's Vibrams


I'm cheap and just don't want to pay $100 to run "barefoot" in those funny Vibram shoes even if everyone I know swears by them. So, I run . . . barefoot. In two years of actual rather than Vibram-mediated "barefoot" running, on both concrete and dirt paths, I have yet to even get a scratch.

But there have been a few times when I've encountered a particularly gravely path. Ouch. On those occasions I've been experimenting with slipping on a kind of Chinese martial arts shoe called Feiyue. Think of them as the poor man's Vibrams as they cost less than $20.

Are they durable? More than you'd expect for a $15 shoe, but they won't last forever. Are they attractive? Not particularly. And wearing them around makes me want to bust out a few parkour moves for our next book signing.

Thanks to Elon Shoenholz for the tip on the shoes and parkour moves. 

Wednesday, December 28, 2011

2011 in Review: Urban Homestead Trademark Dispute


As the year draws to a close I thought I'd review some of our posts from the previous year starting with an update on the trademark dispute over the terms "urban homestead" and "urban homesteading".

In February of this year the Dervaes Institute (DI) sent a cease and desist letter to over a dozen different individuals and organizations including our publisher Feral House/Process Media, public radio station KCRW, Denver Urban Homesteading, and the Santa Monica Public Library. In addition DI successfully manged to get Facebook to take down a page about our book The Urban Homestead, that our publisher had put up, in addition to Denver Urban Homesteading's Facebook page. As of this date both of those Facebook pages are still down.

The Electronic Frontier Foundation and Winston & Strawn LLP have generously assisted us in challenging the DI's trademarks. The DI filed a motion to extend discovery earlier this month. I expect a decision from the Trademark Court sometime next year but I'm not going to predict when. The Trademark Court works slowly and via correspondence. We'll let you know of any major developments.

Thanks again to the support of all the readers of this blog and to our attorneys.

For more background on this issue see our February 21 post.

Tuesday, December 27, 2011

Other People's Poo: Biosolids in the Garden

It's people!

Why not use city compost in your garden? Ecological designer Darren Butler, at a class I was sitting in on, showed a soil report from a site that had used compost from the city of Los Angeles. LA's compost contain biosolids, a euphemism for sewage. The soil test showed high levels of:
  • zinc 196 ppm
  • copper 76 ppm
  • sulfur 5,752 ppm
The problem isn't human waste, it's all the other stuff that ends up in the sewer. I see a future when we'll be responsibly composting human waste (see Joseph Jenkin's website for how to do that). But watch out for that free city compost.

Update: A blog reader, Helane Shields, left an interesting series of links about biosolids in the comments. Thanks Helane!

Monday, December 26, 2011

Tomatoes in December

It ain't pretty but I'm not complaining.

Note to self: the tomatoes that sprout on their own are always the healthiest. The cherry tomato above has reseeded itself for at least 12 years. Sometimes its offspring survive the winter and grow as a perennial. Our climate sort of permits this but occasionally a cold night will kill tomatoes off. And each year the fruit declines in quality.


This summer I transplanted two tomato seedlings that sprouted in the yard on their own. One turned out to be the offspring of the Italian red pear tomato I grow every year and the other a somewhat boring but prolific yellow cherry tomato.


It's Christmas and all of these tomatoes are still growing and producing. I've got an unintentional food forest started here. One of these days I'll just give up starting seeds and let nature do her thing!

Saturday, December 24, 2011

A present for you...


*** PEACE ***

(and buckets of cuteness)


Thank you all for being wonderful.

Friday, December 23, 2011

How to Keep that Christmas Tree Fresh

Photo from WSU
 
Washington State horticulture professor Linda Chalker-Scott, has a podcast "Last minute advice about Christmas trees and other fun stuff" that details more than you'll ever want to know about how to keep a Christmas tree fresh in the house. And, yes, it's been studied. Apparently WSU has a Christmas Tree expert: Dr. Gary Chastagner, seen above counting dry needles.

Thursday, December 22, 2011

The Sun Comes

photo credit: Henry Mühlpfordt

Happy Winter Solstice!

It is the darkest day of the year, and the shortest day of the year.  But from now on, every day will be a little longer and a little brighter, until the year turns once more. This is a rough time to be a gardener, even in Southern California. Everything seems to be sleeping. You, perhaps, wish you were tucked in a warm bed, sleeping, instead of frantically rushing getting ready for the holidays.

As a counterbalance to Erik's gloomy Apocalypse post, I'd just say that the Winter Solstice offers us this annual lesson: there is a dawn after even the longest, darkest night. And then things get better.

We may be facing many challenges right now, as individuals, as a nation, as a global community, but we'll get through them. We always have, we always will.

Things will change, no doubt about it. The future will not look like the present. As Heraclitus reminds us, Everything flows. But life is always made up of equal parts joys and sorrows, no matter when, or where. So whatever winter festival you celebrate, take joy in it. Get together with the people you love best. Burn some lights against the darkness. Keep each other warm. Eat something delicious.

Our best wishes to you all! Thank you for your love and support.

Zombie Apocalypse Poll


Despite the jokey title of this blog post I'm seriously interested in hearing where our readers are coming from regarding our future economic/social situation in 2012. To that end I've crafted a poll that you can find on the right top side of this blog. The poll closes on the 31st and I'll post the results in the new year. Feel free to also leave a comment below. What is your outlook for 2012?

Wednesday, December 21, 2011

How to Memorize Numbers

Giordano Bruno's insanely elaborate memory system.

Yesterday we introduced an ancient memory system that can be handy for learning all those new urban homesteading skills. Today I'll briefly discuss a way to use a related mnemonic called the Major System for committing strings of numbers to memory.

To use the Major System you first memorize a set of consonants that represent 0 through 9. From Wikipedia, here's a table of the Major System consonants and a set of mnemonics with which to remember them:

Numeral Associated Consonants Mnemonic
0 s, z, soft c "z" is the first letter of zero. The other letters have a similar sound.
1 d, t d & t have one downstroke and sound similar (some variant systems include "th")
2 n n has two downstrokes
3 m M has three downstrokes and looks like a "3" on its side
4 r last letter of four, also 4 and R are almost mirror images of each other
5 l L is the Roman Numeral for 50
6 j, sh, soft "ch", dg, zh, soft "g" a script j has a lower loop / g is almost a 6 flipped over
7 k, hard c, hard g, hard "ch", q, qu capital K "contains" two sevens
8 f, v script f resembles a figure-8. V sounds similar. (some variant systems include th)
9 b, p p is a mirror-image 9. b sounds similar and resembles a 9 rolled around
Unassigned Vowel sounds, w,h,y These can be used anywhere without changing a word's number value

So, for example, to memorize the number "1795" you start with the first two numbers "17". Let's say 1 = "d" and 7="g". Next add a vowel of your choice, say "o" to make "dog". "17" now is a dog.  For the 95 let's say 9 = "b" and 5 = "l" to make "ball". You now have a dog playing with a ball that you can put into a room in your memory palace. For a longer strings of numbers it's best to "chunk" them into groups of four to make them more manageable.

This is beyond the amount of time I'm willing to put into this, but you can also commit to memory 100 images to represent double digit numbers between 00 and 99 to be able to memorize longer numbers faster.

Tuesday, December 20, 2011

The Art of Memory


We need a term for superfluous smart phone trivia Googling. After all, with the vast archive of factoids on the interwebs who needs to remember anything anymore? But what do we miss by externalizing all of our memories into an electronic form.  What about those bards of the past who could recite thousands of lines of poetry, or the Greek rhetoricians who could speak for hours at a time without notes? Thankfully the basics of the lost art of memory can be mastered in an evening. And  it's all in a short section of a 2,100 year old document called the Rhetorica ad Herennium.

Here's the memory trick the ad Herennium describes in two easy steps. Step one. Say, for example, you want to memorize the following shopping list: goat milk, goat milk yogurt, two blocks of tofu, olive oil, sunflower seeds and cat food (tuna). Take these items and imagine them in some memorable way. Think crazy, surreal, obscene etc. As the ad Herennium puts it,
When we see in everyday life things that are petty, ordinary, and banal, we generally fail to remember them, because the mind is not being stirred by anything novel or marvellous. But if we see or hear something exceptionally base, dishonourable, extraordinary, great, unbelievable, or laughable, that we are likely to remember a long time.
Step two. place the images you've imagined into a physical space that you know well, say your house, your childhood home, office etc. You are, as the ancients would say, creating a "memory palace". For my shopping list I used our house and imagined a goat in one bay of the garage (goat milk), a goat operating a soft serve yogurt machine in the other bay (goat milk yogurt), two giant cubes of tofu jumping up and down in the living room, Olive Oyl from Popeye in the kitchen (olive oil), Mrs. Homegrown munching sunflower seeds in the hallway (sunflower seeds) and cats dancing around a fish in the bathroom (cat food). When I used my memory palace at the store I was able to recall all but one (olive oil). Later I realized why. I was never really into Popeye and, as a result, using Olive Oyl was not sufficiently memorable. I later came up with a much more graphic way to remember the olive oil later, but this is a family friendly blog so I'll forgo the description. Even though this banal shopping list is almost a week old I was able to remember it for this blog post. And one of the great features of a memory palace is that you can recall your list in any order by simply walking through the imaginary building you're using.

While I've got the basic concept of the art of memory I need to do some more practice. So far what I've found it most useful for is learning people's names. And, as an urban homesteader, I always find myself learning new skills some of which require memorization. Now this won't help you find a lost set of car keys. That's what the ad Herennium calls "natural" memory which it distinguishes from the "artificial" memory that can be enhanced with a memory palace.

I wish this handy trick had been taught to me in school. You can get the idea across in just a few minutes. While we don't want education to devolve into rote memorization, it's a little embarrassing to think about how much memory we've ceded to the Internet in the post-iPhone era.

The art of memory is a right brain, creative activity that exercises creative visualization. It's a tool that Renaissance mages such as Giordano Bruno and Giulio Camillo used to initiate the shift in consciousness that gave birth to the Renaissance. Francis Yates' book The Art of Memory describes the role memory techniques played in this shift. The revolution in thought launched by Bruno and Camillo gave us the wonders of Western science and, ironically, the iPhones that have externalized our memory palaces. It's time to re-aim that consciousness and we'll do so by constructing new memory palaces, even whole memory cities and landscapes. To paraphrase the emerald tablet, beloved by Bruno, "As within so without."

We'll go over a mnemonic system for numbers tomorrow.

For an entertaining introduction to the art of memory see Joshua Foer's book Moonwalking with Einstein: The Art and Science of Remembering Everything.

Monday, December 19, 2011

Hay Boxes or Fireless Cookers

Illustration from The Fireless Cook Book

Mrs. Homegrown here:

Jessica from Holland sent us a letter recently praising our work, but very, very gently scolding us not including the hay box, a groovy old energy saving technology, in our book. We do stand corrected! And her enthusiasm for hay boxes has reignited our interest, too.

We actually considered hay boxes for Making It, but didn't end up building one for a variety of reasons, including just plain running out of time. But I have to admit one of the primary reasons was that natural gas here is really inexpensive, so the cost savings of starting and finishing a pot of soup on the stove, vs. starting a pot of soup on the stove and finishing it in a box, just wasn't compelling enough for me to make a lifestyle change. This is a silly excuse--water is also inexpensive here, but I'm obsessed about saving that resource. I guess a lot of what we choose to do just comes down to our various quirks and passions.

I'm thankful to Jessica for reminding me of the hay box. I believe that my New Year's resolution will be to meditate on the sources and real costs (in terms of the environment, human health, etc.) of gas and electricity, and work on new ways to conserve energy. The hay box, or fireless cooker, may be one of these strategies.

What the heck is a hay box?

Sorry if I'm leaving some of you out of the loop. A hay box aka fireless cooker is a very old fuel saving technology, which perhaps has its origins in Scandinavia.  It is simply an insulated box that you put a hot pot of food into, and leave it all day (or all night) to finish cooking. It's the forerunner of the crockpot.

This cooking technique isn't limited to hay boxes. The same concept is used by people who put oats and boiling water into a Thermos at bedtime and enjoy the finished oatmeal in the morning, or by campers who wrap their sleeping bags around a cooking pot so they'll have hot food when they get back to camp.

As far as I can tell, no one is selling fireless cookers made in the old style, but they are quite easily fabricated at home--or improvised in emergencies. However, if you are in a buying mood, a very similar technology exists in something called thermal cookware. These are essentially giant Thermoses--I'm including a link to a random example of one on Amazon here.

Why would you want to build a fireless cooker?
  • To save time at the stove
  • To have food ready when you get up, or come home from work
  • To save energy, because you're a do-gooder.
  • To save energy, because energy is expensive/unreliable where you live.
  • To learn this technology well so you'll know how to use it in case of emergencies. (A fireless cooker combined with something that can boil water, like a camp stove or a rocket stove, would be a great combo for any emergency, long or short.)
Okay, so how do you build one?

It's really simple. You're just insulating a pot. There are many ways to do it, including simply bundling the pot up in a bunch of quilts. But if you're going to do this regularly, you probably want a more stable system than that. You'll want to build a box.

First, though, you should probably start with your pot and build from there. This technique works best when the pot is full, so you'll want to choose a soup pot/dutch oven sort of pot that is the right size for you and your family. It should have a lid, obviously, and should be made of something can come and go off the stove top--i.e. no ceramic.

 Once you've chosen your pot, you'll need a box to keep it in. This box should allow enough space for at least 4" of insulation all around your pot. (We'll talk about the insulation next.) So the pot height/pot width plus at least 8"= the minimum dimensions of your box.

The cooker could be anything sturdy with a lid, but the tighter built, the better. A big cooler would work great. I've just had a crazy inspiration that one of those newfangled ottomans that are hollow inside for stashing away your junk when company comes would also work nicely!

You can make a "two holer" if you want to have the ability to cook more than one dish at a time. In that case you might be able to build one in a hall bench or a big toy chest or trunk. If you can't scavenge anything, you could build a wooden box with a hinged lid. A well-insulated, box-style solar oven can do double duty as a fireless cooker, too. Whatever you choose, the box should have a lid that either latches or can be weighed down so it closes securely.

If your box is not built pretty much airtight--say it's pieced together out of wood--you should seal it up before you insulate it. In old manuals they recommend gluing a layer of  paper all over the interior. You might choose to use tin foil or a Mylar space blanket. A space blanket would help reflect heat no matter what your box is made of.

Then you need to choose an insulating material.

Early 20th century options, as per old books:
  • Hay or straw, cut fine
  • Sawdust
  • Wool (they mention this is the best material)
  • Southern moss
  • Ground cork (it seems fruit used to be shipped in this!)
  • Softwood shavings ("excelsior")
Contemporary recycled options:
  • Styrofoam or foam. Carving a pot-shaped hole into a block that fit your chest would be the best, but scraps could work, too.
  • Shredded paper. At last, something to do with all those bills!
  • Cotton or polyester batting taken from old pillows or quilts. 
  • Wool in the form of cast off sweaters and blankets, perhaps shredded?
  • This might sound nuts, but if you cut down a bunch of weeds, let them dry and chop them up, they would work as well as hay. Straw has that nice hollow stem construction which probably holds heat better than hay, but some weeds have the same sort of stems.
  • Note: I'd discourage using fiberglass insulation for safety reasons. It's nasty to work with and you don't want to risk any of it getting in your food.
    Fill the box up all the way with insulation. The box should be filled to the top, but the material shouldn't be packed so tightly that there's no airspace. Tiny air pockets are where the magic happens.

    Next, make a permanent nest for your pot in the box by hollowing out a pot-shaped hole in the insulation material. Line that hole, as well as the top surface of the insulation, with a one big piece of fabric. Secure that fabric to around the edges of the box with staples or something. That will allow you to lift the pot in and out easily and will also keep bits of insulation out of your food.

    The final insulation step is to make or find a cushion sized to fill all the empty space in the box from the top of your pot to the closed lid. It should be fat enough that you have to use a little pressure to close the lid. There should be no open space at the top of the box. And again, the lid must latch or otherwise secure tightly. In the image at the top you can see the two cushions that come with that set up.

    It's often easier to understand something just by looking at pictures. If you do an image search for hay box, you'll see lots of them, many improvised quickly. Whereas searching fireless cooker brings up more antique images.

    A fireless cooker from a 19th century German catalog, image courtesy Wikimedia.

    Cooking with the Hay Box

    Okay, this is all very theoretical for me because I haven't done it yet, but this is what I know, and I hope those with experience will comment to help us newbies out.

    The cooker is perfect for anything you'd associate with a crockpot, like pot roasts and other stewed meats, soups and stews and chile, bean dishes and also hot cereals, polenta, whole grains and rice.

    First, it's pretty much impossible to offer up exact cooking times. It's going to vary by both quantity of food and the construction of your box. In short, you're going to have to play with it.

    But the gist of it is that you start your cooking on the stove. If, for instance, you're doing an initial saute, you'd do that first, then you'd add all your ingredients and liquids and bring it up to a simmer (for how long may vary by recipe--the old cook book I'm consulting most often recommends 10 minutes boiling on the stove for meaty dishes, but if I suspect for non-meat things you could just bring it to a boil and then take it off immediately) then move it to the box to finish cooking. A good box should hold heat for 8 hours. The actual cook time will be less--how much less will vary by dish. But it will not burn or overcook and it will keep warm until you're ready to eat.

    I've heard that in general you would use less water than with stove top cooking because there's no evaporation.
     
    Here's some of Jessica's tips:
    Suggestion: put the beans/lentils/wheat/rice/peas in a thermos flask together with the absorbable amount of boiling water/stock. Do this in the morning. In the evening you have a thermos with still warm and well-cooked food. With just a few seconds of boiling water. Think of the hours per month that you can turn off the stove and still have warm, cooked food!
     ...
    It works fine with other things as well:
    Eggs: put pan with eggs and boiling water in, take out of hay chest after 10 minutes (or more, or less, depending on your experience.
    Vegetables: take out of hay chest after 110 to 125% of ordinary cooking time. Experiment! Don't use a lot of water.
    Stock... why not?


    It even works with things like meat balls and chicken wings. Have the meat on high fire until the outside develops the right crust or color, then keep in hay chest for xx time until inside is 'done',

    Mr. Google can lead you to various resources on this technology, but my favorite resource so far is this old book: The Fireless Cook Book by Margaret Mitchell (1909), which is actually both a construction manual and a cookbook--a wonderful crusty old cookbook with recipes for things like Mock Turtle Soup. You can read it online at Archive.org, or download a pdf or even as an e-reader file--for free!

    Do you have any recipes, tips or techniques to share? Please do!


    An obligatory nanny-state warning: If food drops below 140F (60C) for an hour or more, bad bacteria can move in. You might want to take the temperature of your food when you pull it out of the box and see where it is. If it has dropped below that temperature, put it on the stove and rewarm it to at least 165F(74C).

    Friday, December 16, 2011

    Acquainted with the Night


    Light from Sunday Paper on Vimeo.

    This poetic video, shot in my own overlit hometown, likely expresses the filmmakers ideas about wasting electricity. But like all good art it has multiple interpretations. I'm going to suggest that it shows how electric lighting has stolen the gift of night, robbing us of our night skies and peaceful sleep.

    There's a large body of evidence that artificial light plays havoc with our sleep patterns, health and psychological well being, to say nothing of its detrimental effect on wildlife. And then there's that night sky. You can actually count the number of stars in the sky in Los Angeles.

    Thankfully this is one of the issues that we can help change on the home level. Other than one small LED light at the bottom of our entrance stairs we have no landscape lighting (though Mrs. Homegrown did sneak a string of Christmas lights past my bah-humbug filter). We can also take measures to darken our bedrooms at night. While this may at first seem like tin foil hat talk, consider that the International Agency for Research on Cancer has classified night shift work as a carcinogen.

    Several years ago I heard a psychologist speak eloquently on the need for dark nights (unfortunately I can't remember his name). He proposed getting a small town do a trial period of shutting all their lights out at night to see how it would change the well being of the town's inhabitants. It's a great idea. So let's get on it. I'd like to think we can experiment with returning night to our towns and cities before that dinosaur juice peaks out.

    Thursday, December 15, 2011

    Chill Hour Calculator for California


    Please excuse another California-centric post, but if you're in the Golden State and like to geek out on keeping track of your chill hours here's a handy tool bought to you by UC Davis: Cumulative Chilling Hours. Each year this page keeps track of chill hours between November 1 through end of February. If you know of a similar resource for other states/countries leave a link in the comments.

    As cool (so to speak) as this tool is, what constitutes a chill hour and what kinds of fruit will grow in a particular climate is a complex question. For more on this debate see a provocative article on the Dave Wilson Nursery website, "Chill Out".

    Wednesday, December 14, 2011

    CoEvolution Quarterly Online

    While hunting down old appropriate technology resources on the Internet, I was delighted to find the winter 1978 issue of CoEvolution Quarterly, put out by the folks behind the Whole Earth Catalog. This issue of CoEvolution profiled Robert Kourik (which CoEvolution spells "Kourick") who practiced permaculture before Bill Mollison gave it a name:
    [Kourick] is developing methods of growing edible and ornamental plants together for maximum beauty, minimum upkeep, and a self-sustaining yield of food.

    He does it by concentrating on growing perennials that do not need to be replanted each year and annuals that reseed themselves spontaneously. He uses ground cover plants that fertilize other plants, such as the beautiful pastel-flowering lupin which puts nitrogen in the soil. . . Kourick's goal is to develop what he calls a "self-reliant" garden that produces all of the nutritional needs of each plant. "The gardener," he says, "can then supply his own nutritional needs by adapting his diet to the garden's produce."
    Amen is all I can say to that. A garden that requires fewer inputs is exactly what I'm working on right now.


    In the same article Kourik mentions incorporating fruit trees, kept pruned small, into his gardens,
    Robert Kourick believes that tree crops can be a mainstay of any garden, and he has discovered a plant breeder in Modesto, whom he calls the "new" Luther Burbank. This man is Floyd Zaeger [I think that should be "Zaiger"] who has developed genetic dwarf fruit trees that are strong on adaptive qualities and perfect for Kourick's garden.
    Floyd Zaiger, incidentally, is the person who developed several of the fruit varieties I mentioned in yesterday's blog post including the pluot, the aprium and the necta-plum. He developed these varieties through a herculean breeding program involving hand pollinating something like 150,000 trees.

    Robert Kourik went on to write an excellent series of books, Drip Irrigation for Every Landscape, Roots Demystified, and Designing and Maintaining Your Edible Landscape Naturally

    You can read CoEvolution Quarterly and the Whole Earth Catalog for free on the Interwebs at wholeearth.com or download individual pdfs for $2. One of these days I'll put up a separate page of links to more free appropriate tech and prepping resources when I get the time.

    Tuesday, December 13, 2011

    Dave Wilson's Top 21 Fruit Trees for the Southwest US

    A Necta-plum from our tree harvested in July 2010.
    Do you live in a warm climate and have less than 500 chill hours? "Rock star orchardist" Tom Spellman, with the Dave Wilson Nursery, has some suggestions for low chill fruit tree varieties based on productivity and performance. His recommendations:
    • Dorsett golden apple
    • Fuji apple
    • Pink Lady apple
    • Cot-N-Candy Aprium
    • Flavor Delight Aprium
    • Minnie Royal cherry
    • Royal Lee cherry
    • Arctic Star nectarine
    • Double Delight nectarine
    • Snow Queen nectarine
    • Spice Zee Necta-Plum
    • August Pride peach
    • Donut peach
    • Eva's Pride peach
    • Red Baron peach
    • Burgundy plum
    • Emerald Drop pluot
    • Flavor Grenade pluot
    • Flavor King pluot
    • Splash pluot
    Of the trees on this list, we've got the Spice Zee Necta-Plum, a beautiful tree with pink blossoms and  red leaves in the spring that produces a super sweet fruit. It's still too young to evaluate it's performance but I'm happy to have it in our garden. We also have a Fuji apple that's a few years old which is growing but has yet to produce fruit. Last year we also planted a Flavor Delight aprium (in a less than ideal location), and it's also too early to evaluate its performance.

    We sourced almost all of our trees by mail through the Bay Laurel Nursery, which carries Dave Wilson's trees (Dave Wilson is wholesale only). Get your orders in now as Bay Laurel sells out of many varieties by the time they ship in February.

    You can read the complete list of Tom Spellman's low chill fruit suggestions with his  comments here.

    If you have mature versions of any of these trees please leave a comment and let us know where you live and how your trees are doing.

    Thanks to Ari Kletzky for suggesting this list.

    Monday, December 12, 2011

    Gingerbread Geodesic Dome


    Scout Regalia Reel 02: Gingerbread Geodesic Dome from Scout Regalia on Vimeo.

    Now you can bake your own version of Drop City without getting "baked" yourself! Some local designers, Scout Regalia, have cooked up a gingerbread geodesic dome and offer a kit for making one.

    Now when it comes to geodesic domes as shelter I'm with former dome builder Lloyd Kahn who concluded that "Domes weren’t practical, economical or aesthetically tolerable."

    But when it comes to gingerbread domes, I'm all for it!

    Via the Eastsider.

    Friday, December 09, 2011

    Three Power Tools Every Urban Homesteader Should Own


    On nearly all the work I've done on our house, everything from chicken coops to wood floors I've used just three power tools:
    • corded drill
    • circular saw
    • sabre sawjig saw
    While I also own a router, a miter saw, a sander and a few other miscellaneous power tools, the three tools above I consider essential. Even if you don't own a house, but would like to build some furniture or help a friend or relative with a repair project, this great triumvirate of tools will get you through 99% of all jobs. For that 1% of problems that require an exotic tool, you can rent one.

    I prefer corded tools as I hate it when a battery dies in the middle of a day's work and corded tools have more power. That being said, there are a few times when I wish I had a battery powered drill. I'd also recommend spending a little extra to get high quality models of these three tools. They've all lasted 10+ years of heavy use.

    I've got a non-powered backup for each of these tools, with the exception of the drill. Sometime before that that zombie Apocalypse/Mayan 2012 meltdown thing happens, I'd love to learn how to use hand tools. But in the meantime, I'll stick with electricity.

    Thursday, December 08, 2011

    Michael Reynold's Beer Can Houses

    Construction of One of Three Experimental Houses Built from Empty Beer and Soft Drink Cans.

    The National Archive just put thousands of 1970s era images from the Environmental Protection Agency online. One of the photographers working for the EPA, David Hiser, captured New Mexico architect Michael Reynolds building houses out of adobe and aluminum cans. See a selection of these photos after the jump . . .

    Wednesday, December 07, 2011

    Earthquake Proofing the Pantry


    So I finally got around to earthquake proofing the pantry. All it took was a bunch of four foot bungee cords which seemed to have just about the right amount of stretch to span our seven foot shelves. You could probably use the same four foot bungee cords to span an even longer shelf. I used eye hooks to anchor the ends of the cords.

    Looking at the picture, the height of the cords on some of the shelves might not be optimal (looks like some of the jars could slip under in a good shaking). But, all in all, I'm pleased with the results.

    Tuesday, December 06, 2011

    Armchairs Made From Scrap


    Artist and designer Wholman has some really nice plans for a chair made out of scrap over at Instructables. Check out his many other very cool Instructables here. And his blog: ObjectGuerilla.

    Sunday, December 04, 2011

    Testing the Lead Testers

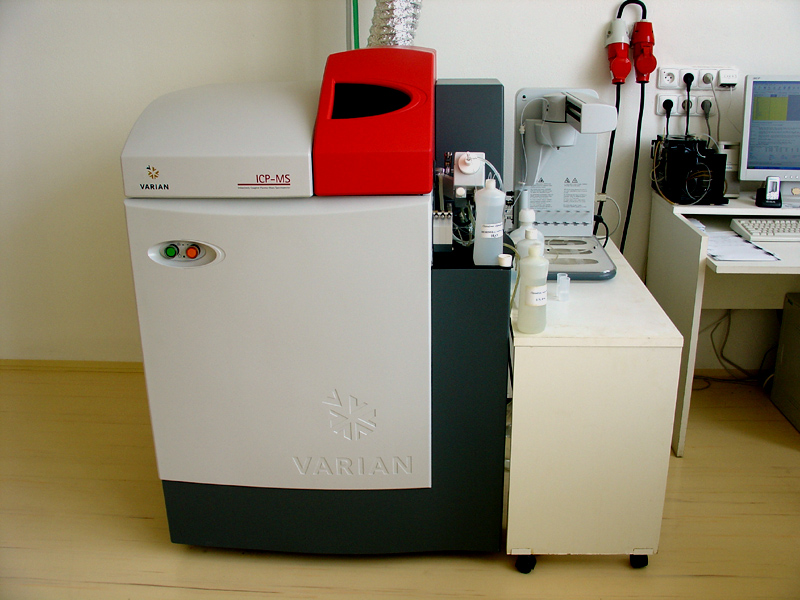
    Varian ICP-MS from Wikipedia

    Dear readers,

    Excuses for a technical post here, but we need your scientific expertise. If you have experience in soil laboratory testing techniques, or know someone who does, please send us an email at rootsimple@gmail.com or leave a comment. We're attempting to reconcile slightly different lead results from three different labs and I'd like to be able to write about soil testing methods. Two of the labs we sent samples off to (UMass and Timberleaf Soil Testing) use inductively coupled plasma mass spectrometry (ICP) to test for lead. Wallace labs uses an extractant, AB-DTPA (ammonium bicarbonate Diethylene Triamine Pentaacetic acid).

    Here's how Wallace described their lead testing techinique,
    We use AB-DTPA (ammonium bicarbonate Diethylene Triamine Pentaacetic acid).

    It is a gentle extractant and it mimics roots in extracting minerals from the soil. Most often environmental tests are made with boiling acids which are more aggressive than roots. The AB-DTPA method is a standard testing method of the Soil Science Society of America. It is called the universal extractant. It measures the bioavailable or plant available minerals which is expected to be adsorbed by plants. Most of the background heavy metals are occluded and are unavailable to plants. Our testing does not see the occluded metals.

    Total lead is approximately 10 times higher than our AB-DTPA measured lead. We recommend that AB-DTPA lead be less than 30 parts per million for home production of edible produce.
    UMass says,
    We use a modified Morgan solution (dilute glacial acetic acid and ammonium hydroxide) to measure extractable lead (using ICP).  Total Estimated Lead is calculated using a correlation established during a study performed here at UMass that compared total digestion levels to extractable levels using 300-400 soils.
    I divided one soil sample into three parts and sent a portion to three labs. While all three labs indicated the presence of above natural levels of lead, there were enough differences between the tests to warrant a closer look at the techniques. Your assistance would be greatly appreciated and we'll share what we find out.

    Food Preservation Resources


    Due to a popular post on making prickly pear jelly, we get a lot of emails asking for advice on canning. So I thought I'd list three favorite food preservation resources.

    I like to go to respected sources when canning for reasons of both safety and reliability. While botulism is fairly rare, it's a highly unpleasant way to pass this vale of tears. But beyond the safety issue, if I'm going to go through the work of canning, I want to know that the recipe is going to work. There are few things more frustrating than a big batch of jam or jelly that doesn't set. Yes, you can call it "syrup" but it's still a big blow to the ego. 

    My three favorite resources are the National Center for Home Food Preservation which has recipes for all kinds of food from fruit to meat, the Ball Complete Book of Home Preserving and Ball's website. All of the recipes in these two websites and book follow USDA guidelines.

    The reason I came up with a prickly pear recipe is that I couldn't find any other ones that worked. But if I were canning something like, say, peaches I'd go with one of the above authorities. If you have a favorite food preservation resource leave a comment.

    Saturday, December 03, 2011

    Quick Tip


    I've learned that if I put a sheet or two of our otherwise useless weekly newspaper at the bottom of my counter-top scrap pail, dumping it out becomes much less gross. No more fuzzy, slimy things stuck to the bottom. Why did it take me so longer to figure this out?

    Friday, December 02, 2011

    What's going on in the garden?


    I don't know...

    but I think the okra is finished.

    Thursday, December 01, 2011

    Cat allergies, cat hearts, cat cuteness: an update on all things cats.


    Many apologies to people who don't come here to hear about the cats.

    This won't take long.

    I just wanted to give two quick updates. The first is to let you all know that Phoebe is doing amazingly well despite having an insanely malformed heart. The meds have perked her up, so she and Trout are playing all the time. To look at her you'd never think anything was wrong. So thank you so much for all  your supportive thoughts and let's hope she stays with us a good while.


    The second update is on allergies. I've posted about this before. When we got Phoebe I was technically allergic to cats, but I decided to push on through that little impediment, powered by the twin engines of Denial and Will, just as I'd done when we got our dog. It worked.

    Then Trout came into our lives. I hoped that I'd get a pass on the allergies, as I'd already adjusted to Phoebe. But instead I had to start all over fresh with him. And it was worse this time around. Not least because Trout is super affectionate and is always, quite literally, in my face. (He kisses!)

    I worried that I might have overloaded my system beyond all tolerance, but guess what? The symptoms have been gone for almost a month now, long enough for me to declare victory over pet allergies--my third victory so far.

    The secret? Pig-headedness. Willingness to be constantly snotty. Absolute faith in mind over matter. I took nothing for relief, nothing at all. Not even nettle tea this time, because I was out of nettles. I think it's important not to have a crutch, to force your body to work through it. The whole process took about three months.

    I realize that there are people with worse allergies than mine, and I don't mean to underplay anybody else's experiences. I'm sure some allergies are so severe that they can't be ignored. But I'm intrigued that this works, for me as well as for others I've heard from, and just wanted to say that it is possible to break free.


    Wednesday, November 30, 2011

    My Big Fat Worm Bin

    These worms are fat and happy
    Some of you may remember that Earth Goddess Nancy Klehm taught a vermicomposting class at our house in October. Some of you reading this may have even attended!

    That day, Nancy and the class foraged and gathered materials to fill a bin and worked together to chop, moisten and prep the materials. The materials included our own kitchen scraps, farmers market trimmings, cardboard and newspaper gathered from neighborhood recycling bins, chunks of our infamous prickly pear cactus, a "nitrogen contribution" from one of the more intrepid class members, some well aged humanure compost and some of the aged cat compost from our kitty litter compost barrel. (More on that later.) We didn't have our final worm bin built at that time, so the materials were layered like a lasagne in a 50 gallon drum. When introduced the worms from our sad little kitchen bin into this pile of goodness, the worms thought they had landed in nirvana.

    Since then, Erik has built a giant wooden bin for us following Nancy's plans. It's a simple thing, very like a toy chest. Nancy's plans called for it to be 4 feet long, but Erik built the chest 5 feet long because he was working with 10 foot boards (less waste that way, you see). The result is a long pine box that looks disturbingly like a coffin! But that's okay. Really, what better than a pine box full of worms staring us in the face to remind us all that we have to seize the day? 

    Why do we have a coffin on our back porch, you ask?
    The inside view, proving it is not a coffin. We're going to decorate this somehow--which might help, or it might just look like we have a decorated coffin on our back porch. Right now the process is stalled because we are bickering over which pretentious Latin motto to paint on the side.

    I transferred all the contents into the coffin box. What was interesting about Nancy's mix is that it is much more like an active compost pile than the traditional newspaper shreds + scraps that make up a typical worm bin. The materials had heated up while sitting. Heat isn't good for worms--they like to occupy cool compost piles--but I figured in a box of that size they could find cool pockets and edges to hang out in until it cooled off.  And that's exactly what they did. There weren't so many of them to begin with, and they were happy to hang out on the top layer until the rest cooled.

    Since then, a wormy miracle has taken place. First, given the space and resources, they've started breeding like crazy. That's to be expected. More interestingly, they've grown. The worms are getting super big and fat. I figure they're like goldfish, adapting to fit their space. I think they really like the diversity of materials they're living with, both in terms of habitat and nutrients.
    The surface of the bin as of today. You'll see it looks a lot like a compost pile, as opposed to a bunch of newspaper.

    For my part, I love, love, love having a huge worm bin because it can easily absorb all of our kitchen waste. I can take my entire one gallon scrap pail, dig a hole in the bin, and dump it all in. When we had the small worm bin--which was made of a plastic storage bin--I could only add a cup or two of scraps at a time. This made the bin more of a hobby than a convenience. What's extra cool is that those huge scrap loads vanish really fast in the new bin, whereas scraps tended to linger in the small bin.

    Here's a morbid question for you all: Whenever I add new scraps and see the old ones broken down so quickly, I recall something about an old cemetery in France, I believe, which was known for breaking down bodies extra fast, due to the composition of the soil. Mr. Google isn't helping me recover this lost information, but I believe the cemetery was nicknamed "the man eater" or the "bone eater" or something like that. Does anyone with similarly Gothic tendencies happen to know what I'm talking about?

    On outdoor worms:

    Outdoor worm bins do have to be protected from worm predators--lots of critters like to eat worms, even dogs--either by weighing down the lid or latching it somehow. For now, we're just keeping a big chunk of broken concrete on top. (Uhh...do I hear banjo music?)

    Extreme temperature fluctuations are a problem outdoors. Worms like the temperatures we humans prefer, essentially. If it's broiling out and they can't find cool ground, they'll die. When their bin freezes, they'll die. Freezing is not an issue for us, but Nancy, being from Chicago, is an authority on cold. She says what happens with outdoor bins there is that when the deep freeze comes, the adult worms will die off, but the eggs will overwinter, and the bin will rebuild itself in the spring. Obviously, if you want your worm bin to function year-round in a cold climate it will have to be kept in a basement or a mudroom or somewhere where the temperatures are a little more moderate.

    On the flip side, the mass of a big bin helps insulate the worms from the heat. They can dive deep, or hang out on the shady side of the bin. But it helps quite a bit if you can give the worms some shade during the summer, either by moving the bin under a tree or setting up some kind of screen to block the worst of the sun. 

    Managing the waste stream:

    Diverting all kitchen waste to the worm bin works well with our waste stream because of late, Erik has preferred to build his compost piles all at once--usually when we clear out our garden when the seasons change. The piecemeal additions of food scraps interferes with the timing of his compost harvest. See, if you build a pile all at once, you get finished compost much more quickly than if you add material a bit at a time. This is not to say that "bit at a time" piles are bad, they're just slower. Now we have the best of both worlds.

    Regarding the cat poop compost:

    This should probably be a whole other post. But the short version is that I've been composting our cat litter in its own separate pile. This works pretty well, but with two indoor cats (aka pooping machines) the bin fills up fast. When we built the worm bin, Nancy had us harvest some of the older, more finished kitty litter compost from the bottom of the cat pile to mix into the worm pile as a base material, and I will continue to do this whenever our cat bin overfloweth. The ability to transfer some of the mature material to the worm bin will function as sort of a pressure release valve on our cat pile, allowing the whole system to work better.

    Is this safe? I'm not going to say it is. I'm not going to recommend that any of you do this. When it comes to composting pet or human poo, we believe good composting technique, worms and time make all things well. But obviously if this is done badly, it could be quite dangerous. If you're interested in extreme composting, as always, I recommend you visit Joe Jenkins' site--he's the author of The Humaure Handbook.

    So from Erik, me and the worms: A huge and hearty thank you to Nancy and to all the class attendees who helped us make this wonderful bin!

    Tuesday, November 29, 2011

    Gifts for the Holidays Food Crafting Workshop


    One way to avoid the consumerism of the holiday season is to make your own gifts. And if you live in our hometown you can learn how to make edible gifts while supporting the recently revived Los Angeles Master Food Preserver program. From their announcement:
    Join the Master Food Preservers of Los Angeles County and Homegirl Cafe for a special workshop and fundraiser on Sunday December 4th from 1 to 4 pm.

    Master Food Preservers Ernest Miller, Felicia Friesema, Joseph Shuldiner, Amy Goldman, Roshni Divate and Craig Ruggless.

    Learn how to make truly unique and special home crafted food gifts for the holiday season! Topic include food ornaments, elegant liqueurs, gourmet mustards, seasonal spiced jams and candied fruits.

    Guests will take home samples and recipes, knowledge and a healthy dose of holiday cheer.

    Proceeds benefit the Master Food Preserver program, a volunteer community education group of the University of California Cooperative Extension.

    The cost is $45 and you can get your reservation here.
    The workshop will take place at the Homegirl Cafe which is located at: 130 West Bruno Street, Los Angeles 90012. 

    Meet the Good Guys: Beneficial Insect Poster


     The good folks at the University of California Integrated Pest Management Program (IPM) have created a handy little poster featuring some of our best insect friends--the natural enemies of garden pests.

    They want it spread far and wide, so they're promoting this link to a downloadable PDF fit for printing. This is a great resource for home gardeners, but also for teachers, schools and community gardens. Laminate it and pass it around! And please feel free to share the PDF link with your circles:


    (The UC Statewide IPM website is a great resource, even if you don't live in California. Go there and you'll find fact sheets on residential pests and advice on how to deal with them.)

    Two Vegetable Gardening Commandments

    Two of our vegetable beds looking kinda shabby.

    I spent the Thanksgiving weekend up on the vegetable gardening equivalent of Mount Sinai receiving a set of revelations. Someday I'll have Mrs. Homegrown transcribe the complete stone tablets (urbanite rather than stone, technically) I received in their entirety. In the meantime, I'll share two of the commandments:

    1. Thou shalt not have more vegetable beds than thou canst maintain in a worthy condition.

    We've already reduced the amount of vegetable space in our garden and replaced it with native perennials. I'm considering cutting more vegetable space. Having a lot of poorly maintained vegetable beds sends out a big invitation to the sorts of insect visitors we don't want in our gardens. Better to have one well maintained and productive vegetable bed than ten poorly maintained beds. And right now I've got a few less than optimal beds.

    Light row cover stretched over hoops protects the bed from cabbage moths

    2. Thou shalt secure thy vegetable beds with bird netting or row cover material even if thou thinkest "I'll get lucky this time."

    I do this every year even though I know that if I leave a newly planted bed unprotected it will be visited by a clumsy skunk or a cat looking for a place to poop. I hate bird netting--it inevitably gets tangled and is a pain to work with--but the fact is that if I don't use it I don't get any vegetables. And, if I plant any brassicas at this time of the year without first covering them with row cover material, they will get munched to the ground by cabbage leaf caterpillars.  I've found that once the plants gets established I can pull off the row cover or bird netting and enjoy a season of un-munched veggies.

    Kelly Speaketh on this Issue:

    Erik seems to need to get this off his chest--he gets dramatic when garden disasters occur, and we've been hard hit by the skunk and cutworm brigades this week-- but I'd say he's being way too hard on himself.

    First and foremost, we learned about the possibly high levels of lead in our soil, just when we were at the critical transition stage between the summer and winter garden.The whole yard became off-limits at that point. We just let things go until we knew what we were going to do--and we're still figuring that out. So yup, the two beds in the top pic look like crap, because they are completely untended beds--beds that have been waiting around for us to figure things out. They don't look that way because we have too many beds.

    We've had fallow beds, and cover cropped beds, beds gone a little wild, and beds full of things going to seed, but I've never thought our beds poorly maintained--except in the last two months. So I think Erik just needs a glass of scotch or something tonight.
     
    Just to be factual, we have four vegetable beds. We used to have more ground space where we could plant food, which helped with rotation, but we'll be doing all our veg growing in our four raised beds from now on out, and dedicating the ground space to natives and other perennials. We had planned to do this prior to the lead thing, coincidentally--to save labor. We figure four beds is plenty for the two of us.

    As to the lead thing (that's what I call it--"the lead thing"), we are still getting conflicting tests from different services. One testing service even insists we don't have a problem at all! Until we sort this out, we've decided to "Keep Calm and Carry On" and plant in raised beds.

    As to Commandment #2: I agree entirely! The beds must be protected. Otherwise husbands have breakdowns.

    Monday, November 28, 2011

    How to Build an Igloo


    TRANSA | Iglu Bauanleitung from Sooli Entertainment on Vimeo.

    Paul Overton over at Dude Craft (a great website, by the way) described this slick video as "Swiss hipsters build an igloo." Sure looks like fun. Instructions are in German, but I think the process is pretty self explanatory. Makes me want to head up into the mountains and give this a try.

    Friday, November 25, 2011

    Netafim Tiran, a Greywater Dripline


    In a lecture I heard recently, Leigh Jerrard of the Greywater Corp mentioned an intriguing product from Australia: a dripline compatible with greywater. Now, if you tried to push gunky greywater through conventional dripline it would clog in seconds. According to the manufacturer, Netafim Tiran Greywater Dripline gets around this problem because,
    Each dripper has its own mini filter. When a contaminant attempts to enter the emmitter, it is rejected by the emitter and simply remains in the tube. The irrigation system should be flushed once a year, however anecdotal evidence indicates that flushing may only be required every 5 years.
    100 meters of Netafim costs 100 Australian dollars excluding tax, or about .30 USD a foot. Not a bad price if it performs as advertised. Some quick Googling failed to turn up a US distributor. Root Simple reader Rachel wrote to point out Netafim's distributor locatoer: http://www.netafimusa.com/wastewater/support/locator.

    To use Netafim you need to add a filter as you do with every drip system. I could see this product working nicely with Art Ludwig's Laundry to Landscape system.

    If any of you have worked with Netafim, leave a comment.

    Thursday, November 24, 2011

    I'm Thankful for Lemmon's Marigold


    Spotted at the Huntington Ranch: Lemmon's Marigold (Tagetes lemmoni), a four to six foot wide schrub native to Arizona and northern Mexico. More info on this beautiful plant here. I want one in my garden!

    Wednesday, November 23, 2011

    The Holiday Gift Truce


    One of the traditions my family has experimented with in the past few years is the holiday gift truce. At Thanksgiving we agree to terms. In the past we've exchanged names and given one gift per person or we've just agreed to not do any gift giving or shopping (kids are exempt). Though we haven't tried it, another option would be to contribute to a favorite charity, say Heifer International, in lieu of gifts.

    Economics professor Joel Waldfogel has studied the inefficiencies of gift giving and calls Christmas, "an orgy of value destruction." The problem? When it comes to gift giving we're not very good at guessing what people actually want. In a Bloomberg article Waldfogel says, “People value the items they receive as gifts 20 percent less per dollar spent than the items they purchase for themselves. These are items that are not well-suited for their tastes.”

    Particularly in challenging economic times it's hard to justify this orgy of value destruction, not to mention the stress and time spent in mall parking lots. I'm interested in how readers of this blog navigate the holiday season. Do you make your own gifts? Do you think gift giving is important? Do you give cash or savings bonds? Or do you avoid gift giving altogether?

    Tuesday, November 22, 2011

    What Do You Love?


    A very talented filmmaker named Alex Gorosh did this superbly shot little mini-doc about little old me for Good Magazine. It's part of a series of videos entitled "What Do You Love?" Thanks Alex!

    If you want, leave a comment telling us what you love!

    Meet the Gophinator

    The Gophinator

    Thankfully, we don't have gophers, but dealing with them is one of the first questions we get when teaching vegetable gardening classes.  You can use raised beds lined with hardware cloth. But, other than target practice (a no-no in urban areas), most people I know with gopher problems end up using traps or zealous cats.

    Several sources have told me about the Cadillac of gopher traps, the aptly named "Gophinator". Scott Kleinrock of the Huntington Ranch is one of those Gophinator fans, who stressed avoiding the cheap traps available at big box stores. The Gophinator is sturdy, easy to set and made out of stainless steel that lasts much longer than cheaper traps.

    To use it you need to dig around and find the main subway line the gophers ride. Scott hooks up a wire and a stake to the traps to remember where they are placed.

    The Gophinator is manufactured by Trapline products and you can order one and view some instructional videos here.

    How do you deal with gophers? Leave some comments!

    Monday, November 21, 2011

    Urban Homesteading Thing Catching On


    I have a Google alert set up for the phrase "urban homestead". Lately I've noticed more real estate and apartment listings using this phrase. Our neighbors Anne and Bill even used it to rent out their duplex. A rental listing that includes the photos in this post came from a real estate concern renting out an apartment in Edmonton, Canada. For $1,600 Canadian dollars a month you get:
    •  hot water on demand system. 
    • sunroom has a high efficiency wood burning fireplace that helps keep house warm and cozy in the winter.
    • fenced back yard is an urban oasis with three apple trees, three plum trees, eight choke cherry bushes, a grape vine, covered deck, and enclosed fire pit with a private seating area. A perennial flower garden lines the path to the front yard. Three rain barrels provide ample water for large vegetable and flower gardens.
    • get to know your neighbours at the nearby community hall and rink. The hall holds a variety of children, youth, and adult-focussed classes, programs, and events, such as free dog training; playgroups; skating, yoga, and dance classes; children's Halloween and Christmas parties; community bbqs; collective kitchen; and more! 
    • trained dogs welcome; absolutely no cats.


    Other than that last bit (Dogs but not cats? Someone please explain the logic.) I'm happy to see fruit trees, rain barrels and community activities listed as an asset. Maybe that common sense thing is catching on.

    Friday, November 18, 2011

    The Whip: A Homemade Moisturizer How-To from Making It


    A quick little project: lavender infused moisturizer, two Calendula/plantain salves and a chamomile infused lip balm. Enough unguents to see me through Christmas.
    Mrs. Homegrown here:

    Confession: I can't live without my homemade moisturizer. This is not true of all things. I like take-out food sometimes, and I prefer Ibuprofen to willow bark tea. However, I'll never go back to store bought lotion.

    This recipe appears in Making It as Olive Oil Whip. It's my every day body lotion/face cream and I figured it was about time to share it with you. It only has three ingredients. It's safe and wholesome and very effective. Heck, you could eat it!

    You might find it heavier than what you're used to, because it doesn't contain all the chemical dryers that store-bought stuff has (see the Skin Deep database for the scoop on what's in your favorite moisturizer). But I promise you that if you use it for a week you'll get used to the difference--and then you'll get hooked. My skin has never been so happy as it has since I started using this stuff, and I'm saving tons of money.

    The Whip

    Ingredients:

    1/2 cup olive oil  (It's particularly nice to make this with herb-infused oils, but it's also very good with plain oil. I just made a batch with oil infused with lavender buds. Heavenly!)

    2 tablespoons (.5 oz) of cosmetic grade beeswax, either in bead form or grated and packed into the spoons. (You can use vegan waxes instead).*

    1 cup of tepid water, filtered or bottled or distilled is best.

    Optional: Essential of your choice for scent, about 10 drops

    *I know, I know, you have to buy wax, which is sort of a pain, but it's very worth it because if you do, you can make salves and lip balm, too. If you have a honey person at your local farmer's market, you might ask them. I also like the pastille (bead form) beeswax that they sell at Mountain Rose Herbs. It's very convenient. If you get a block of wax, you'll have to grate it. The charm of that wears off fast. It's not such a good idea to use ground up candles or hardware store beeswax, because you just don't know where it comes from.

    Equipment:

    You need a double boiler, an improvised double boiler--which would be a heat proof bowl balanced over a saucepan--or my favorite method, a Pyrex measuring cup sitting in a small saucepan.

    You will also need a countertop blender or a powerful stick blender. A weak stick blender may not be up to the task. ETA: Since I've posted this recipe I've had a lot of feedback which indicates that a decent stick blender really is the best tool for the job, especially when used in a confined space, like the lotion's jar, or a Pyrex cup (rather than, say, a mixing bowl).

    A couple of clean and dry jars to store your lotion in. This recipe makes about a 1 1/2 cups.

    Wax and oil heat up in Pyrex measuring cup in a saucepan. Our grimy stove is now immortalized on the Interwebs.

    The Procedure:

    Put the olive oil in your double boiler setup and add the wax. Heat over gently simmering water until the wax vanishes into the oil.

    Meanwhile, measure out your tepid water. Cold water will make the lotion seize up too fast. Hot water makes the texture strange. Tepid water is what you want.

    Optional step: I find it helps to pre-warm the blender jar by filling it with hot water prior to blending. See, some of the liquid wax will solidify when it hits the cool glass of the jar. This isn't a huge problem, but you might scrape some of those chunky bits of wax into your finished lotion when you're emptying out the blender. Heating it first minimizes the problem. So just fill it with hot water and let it sit until you're ready to blend. Empty it out at the last second. You don't have to dry it.

    Get your blender or your stick blender all ready to go. Do a pre-flight on the blender. Make sure the ring at the bottom is tight. If you're using a stick blender, you can actually blend the lotion in the jar you're going to keep it in, which eliminates a lot of clean up.

    With a stick blender you can make the lotion right in the jar.

    Take the oil off the stove. Now is the time to stir in the essential oil if you're using it. Don't dink around and let it oil/wax moisture cool. Move promptly to the blender site and pour the oil into the blender or the container you're using with the stick. Start your engines. Pour the tepid water in steady stream into the whirling oil. It will start coming together immediately. If the blender chokes, stop it, scrape down the sides and start it again. Incorporation should only take a few seconds. Look for unincorporated pockets of water and keep blending until they're gone.

    (Once in a rare while I'll end up with a little water that just won't incorporate because the emulsification process finishes and for whatever reason, it didn't get included. If this happens, just pour it off. But generally you should be able to get the whole cup mixed in. You can experiment with using less water if you want. As you reduce the amount of water, the moisturizer will become more like a butter and less like a lotion. A ratio of equal parts water and oil makes a butter that is a really dense weather barrier, good for extreme conditions and outdoor activities.)

    While the lotion is still warm, pour it into your chosen vessels. Leave the lids off until it cools. It will thicken some on cooling.

    Storage:

    This keeps at room temperature for at least a month or two. Signs of decay include texture changes, color changes and outright mold. I've only seen this happen in little jars of the stuff that I've used for travel and have forgotten about. I might go through my usual supply too fast for it to go bad. This is a natural product, though, so you should make it as you need it, rather than making it in bulk and expecting it to keep for a year.

    Clean up:

    Oil and wax can be tricky to clean off glass, and hard on your pipes, too. The secret, I've discovered, is baking soda. Shake some in and wipe it around. It picks up grease just like sawdust picks up vomit on a fairground midway. Dump the greasy soda lumps in the trash. Boiling hot water rinses help, too.

    Last note:

    This lotion and even more so the Silky Cream in Making It are good make-up removers/cold cream substitutes. You can slather this on and tissue it off to clean your face, or for a light moisture treatment.