Showing posts with label vegetable gardening. Show all posts

Monday, October 22, 2012

Row Cover as an Insect Barrier

It ain't pretty but it works.

As one would expect, cabbage leaf worms love cabbage and nearly every other member of the brassica species.  Which  is why I've become a real fan of row cover material as an insect barrier.

The perp in question.

It rarely freezes here so I use the thinnest row cover possible, specifically a product called Agribon-15. If you live in a cooler climate and want to use row cover for frost protection you would use a thicker product such as Agribon-30. Johnny's Select Seeds carries Agribon row cover in lengths as short as 50 feet--plenty for an urban or suburban garden. I've used both PVC pipe and chain link fence tension wire as support. I secure the row cover down with pieces of rebar and bricks to keep out skunks.

What cabbage worms become.

It's not a plug and play solution, however. If it gets hot I have to remember to pull the row cover off. And the added humidity can cause outbreaks of aphids. But overall, it works great. I've found that I just need to use it when tender seedlings are getting established. Once they have a fighting chance against the cabbage worms I can pull it off.

Friday, September 07, 2012

Comopost, Compost, Compost


As if I didn't need a reminder of how important compost is to a vegetable garden, note the tomato above. It's on its way out, but it grew with no supplemental water in hard-packed clay soil contaminated with lead and zinc in a hot side yard. Why did it do well while the rest of my vegetable garden did not do as so good this summer?

Homemade compost.

I didn't have enough compost for the rest of the veggie garden so I bought some at a nursery. The homebrew compost obviously had much more life in it. 

And life is the point. Soil is a living thing. Plants, particularly vegetables, need microbial life to thrive.

For more on the importance of microbial life read the USDA's soil biology primer written by Dr. Elaine Ingham.

Thursday, September 06, 2012

Don't be so quick to clean up


A lot of magic happens in the "dead" parts of a garden. Flowers gone to seed feed birds. Dead stalks support important insect life--from spiders to pollinators. Fallen leaves and sticks give habitat to lizards and toads and mushrooms and myriads of invisible creatures.

Yet dead growth is not attractive to the human eye, and around about this time of year we're all itching to make a clean sweep of all that brown stuff. I know I am, but this morning I was grateful that I've procrastinated thus far, because I saw a flock of tiny little gnat catchers (adorable!) feasting on whatever tiny bugs live on the scraggy stand of fennel standing in our front yard, and a couple of hours later I found a flock of house finches enjoying the withered heads of our long, long dead sunflowers. I almost cut those stalks down yesterday, and am so glad I didn't.

It's a balancing act. If your garden is in your front yard you pretty much have to be tidy to appease the neighbors. If you have a small back yard, like we do, it's hard to avoid the temptation to clear the decks, because everything is right in your face. Blessed are those with big yards, because they might have the option to keep the areas closer to the house tidy while allowing the "back 40" to go to seed.

I guess all you can do is keep the little creatures in mind and put off the clean up as long as you can. Leave dead leaves and sticks on the ground year round. Designate small corners as wilderness. The more you support all levels of life in your garden, the more your garden will thrive.

Friday, August 31, 2012

New Zealand Spinach is the New . . . Spinach


Spotted in a neglected corner of our backyard: New Zealand spinach (Tetragonia tetragonioides). What's interesting is that it self-seeded and grew with no supplemental water in the middle of summer in lead and zinc contaminated soil.  We've never been able to grow regular (and unrelated) spinach here. But there's no stopping the New Zealand spinach. Due to the heavy metal problem we won't be eating this particular specimen, but when I build our new raised beds you can bet I'll sow some New Zealand spinach for next year.

Friday, August 24, 2012

Quebec Kitchen Garden Saved


From BoingBoing, an update on the Drummondville, Quebec kitchen garden, seen in the time lapse video above. City officials have backed down on asking for the garden to be removed.
Drummondville town officials announced the decision [Link is in French] this week during a special session of the Municipal Council to discuss the case. The decision could create a ripple effect in other cities worldwide as zoning laws are a constant debate in urban environments. Roger told us, “The Drummondville case was one of the highest profile examples of a local municipality challenging the right to grow food in one’s own yard. While it took place in Canada, it quickly attracted international media attention because of the garden’s beauty and productivity. The win is significant because it helps establish a precedent that other urban and suburban gardeners can refer to when similar challenges arise in other parts of the world.”

Tuesday, July 31, 2012

Tomato Report: Indigo Rose


Another tomato I got to taste on my trip up California's central coast was the striking, nearly black "Indigo Rose". The Indigo Rose tomato was bred conventionally by Oregon State University specifically to have high levels of antioxidants. Those antioxidants are in the tomato thanks to a class of flavonoids called anthocyanin, substances which also give the fruit its dark color.

According to Oregon State,
Indigo Rose's genesis began in the 1960s, when two breeders – one from Bulgaria and the other from the United States – first crossed-cultivated tomatoes with wild species from Chile and the Galapagos Islands . . . Some wild tomato species have anthocyanins in their fruit, and until now, tomatoes grown in home gardens have had the beneficial pigment only in their leaves and stems, which are inedible.
The size is somewhat bigger than a cherry tomato. The inside of the tomato is a dark red. The taste? Good, even though the one I tried had not matured yet. I'm going to consider growing these next year.

You can find out more about the Indigo Rose on the Oregon State Extension Service website.

Indigo Rose seeds can be purchased through Johnny's Select Seeds.

Monday, July 30, 2012

Tomato Report: Blush


I think I've tasted my new favorite tomato variety: Blush. I got to tuck into a box of these delicious tomatoes at the farm of Shu and Debbie Takikawa near Los Olivos. Yellow with red streaks, Blush tomatoes have the perfect balance of sweetness and acidity.

The blush tomato was developed by geneticist and tomato geek Fred Hempel and are available via Seeds of Change.

Due to a series of gardening blunders that I'll blog about at some point, we're not going to have many tomatoes this summer from our yard. Thankfully I can visit Shu and Debbie's stand at the Altadena Farmer's Market on Wednesdays.

If you've grown Blush tomatoes please leave a comment and let us know how they did.

Friday, July 20, 2012

Front Yard Vegetable Garden Update


One advantage of living in a slightly rough-around-the-edges Los Angeles neighborhood is that nobody gets bent out of shape about front yard vegetable gardens. Indeed, they are  a tradition in immigrant neighborhoods.

The picture above is an update of one of the front yard gardens Kelly blogged about back in May.


It looked like this when she first blogged about it. Not sure exactly what's growing here. It looks like beans from a distance, but up close they're not any bean variety that I've ever seen. There are also bitter melons and hot peppers growing on the front fence.

Looking nice, and food will be on the table soon.

Wednesday, May 02, 2012

Chop and Drop: Leaving Plant Residues in the Garden

Image from California Agriculture

Since 2004, University of California scientists have been studying "conservation tillage," a suite of techniques that includes practices such as reducing tillage and leaving crop residues in the field after harvest. Leaving crop residues, in permacultural lingo, "chop and drop," it turns out has a number of important benefits.

According to a research paper in the April-June 2012 issue of California Agriculture,
In two field studies comparing no-tillage with standard tillage operations (following wheat silage harvest and before corn seeding), we estimated that 0.89 and 0.97 inches more water was retained in the no-tillage soil than in the tilled soil. In three field studies on residue coverage, we recorded that about 0.56, 0.58 and 0.42 inches more water was retained in residue-covered soil than in bare soil following 6 to 7 days of overhead sprinkler irrigation. Assuming a seasonal crop evapotranspiration demand of 30 inches, coupling no-tillage with practices preserving high residues could reduce summer soil evaporative losses by about 4 inches (13%).
While this study is about commercial agriculture, much of its findings apply to home gardens as well, in my opinion. Leaving residues from the previous crop as a mulch layer saves water and builds soil. It does, of course, make it harder to direct sow seeds, but this is one of the reasons I like to work with transplants.

So don't keep that vegetable garden too neat!

Tuesday, April 10, 2012

Introducing Nancy Klehm With Tips on Growing Jerusalem Artichokes

Photo by Ann Summa
We're very proud to welcome to the blog our good friend Nancy Klehm. Nancy is a radical ecologist, designer, urban forager, grower and teacher. Most importantly, unlike Kelly and I here in Los Angeles, she lives in a place subject that odd meteorological condition called "winter", namely Chicago. We asked her to write posts for us for on gardening in a four-season climate and to add her expertise to Root Simple. Nancy's website, where you can find listings for her upcoming classes and events is http://spontaneousvegetation.net/.

She keeps a garden in her yard, an empty lot next to her house and on her roof in addition to lots of indoor seedlings. She has 5 chickens (one is rooster) and 7 quail (5 bobwhite and 2 coturnix). She also grows and gathers in her neighborhood and maintains a half acre food forest west of the city. In her first post for Root Simple Nancy introduces her climate and offers some tips on growing Jerusalem artichokes:

Welcome to Zone 5
I live in what is known by the USDA as Cold Hardiness Zone 5. Chicago is 5B and my food forest is in 5A. If you don’t know, the map is based on minimum average temperatures and helps as a guideline for first and last frost dates: http://www.usna.usda.gov/Hardzone/ushzmap.html. In the Midwest, where winter is a serious endeavor, a zone 5 growing season’s frost dates are May 15 and Nov 1, meaning that is the bracket for growing more tender annual plants such as basil, tomatoes, melons, etc. We have had a mild winter and a very early Spring this year – almost a month ahead according to any record. As a true farmer said: ‘This is the warmest April on record.’ And it was still March when he said it.

In the past 10 days, dodging rain and wet soil, I have planted out potatoes, asparagus, peas, collards, chard, kale, radishes, carrots, beets, turnips, salsify, and cress. I have many vegetables, fruits, culinary and medicinal herbs sown and growing under lights indoors that have weeks ahead of them under 14 hours of artificial sun. But thankfully, I have already been eating out of my garden which is a loose collection of the cultivated and the forageable: asparagus, stinging nettle, dandelion, chickweed, dock, wild and French sorrel, parsley, pea shoots, garlic mustard, ground ivy, wild onion, horseradish leaves, wild carrot, hawthorn flower and burdock root. The hops are almost four feet high, the fruit trees are in heavy bloom and my pawpaw birthed 14 blossoms for the first time since I planted its seed seven years ago!

The problem with this early spring is that it is likely to freeze between now and may 15. Everyone I know who grows tree fruit commercially is a bit worried about the fast blooms so early in the season. We could lose our fruit if the weather snaps to 30 degrees.


Jerusalem artichokes – PLANT NOW!
I was given a lunch bag full of dirty Jerusalem artichoke roots a handful of years ago and now I have a stand that is at least 500 square feet. It is in the center of my food forest. The stand acts like a giant sponge to absorb the extra water that floods my growing area now that the natural hydrology has been interrupted by a nearby housing developer. The stand provides shade for toads and in wet times, muddy crayfish tunnel into the mud around its tubers. In August, the flowers are 10 feet tall. Every spring, I dig out 30-50 pounds of chokes from my ever expanding bed to keep them from overwhelming my young quince and apple trees, which they would if I didn’t.

Muddy chokes and a few worms.

Chokes are a delicious wild perennial food. Darn easy to grow, but can be a lot of work to dig and wash and are really tough to store well. They either mold or dry out quickly once out of the ground and, even if I keep them nice and muddy, I haven’t had the luck or skill to store then over two weeks. In other words, use them or process them immediately.

Washed chokes and wild carrots drying.

I almost broke my mother’s Kitchen Aid when I tried to make Jerusalem artichoke flour, an answer to my father’s diabetes and new anti-gluten faddists. I sliced them, dried the slices and then tried to use the Cuisine Art to chop them up. Wrong tool, so I went to the mixer. It beat on and on for 10 minutes. I threw a towel over the top of the entire machine to keep the fine clouds of dust down. I got flour as well as some hard bits which I sifted out. It was tasty, but given the work I had to do, I had to think of another approach. And this is coming from someone pretty intrepid athlete with food processing. Making sunchoke flour takes second place for me just after creating my own dried pectin from wild crab apple skins.

Note from Kelly for folks in dry climes: Jerusalem artichokes grow in LA, too. We blogged about them here, where you can see a picture of one growing (they look like small sunflowers on enormous stalks). Our patch didn't grow for more than one year because we decided we didn't want to water them.  I believe in a wetter place they can grow without inputs--indeed, they're hard to stop once they get going!-- but in a dry climate they do need some water.

Thursday, March 29, 2012

A Food Forest in Los Angeles


The great thing about this blog is that I get to meet people like Ron Finley, profiled in the video above. Ron got busted for this garden (the city of Los Angeles requires all parkway plantings to be mowed to 2 inches). Ron is now leading an effort to get the rules changed. We wish him luck and hope that his garden inspires many others around the world.

Thursday, March 01, 2012

Peat-free Planting Mix Recipe With Coconut Coir

Nancy's coconut coir-based planting mix. Here she's doing the squeeze test, which we talk about below.

From an environmental perspective peat moss is a nightmare. Mining of this material is unsustainable, contributes to global warming and destroys habitat for many plants and animals. But, for starting seeds, we've used it for years. Our friend Nancy Klehm taught us recently how to make a seed starting mix with coconut coir instead of peat moss. Thanks, Nancy! Here's how to make it:

Ingredients
Watering the coir brick to break it up. Once saturated, this brick will expand to fill the tub.

COIR:  A fibrous material made from coconut husks. It is sold in compressed bricks which expand greatly when wet. It is pH neutral and has no nutrients. Its role in planting mix is to hold moisture. Coir is the environmentally correct alternative to peat. Peat is mined out of peat bogs, which is a disruption of an ecosystem. Coir, meanwhile, is a by-product of the coconut industry. Of course, it has to be shipped in from the tropics, so is not particularly sustainable in that way. Nothing is perfect. So, if you have peat on hand or prefer peat you may use it in this recipe instead of coir, just substitute it, 1:1.

PERLITE: Perlite is a volcanic glass which, upon being subjected to extremely high temperatures (850C +), puffs--sort of like popcorn, or a Pop Rock. Obviously, though its origins are natural, it is an industrial product, but it is very useful for making soil fluffy and light. You will recognize it as the "white stuff" that you see in the soil of nursery plants. As it is essentially a rock, it is a neutral player in the mix. It simply keeps things light.

Note: you should avoid breathing perlite dust when working with it.

Store-bought worm castings. Homegrown, of course, are the preferred alternative!

WORM CASTINGS: Castings bring healthy microbial activity to the mix, as well as balanced nutrients and trace minerals. In addition, they hold moisture well. They are invaluable players in this mix. You can buy worm castings at the nursery, or you can keep a worm bin and harvest your own. Store bought and homegrown castings have very different textures--the store bought tends to be very fine, almost a black powder, whereas castings fresh out of the worm bin have more of a open, grainy, soil like texture-- and this effects the recipe.  

For the purposes of this recipe, we will assume you are using fine-grained, store bought castings. If you have your own castings, congratulations! But you will have to play with this recipe a little bit. You will use a little less coir, because your castings (probably) have loft or springiness of their own. We can't tell you exactly how much less coir, because castings vary.  Start, say, with half the recommended quantity of coir in the recipe below, and then test the mix, and add more coir as necessary. The proof will come in the squeezing. Do the hand test described in the instructions below. If the mix won't hold form when you squeeze it, you have too much coir, if the clump you make doesn't break easily, there isn't enough. Again, see below.

Quantity

This recipe makes about 4 gallons of planting mix. To make more or less, just use the same ratios. 

Equipment

We like to mix ours up in 5 gallon bucket, but you can do this on a tarp or in a wheelbarrow or whatever you like.

You will also need something big, like a cement mixing tray or tub to soak the coir brick in. Remember, one brick swells into to a big bag's worth of wet coir. If you don't use all the coir, you can store it in a plastic bag. If it dries out, it can be re-hydrated.

You will also need a measuring tool. For this 4 gallon recipe you will need a quart measure to scoop the materials out of the bags--like a big yogurt/cottage cheese container, or something with same volume. Again, you can make as little or as much as you want using the same proportions, so your measure could be a 1 cup scoop or a 3 gallon bucket.

Prep

Prepare to make the mix by soaking the coir in a large tub of water for maybe a half hour or so. Break it up as it expands. It will drink up a lot of water and grow proportionately huge. Add water if necessary so that it all gets evenly moistened. When finished, it should be wet but springy, like a wrung-out sponge.

Put it together

3 quarts/parts worm castings (store bought, see notes above for homegrown)
8 quarts/parts coir
4 quarts/ parts perlite

Measure out the worm castings and coir into a five gallon bucket and toss them together with your hands until they are evenly and thoroughly mixed. This mix should be moist and dark, again with a nice "wrung-out" sponge level of dampness.

Only when those two are mixed should you add the perlite. It's easier to mix the perlite in last--trust us. Mix the perlite into the coir/casting blend until it is also evenly distributed--the mix should be absolutely consistent--no patches or clumps should be visible. You might find it helpful to dump the mix back and forth between two five gallon buckets to speed mixing.

After it is mixed, pause to analyze the texture. Gather up a fistful, squeeze it hard and open your hand. The mix will form a ball in your fist, but if you turn your hand over and drop the ball a few inches, it will break easily. Overall the mix should be moist, light and springy. We can't emphasize that enough. Moist, but not soggy. Springy, not heavy.

If the mix seems a little clumpy/dense/heavy don't be afraid to add another part of perlite. It is better to err on the side of too much perlite than too little. Lightness is everything.

Measuring into the buckets with a quart-sized yogurt container. If you have two buckets, you can pour the ingredients back and forth between them to speed mixing. Otherwise, just toss the ingredients with your hands in one bucket.
Notes on growing

The seedling feeds itself from its seed body up through the formation of the first set of leaves, the cotyledons. After that, it is dependent on the nutrients in the soil. Your seedlings will be fine in this planting mix until around the time of the full unfurling of their first true leaves (the ones that come after the cotyledons). At this time--or no later than the opening of the second set of true leaves--you will want to feed your seedlings by watering them with some kind of diluted organic fertilizer of your choice. Do this maybe once a week until you transplant them.

Feeding accelerates root growth which is even more important to plant health than leaf growth. It prepares the plants to thrive after transplanting.

For most seedlings this means the first feeding would occur about 3-4 weeks after planting. The seedlings should be transplanted by 6 weeks of age--either into the garden or into bigger pots with real soil.

Recycling

You can re-use this mix to plant more seedlings, but you'll want to recharge it by adding in more worm castings. Just dump out your seed starting trays, mix it all up and let it air a bit. Also, the coir breaks down over time, so you find you need to add more of that as well. And if you add enough castings and coir, you'll probably want to add more perlite to balance it. There's no recipe--you'll have to use your intuition to create a consistency that resembles the original mix.

Or you could compost it and start fresh. It's safe to compost perlite, as long as you don't mind having little white perlite bits all over your yard!

This is the surface of the finished mix. It's so light and moist that it has holes in the surface. Note the even integration of the three ingredient: no lumps or patches left unmixed.

Options
 
Another planting mix option is part coir and part compost. This is provided your compost is of the best quality--bagged compost from the nursery is not good enough. This is a hard area to generalize about because compost varies wildly in both quality and consistency, but you'd want to use lovely, lively, springy, sweet smelling compost.

Gardening guru John Jeavons starts his seeds in mix which is 1 part compost and 1 part garden soil--soil dug from the same beds the seedlings will be going into. This way the seedlings are already accustomed to the local soil and don't go through so much shock upon transplanting. It also makes his garden a "closed loop," meaning he doesn't have to buy anything or bring any materials in from the outside. This saves money, keeps things local and prevents the accidental importing of diseases.

Using compost and soil works for him because he's got top-notch compost and rich, fluffy soil--the kind of soil you can plunge you hand into up to the wrist without meeting resistance. This should be a goal for all of us to work toward, but in the meanwhile, while we're developing that soil in our own yards, we've got perlite, worm castings and coir!

Monday, January 30, 2012

USDA Releases New Hardiness Zone Map


The United States Department of Agriculture has just released a new zone hardiness map that reflects both a warming climate and new algorithms that take into account things like terrain, and proximity to bodies of water.  The map is also now searchable by zip code.

You can access the new map here: http://planthardiness.ars.usda.gov/PHZMWeb .

For the background on how this map is different from the previous (1990) version, the USDA has a press release. 

Thursday, January 19, 2012

It Ain't Cats but . . .


yes, indeed, there is a tree collard blog.

I can haz tree kollard?

Via Ari Kletzky!

Tuesday, January 17, 2012

Sunset Magazine's Take on Zones

A Sunset Magazine zone map

Yesterday we posted a USDA zone based vegetable gardening planting guide. But the problem with USDA zones, as many readers pointed out, is that they aren't specific enough. For instance, all of the city of Los Angeles is in USDA zone 10, but the difference between where we live and the coast is significant.

This is where Sunset Magazine's more detailed zones maps come in handy. Sunset has divided the entire country into more finely delineated micro-climates. You can find your Sunset zone here. With your Sunset zone you can then use their handy online plant finder or one of their many books.

While an excellent resource, unless I failed to find it, I couldn't locate any vegetable planting schedule based on Sunset zones. Perhaps its an impossible question, proof of the adage that "all gardening advice is local."

Monday, January 16, 2012

USDA Zone Based Veggie Planting Schedule


Knowing when to plant vegetables is one of the big keys to edible gardening success. Unfortunately, many gardening books, websites and the back of seed packages assume you're in a place with easily delineated seasons. What about those of us in Alaska, Southern California, Texas, Florida or Arizona? Wouldn't it be nice to have a web-based vegetable planting calendar based on zip codes?

While it's not down to the zip code level, there's a USDA zone based web tool on a site called the Vegetable Garden. Now I have to say that this website, with all those contextual ads, looks like a scraper site at first glance. But the info on our zone 10, here in SoCal, was accurate.

I'd be interested in hearing what those of you in other USDA zones think of this tool. Give the Vegetable Garden planting schedule a spin and leave a comment. I'm hoping to post tools like this on a resource page that will appear on this blog later this year and would appreciate your input.

Thanks to Root Simple reader Kristen of the Urban Farm Blog for this tip. You can also scroll to the bottom of a post we did on the 6th for planting schedules for Texas, Montreal and Southern Nevada.

Monday, January 09, 2012

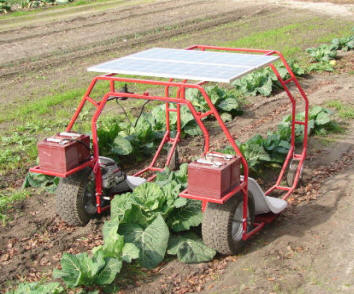
Solar Garden Helper Thingy


From the always cool Build It Solar blog, a "garden helper machine" built by Randy, aka "PD-Riverman".
I really Love gardening but I have a bad back and when it comes to staying bent over in the garden it gets rough. So I built this Helper Machine. I  call it My P-Machine. Planting/Picking/Pulling weeds/Putting around the garden machine. 
It's powered by two 12 volt 80 watt solar panels that charge some golf cart batteries.

I feel like adding learning welding to my New Years resolution list!

Friday, January 06, 2012

How to Plan a Vegetable Garden


Today I did the unthinkable and made good on one of my many New Years resolutions: I planned our 128 square foot vegetable garden a year in advance. Here's how I did it:

Identifying Seasons
Using an Ecology Action pamphlet as my guide, Learning to Grow All Your Own Food: A One-Bed Model For Compost, Diet and Income Crops, I divided the year into three seasons. Most of you reading this blog probably have two: a cool season and a warm season. Here in Los Angeles we have:
  • warm: April-July
  • hot and dry: July-October
  • cool: October-March

Picking Planting Dates
Using the handy Digital Gardener's Southern California Vegetable Planting Schedule I chose planting dates (in April, mid-summer and Septmber/October) for each season and marked them down on my Stella Natura calendar. I identified the vegetables I'd like to grow choosing only those veggies that have done well in the past and that we like to eat.

A planning form from Ecology Action

Deciding How Much to Plant
To decide how much to plant I rely on the charts in John Jeavons' book  How to Grow More Vegetables. I took his three day Biointensive gardening class early last year and recommend it highly, especially for learning how to use the, at first, intimidating charts in the book. Jeavons handed out a handy planning form during the class that works with the tables in the book to help organize your garden. With experience, I also now have an idea about how many square feet of, say, lettuce it takes to keep me and Kelly in salad for a season. While not everyone likes Jeavons, I can say that my best years in our vegetable garden have been when I follow his methods (minus frequent double digging).

Planting Compost Crops
Jeavons stresses the importance of learning how to grow your own compost and fertilizer. I adapted the food/compost ratios suggested in the Ecology Action pamphlet to match our climate. Instead of growing a big winter compost crop (Ecology Action is in cooler Northern California) I decided to treat the late summer/early fall as our "winter". Growing vegetables in the hot, dry late summer here in Southern California is, frankly, a pain in the ass and water intensive. It's a time when I'd rather just take a break from vegetable gardening and just grow a bunch of drought tolerant sunflowers, amaranth, cowpeas etc. On the other hand, winter here is the best time to grow all those cool season crops like lettuce and arugula. Using Ecology Action's suggestions I came up with a compost/food growing ratio:
  • spring/summer - 33.3% food, 66.7% compost
  • summer/fall 100% compost
  • fall/winter 66.7% food, 33.3% compost
The compost crops will reduce my gardening workload, build fertility and assure that there's always something growing and no sun-baked bare soil.

Apologies for a Southern Californiacentric post, but you can use the same process to identify dates and how much seed you need for any climate. In fact, if you know of a good vegetable planting schedule for your climate please leave a link in the comments.

Update: Scott left a link for readers in Texas. The Texas A&M Extension Service has a vegetable planting guide here.

And meansoybean left a link for vegetable gardeners in Montreal which you can see here.  

Thanks to Hak, here's Southern Nevada. 

Kristen sent one for all of the US based on your USDA zone here.

Thursday, January 05, 2012

2011 in Review: The Garden


It's was a difficult year in the garden. A lead and zinc issue screwed up my winter vegetables garden plans. At least we managed to find some river rocks and put in a path.

I found this photo from December 2010. I was certainly a lot more organized that year.


For 2012, I'm putting in raised beds to deal with the heavy metal issue and we've already planted more native plants. But most importantly one of my New Years resolutions is to plan the vegetable garden ahead of time. And I'm going to take better notes (though I've been saying this for ten years now). Those notes simply being, the date a veggie is planted and the first and last harvests of said plant. That info will make coming up with a planting schedule easier in subsequent years. At least if I keep my many resolutions!

Wednesday, January 04, 2012

In Chaos Order, In Order Chaos


Periodically Mrs. Homegrown and I teach vegetable gardening classes. For the students, I've been looking for a way to illustrate nature's complex, non-linear dynamics that, paradoxically, seem ordered. I stumbled across this cool sculpture that neatly summarizes the idea of "in chaos order, in order chaos."

Imagine each of the hammers standing in for one of the systems in your garden, insect life, nutrients, microbes, fungi, etc. Now imagine intervening in the motion of one of those systems. The point is that, with complex non-linear dynamics, we don't know what the end result of our interventions will be. Best not to monkey with the system . . .

You can see more sculptures by the creator of this video at www.kenkinetic.com.