Showing posts with label food preservation. Show all posts

Thursday, August 30, 2012

What Mountaineering Accidents Can Teach Us About Food Preservation

Would you eat pickles made by these two?

Each year the American Alpine Club publishes a book detailing all the mountaineering accidents in North America. The club's goal is simple, as they put it, "to help you learn from the mistakes of others."

I've often thought that the same approach should be applied to many of the activities we love in the homesteading movement, especially food preservation. Now, I think that home food preservation is very safe. Indeed, it's much healthier than eating commercially processed foods. But I find mistakes to be one of the best ways to learn. In the case of food preservation, like mountaineering, I'd prefer to learn from the mistakes of others rather than experience them myself.

As it turn out, food safety scientists do keep a close eye on, especially, botulism. With the increased popularity of home canning there have been a few botulism outbreaks in recent years. Botulism is very rare, but you definitely do not want to get a case of it (just read about the symptoms and treatment here if you don't believe me). Periodically, the Center for Disease Control publishes a review of all the cases. The last one looked at botulism incidents between 1990 and 2000.

The CDC's botulism review is informative. The majority of cases in the US are related to traditional meat fermentation practices of the Inuit in Alaska, compounded by the inappropriate use of modern materials such as plastic and glass. The leading cause of botulism in the lower 48 is, however, improper home canning. All incidents were low-acid foods, such as asparagus, canned without following proper procedures. I suspect most of these cases were people using a boiling water bath instead of a pressure canner. Other home cases involved storing low acid foods at room temperature (which is just plain dumb).

Four cases that stand out are related to storing garlic in oil at room temeprature. The National Center for Home Food Preservation now recommends the following if you want to preserve garlic in oil:
Garlic-in-oil should be made fresh and stored in the refrigerator at 40°F or lower for no more than 7 days. It may be frozen for long term storage for up to several months. Package in glass freezer jars or plastic freezer boxes, leaving ½-inch headspace. Label, date and freeze.
The take home from the botulism review is that the problem is rare and that home food preservation is very safe assuming you follow standard procedures, most notably using a pressure canner to can low acid foods. None, zero, zilch of the incidents were related to high acid foods such as jams and jellies.

Now go pickle something (and you won't need a pressure canner to do that!).

Wednesday, August 29, 2012

Learn How To Can For Free


Want to learn how to can? The National Center For Home Food Preservation has a free online course. Offered by the University of Georgia, the course covers canning of both high and low acid foods along with a general introduction to food preservation. While the class is free, you need to register here.

Happy canning!

Tuesday, August 21, 2012

How To Ice Glaze Fish

Frozen fish
Photo by Portable Soul

Ice glazing is a process of creating a thin layer of ice to help preserve foods, usually chicken or fish. Ice glazing prevents freezer burn and helps preserve texture and flavor. The big processors do it, but it can also be accomplished at home.

To ice glaze fish you need to do some pretreatment. You dip fatty fish in an ascorbic acid solution. Lean fish are pretreated in a brine. Once treated, you then put the fish in the freezer. Once frozen solid, you take them out of the freezer and dip them in ice water and put them back in the freezer. You repeat this process until there is a thin later of ice around the fish. Alternately, you can use a lemon-gelatin glaze. Full instructions for ice and gelatin glazing can be found on the website of the National Center for Home Food Preservation, an excellent resource for reliable, science-based recipes.

Ice glazing is a somewhat laborious process, so it's probably best reserved for that special catch. If you're in a hurry you can just freeze fish in a solid block of ice but, according to the National Center for Home Food Preservation, this will result in poorer quality. But it's better than just throwing fish in a plastic bag to dry out in the freezer.

Thanks to fellow Master Food Preserver Jake Mumm for this tip.

Monday, August 20, 2012

How To Dry Food With the Sun

Drying Apricots in Southern California--early 20th century style.

Dehydration is one of my favorite food preservation techniques. Drying food concentrates flavor and is a traditional technique in our Mediterranean climate. Best of all, drying food is one of the best applications for low-tech solar power. In many places, you can simply set food out under cheesecloth to dry in the sun.

But there's a catch to sun drying: humidity. Food dries best when temperatures are above 85º F and below 60% humidity. If you live in a desert, humidity isn't a problem. But in most other places in North America it's simply too moist to set food out under the sun. It will rot before it dries. In Los Angeles, due to the influence of the ocean, it's slightly too humid most of the year for sun drying to work well.

But there's an easy way to overcome humidity: convection, i.e. hot air rises. Most solar dehydrators take advantage of the passive movement of hot air to lower humidity enough to dry food. Here's a couple of solar dehydrators that harness this simple principle to dry food without electricity:

Appalachian Solar Dehydrator


This is the dehydrator I built with plans from Home Power Magazine. The plans and an improvement on the original plans are split between two articles in Issue #57 and Issue #69. You need to download and read through both articles before building this dehydrator. This dehydrator has performed well for us. The same design can also be modified to work as a rudimentary solar house heater. I had originally used a sheet of plastic over the collector, but have sinced replaced that plastic (which ended up spltting) with a door I was getting rid of.

Cardboard Box Dehydrator


Mother Earth News has plans for a Appalachian style dehydrator made from cardboard boxes. As long as you keep it out of the rain, this dehydrator should work just fine, and is a lot easier to make than the plywood version. I've never built one of these, but am interested in hearing from anyone who has. 

Eben Fodor Solar Food Dryer

Photo from Simply Resourceful

This design is by Eben Fordor, and is described in a book by Fodor called  The Solar Food Dryer: How to Make and Use Your Own Low-Cost, High Performance, Sun-Powered Food Dehydrator. I have not seen one of these in person, but the folks at Simply Resourceful built and blogged about their Fodor style dryer. If you've got a Fodor dryer, please leave a comment to let us know how it worked.


Solar Tunnel Food Dryer


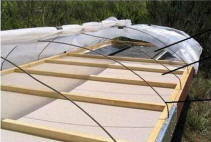
Builditsolar.com has a link to a solar dryer that's, essentially, a mini hoop house with ventilation. It's a scaled down version of the large hoop houses that small farmers use to dry fruit. Again, if you've used something like this, please comment.

Beware of Bugs

One drawback to outdoor drying is that you can often get infestations of flies and pantry moths. We've lost a lot of dehydrated tomatoes this way even though our Appalachian dryer has screens. I've even lost batches I've done in an electric dehydrator inside. Thankfully it's easy to kill larvae by sticking your dried food in the freezer at 0ºF for 48 hours. I'd recommend this step.

Further Reading

Build It Solar is one of my favorite resources. You can check out a couple of other solar dehydrator designs that are variations on the ones above on their Solar Cooking, Food Drying, Solar Stills and Root Cellars project page.

Monday, July 23, 2012

Why You Should Have a Thermometer in Your Refrigerator/Freezer


While I'm tempted to buy lots of kitchen gadgets (a male disease, I think), I know that to do so with a kitchen as small as ours is a foolish and costly pastime. One gadget that I picked up recently, however, has proven very useful: a refrigerator/freezer thermometer.

Freezers should be kept at 0ºF (-18ºC). At that temperature most frozen foods will keep for a year. The refrigerator should be below 40ºF (4.5ºC). (Source: Food Safety Advisor)

After picking up an inexpensive thermometer, I discovered that our old fridge/freezer was simply not keeping low enough temperatures. I made the mistake of replacing it with a used fridge, which also did not maintain low enough temperatures. Nor did the loaner fridge, provided to us by the shop that sold us the used fridge, keep low temps. Thankfully we were able to return those units and buy an inexpensive new fridge which works just fine. The moral here was that I should have listened to the advice of a friend of mine who owns a restaurant who told me that you should buy used stoves and new refrigeration. Stoves are easy to fix, but fridges, often times, are harder to keep running.

So why don't fridges come with a built-in thermometer? How else can you know the temperature?


Monday, June 18, 2012

Four Ways to Preserve Prickly Pear Pads (Nopales)


For my final project in the Los Angeles Master Food Preserver Program I attempted to see how many ways I could preserve the abundant pads of the prickly pear cactus that grows in our front yard. Of course they are best fresh, but I like them so much that I wanted to see if I could preserve some for use later in the year. Incidentally, I prepare them fresh by first cutting them into strips and boiling them for five minutes to remove the mucilaginous texture. After boiling I pan fry them and serve them with eggs. It's a meal that comes, except for the salt, entirely out of the yard. What follows are the methods I used to preserve those tasty pads.


Dehydrated
I removed the spines, cut the pads into 3/4 inch strips and boiled them for one minute. I then marinated them for ten minutes in soy sauce and dried them until brittle in an Excalibur dehydrator at 135º F for a couple of hours. Prepared this way they actually taste a bit like beef jerky. You definitely need to spice them--when dried plain they have a bit of a dirt note in terms of taste. Next year I plan on trying some more dried "nopalitos" with some different marinades.

Frozen
Once again, I removed the spines. cut them into strips and boiled them for one minute. I then packed them in to freezer bags. Freezing is the best method in terms of taste and nutrition. It's easy and it works great.

Pickled
I used the this okra recipe from the National Center for Home Preservation for my pickled nopalitos. They turned out very tasty.

Pressure Canned
Prickly pear is sold canned both in water and with a small amount of vinegar.  Unfortunately there are no tested home canning recipes for pressure canned prickly pear pads (this needs to be rectified but is difficult in an era of reduced funding for Extension Services). I used a tested recipe for okra and consumed the product immediately as I don't trust my own untested pressure canning recipes. The results were acceptable but not exciting--basically they tasted like canned vegetables and had a slightly mushy texture. If I had a tested recipe to work with, that used a small amount of vinegar, perhaps the processing time could be reduced, leading to a crisper result.

Lastly I should mention that I've dried and made jelly with the fruit in previous years. If you've got a favorite way to preserve the pads or fruit please leave a comment.

Wednesday, June 13, 2012

Remember to Label Those Jars!


"Label, label, label!" This was one of the most important lessons I learned in my Master Food Preserver training. You'll note, from the jars above, that I'm not very good about this. When were those jars canned and what's in them? I have no idea. They were probably the result of some late night canning frenzy two years ago. At the time I probably thought to myself, "I'll label them in the morning."

Not only should the jars be labeled, but it would also have been nice to have some notes on the recipe I used and where the fruit was sourced from. To this end I've started a preservation diary in a useful program called Evernote.

Perhaps I should get a tattoo on my forearm that says, "Label, label, label."

Thursday, May 10, 2012

Using Kosher Salt for Making Pickles


Naive me, I purchased a box of Morton's kosher salt for a pickling project. I thought that kosher salt lacks the anti-caking agents that cause cloudy and sediment filled jars of pickles. No blue ribbon for me at the county fair:


Morton salt has anti-caking agents. But I can follow them on Facebook (why I would want to do that would be the topic of another post). Diamond Salt, on the other hand does not have anti-caking agents:


So, when pickling, be careful selecting your kosher salt--some contain anti-caking agents, others do not.

Another precaution when using kosher salt in food preservation projects comes from the University of Wisconsin Cooperative Extension's guide to Homemade Pickles and Relishes (pdf):
Kosher pure flaked salt requires special care if used for pickling. Flaked salt weighs less per volume than canning and pickling salt, so you need about 50 percent more—11⁄2 cups of flaked salt equals about 1 cup of canning and pickling salt. If you use kosher salt for fermented pickles, you must weigh out the proper amount.Weigh out 73⁄4 ounces (220 grams) of flaked salt, and you will have the equivalent of 1 cup of canning and pickling salt.
This same publication also notes how easy it is to find pickling salt and how hard it is to find kosher salt. It's just the opposite here in Los Angeles.

So what kind of salt do you use for pickling and fermenting? What's the easiest to find where you live?

See the University of Wisconsin's other tested food preservation recipes here.

Monday, May 07, 2012

Loquat Leather Recipe


Our neighborhood is full of loquat (Eriobotrya japonica) trees. For years I've been trying to figure out a way to use them. Loquats, a warm climate relative of the apple tree, produce tons of fruit all at once that do not keep well fresh. Thus the need to preserve the fruit. Unfortunately, they are also a chore to process--small large seeds and skins that are difficult to peel. They also vary widely in quality, since many in the neighborhood are probably seeds planted by birds and squirrels rather than grafted specimens.

But at last, I've found a use for them that's repetitively low-labor and yields a tasty result: loquat leather. Here's the recipe I came up with:

2 cups loquats (no need to peel)
2 teaspoons lemon juice
2 teaspoons agave syrup
1 teaspoon triple sec

Remove seeds. Place loquats in a blender with the lemon juice, agave syrup and triple sec. Dehydrate at 135º until, as the Colorado Extension Service puts it, "translucent and slightly tacky to the touch, but easily peeled from the pan."

Tips: Chef Ernie Miller suggested using a blender is rather than a food processor for this recipe. Also, try to spread the puree thicker towards the edges of the dehydrator sheet and you'll get a more uniform result. Finally, the triple sec is optional, but some sort of flavor addition gives your fruit leather a more "adult" taste.

Fellow Master Food Preserver trainee Emily Ho is working on a loquat soda syrup and has also made some loquat jelly.

Friday, April 20, 2012

3 things to do with citrus peels


Waste not, want not! Our  recent post on Candied Grapefruit Peel yielded some interesting comments, and at the same time Erik made a discovery about citrus. Thus, three things to to do with your rinds:

Idea #1
Readers Terry and Barb both commented that they soak citrus peel in vinegar to make citrus infused vinegar to use for cleaning, and in Barb's case, as a deodorant. This is an excellent idea. Infusing vinegar with cleansing/disinfecting herbs, like lavender or sage, is something I've known about for a long time, but don't do, in practice. I'm too lazy. Instead, I scent my cleaning vinegar with essential oil. But we always have citrus peels laying around in piles, and the simplicity of the citrus idea is so a peeling that I had to try it. (ouch! stop throwing things!)

I filled one jar with orange peels and covered it with vinegar. After only a couple of days it started smelling really nice. Now it's about a week old and doesn't seem to be getting any more potent, so   I'm going to strain it off. In a second jar I'm trying an experimental blend of orange and thyme. Like citrus, thyme has excellent disinfectant qualities, but I'm not sure how its scent will blend with the orange.

I suspect our cleaning vinegar is going to smell like citrus from now on out.

UPDATE: I've been using orange-peel vinegar for a while now and the only drawback is that it is tinted yellow. If you spray a light surface and forget to wipe afterward, it will leave yellow stains behind. Not true stains--they wipe up easily even if they're long dry. This isn't a big problem because generally I am spraying and wiping, but once in a while I'll find yellow droplets in spot I forgot to wipe.

This, of course, disqualifies this spray for carpet cleaning. (And plain vinegar spray is a great thing to use to clean up pet accidents on carpet.)

Speaking of pet accidents, I realized this first when I found a yellow spray at the base of our bathroom sink and immediately though young Trout had taken to spraying. Cryeth the cat: "O! Unfair! I never did such thing!"


Idea #2
A reader named Chile sent us this link to an old Cuban recipe for candying grapefruit pith. As you know, grapefruit pith can be quite thick. If you have some separate use for the peel or zest, you can cut the leftover pith into cubes and candy it with cinnamon. She says it's really good!

Idea #3
Erik has learned that you can make pectin out of citrus rinds and membranes. Like apples, citrus is quite rich in pectin. This is a really good use for under-ripe, not so tasty oranges. Here's a how to link: Wedliny Domowe. The same link also has instructions for making pectin from apples. It's all about local sourcing, after all. An oddity of living where we do is that it is much easier to come by citrus than apples. At least for now.

On a related note, we also know that you can make clear, citrus flavored jelly by boiling organic citrus rinds in water, then straining off the solids. The resulting liquid is citrus-flavored and pectin-rich. Add sugar and you have citrus flavored jelly. It's tasty, we've tried it. But unfortunately, we don't have a recipe. If you happen to have a recipe, please share!

Thursday, April 19, 2012

How to Store Canned Goods: Take the Screw Band Off!

Right in the center, wrong on the left. Bungee cord 'cause we're in earthquake country.

Another quick tip from the Los Angeles Master Food Preservers: you should store your canned goods with the screw bands off. Why?
  • So you can clean underneath the band to prevent spoilage and bugs.
  • The screw band can create a false seal.
  • Leaving the screw bands on can cause corrosion. 
The only time to have the screw bands on is if you are transporting the jars. Otherwise, take them off!

Wednesday, April 18, 2012

Canning Citrus


Say you've got a huge citrus tree and want to can some of it without using a lot of sugar. The nice thing about citrus is that it's so acidic you can water bath can it in its own juice, in just water or in a light sugar syrup. In our Master Food Preserver class we did a taste test of tangerine sections canned in a variety of liquids:
  • water
  • very light syrup (1/2 cup sugar per quart)
  • light syrup (1 cup sugar per quart)
  • medium syrup (1 3/4 cup sugar per quart)
  • heavy syrup (2 3/4 cups sugar per quart)
  • very heavy syrup (4 cups sugar per quart)
  • syrup with honey (one part sugar to one part honey in any of the ratios above)
The citrus preserved in just water was edible but not particularly good nor was it aesthetically pleasing. As much as I try to avoid sugar it does help the fruit hold its shape. The best formula for canning citrus in terms of flavor and aesthetics was, in my opinion, either the very light or light syrups.  I was not fond of the honey/sugar syrup as the honey tended to overwhelm the flavor of the fruit.

A home grapefruit canning experiment I tried at home went horribly wrong, but I'll blog about that in another post. Let's just say that if I had a big citrus tree I'd consider canning some of the harvest using a very light sugar syrup. It's a decent way to get a shelf stable product with a lot less sugar than, say a marmalade or jelly. Another sugar-free alternative would be to dehydrate the fruit.

Directions for canning all kinds of fruit in syrup can be found on page 2-5 of the USDA's Complete Guide to Home Canning which you can download for free here.

Thursday, March 22, 2012

Home Food Preservation Resources


I'm honored to have been included in this year's class of the Los Angeles Master Food Preservers, a program offered by our local extension service to train volunteers to teach food preservation in under-served communities. I thought I would share the textbook resources from the class as they are an excellent set of reference books for your homesteading library. And many are available for free online. Like all information from the extension service system, they are research based.

First off is So Easy to Preserve a large collection of recipes, everything from canning to dehydrating, all carefully tested and in line with current U.S. Department of Agriculture food safety recommendations. The book is put out by the University of Georgia's Cooperative Extension.


We also will be using the Complete Guide to Home Canning, put out by the USDA and available for free online. Lastly, there's the classic Ball Blue Book Guide to Preserving, a reliable introduction to the subject.


In addition to covering food safety issues, I like these carefully researched food preservation guides for their reliability. If I'm going to commit the time to doing a food preservation project I like a reasonable chance of success. While we learn from our mistakes, I'd prefer to have a few more jellies and a few less accidental "syrups".

You can connect with the Los Angeles Master Food Preservers on Facebook and via their blog.

Sunday, December 04, 2011

Food Preservation Resources


Due to a popular post on making prickly pear jelly, we get a lot of emails asking for advice on canning. So I thought I'd list three favorite food preservation resources.

I like to go to respected sources when canning for reasons of both safety and reliability. While botulism is fairly rare, it's a highly unpleasant way to pass this vale of tears. But beyond the safety issue, if I'm going to go through the work of canning, I want to know that the recipe is going to work. There are few things more frustrating than a big batch of jam or jelly that doesn't set. Yes, you can call it "syrup" but it's still a big blow to the ego. 

My three favorite resources are the National Center for Home Food Preservation which has recipes for all kinds of food from fruit to meat, the Ball Complete Book of Home Preserving and Ball's website. All of the recipes in these two websites and book follow USDA guidelines.

The reason I came up with a prickly pear recipe is that I couldn't find any other ones that worked. But if I were canning something like, say, peaches I'd go with one of the above authorities. If you have a favorite food preservation resource leave a comment.