Showing posts with label fermentation. Show all posts

Friday, September 21, 2012

Fermenting culture wih Sandor Katz

Katz chats up Master Food Preserver and author Kevin West

Last night Erik and I went to see a talk by fermentation guru Sandor Katz, hosted by the Environmental Changemakers. Being a huge Sandor Katz fangirl, I was thrilled to get a chance to see him in person. These days he's sporting a charming 19th century mustache!

His first book, Wild Fermentation, was one of those really important, life-changing books for me. It might sound strange to say this about a book on pickling, but it opened my eyes in many ways. And it taught me how to do vegetable and salt ferments, which are the backbone of my pickling practice. The daikon pickles we wrote about in The Urban Homestead are due to Wild Fermentation.

Now he's got a new book out, The Art of Fermentation, which I've got to get my hands on:

Here are some excerpts from my notes:

•  For those of you who need convincing, The Four Benefits of Fermentation:

1) Pre-digestion: Fermentation makes foods more edible by breaking them down a little for us. Soybeans are hard to digest, tofu--easy. Milk is hard for some people to digest, but yogurt much easier, etc.

2) Nutrient Enhancement: These foods are rich in B vitamins as well as less known micronutrients, which are being studied right now. They also make minerals more available to us.

3) Detoxification: Some plant materials are downright toxic unless fermented, e.g. cassava root.

4) Live Bacterial Cultures: We need live bacteria in our gut-- most especially lactobacillus. By eating these foods we renew and diversify our microbial armies.

And of course, fermentation is a preservation process. Today that aspect isn't as important as it once was, but really, into the last century it was a survival skill.

And finally, it creates delicious, strong-flavored foods. Where would we be without stinky cheese, miso, sourdough, kimichi and kraut?

• He mentioned the Human Microbiome Project, which I'd never heard of but which I think we'll have to blog on soon. Thank god someone is studying this stuff!  He said they're really bringing to the fore our deep and intimate relationship with bacteria.

• Because we drink chlorinated water and antibiotics are so grievously overused, we need to consciously replenish and diversify the bacteria in our guts by eating living foods like fermented vegetables and yogurt.

• Lacto-fermenting vegetables is a very safe practice. The FDA has no reports of anyone contracting a food borne illness from eating live kraut, kimchi, sour pickles, etc.

• Sandor encourages people who are interested in fermented/cultured foods to start with vegetable ferments -- and I agree--it's where we started!  Vegetable ferments are safe, easy, require no special equipment or starter cultures. Here's our daikon pickle recipe from way back in 2007.  How did our blog get so old?

• Two kraut tips:

1) Don't use juice from the last batch of kraut to inoculate a new batch. It works, but it tastes much better if you just start from scratch with salt and the bacteria present on the cabbage. He explained that any ferment goes through stages where different strains of bacteria rise to dominance and effect flavor--which is why ferments taste different at different stages. The juice from ripe kraut contains late-stage bacteria. By inoculating with that bacteria, you skip all the delicious, intermediate stages.

2) He encouraged us not to be afraid of old vegetable ferments. Say you've made a big batch of kraut or kimchi. To retard the fermentation process (i.e. stop it where you think it tastes good) you'll want to pack it in jars and put it in the fridge. (You don't want to heat-process your jars, because that will kill all the living bacteria).  How long do you think a full jar of kraut or kimchi will last in the fridge? Sandor says two years is not unreasonable--as long as it is full. Airspace creates mold opportunities.

• "But I don't like the flavor."

One of the audience confessed she really doesn't like the strong flavors of sauerkraut. Sandor explained that when making kraut, or any veg ferment, you can stop the process anywhere from say, 3 days to 3 months, depending on both your preferences and the ambient temperature. 3 day old kraut is very different than 3 month old kraut, but both are delicious living foods.  I'd add that I agree. One of my favorite forms of kraut is a blend of red cabbage and green apples and caraway seeds which is fermented only for a few days. It's still crisp and bright when you eat it, sort of like a fermented salad.

• One thing he said surprised me: he doesn't think it matters at all what kind of salt you use. I've always used non-iodized salt for my ferments. But I'd bow to his greater experience. He did say that if you have it, and can afford it, high-mineral natural salts are fantastic to use.

• How much salt? That's sort of a perennial question. For him, it's a matter of taste. Other resources will give exact recommendations of salt per pound of vegetables. The more salt you use, the slower the fermentation will be, and the longer the end product will last. It will also, of course, be very salty. Less salty ferments go more quickly.  He salts his kraut to taste. Simple as that.

• I was glad to hear him admit that cucumbers are the hardest thing to pickle!

• If you're in the market for a ceramic crock, he pointed out that you can order one via Ace Hardware's website and then pick it up at your local Ace.

Tuesday, September 11, 2012

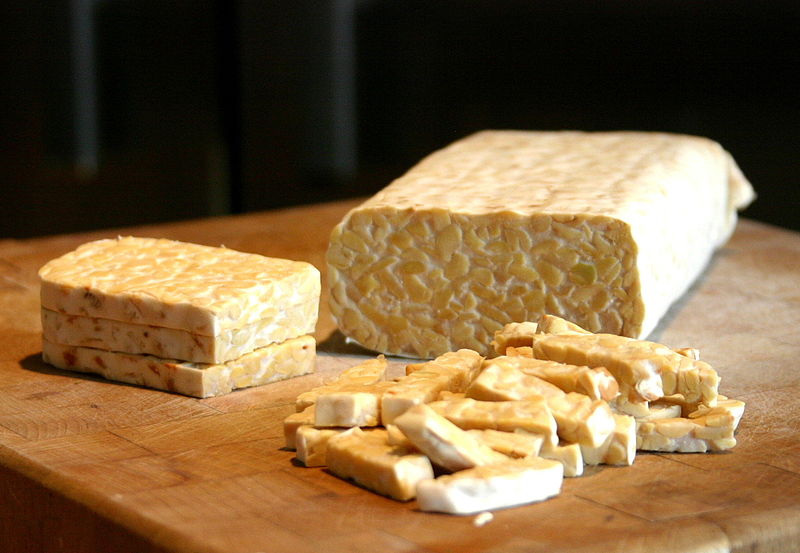
When It Gets Hot in Chicago: Make Tempeh!

Tempeh image from Wikipedia.

Today, a guest post from Nancy Klehm, writing to us from Chicago, in the midst of an epic drought and heat wave. Here's Nancy:

A Drought of Inspiration

Until last week, we were at 12% of our normal precipitation for our eight month growing season. This, plus extreme temperatures, made us delirious when some humidity blew south from Canada and was sticky enough to grab ahold of some clouds and build them until they spilled rain. And yet, the GM soy is limp and the GM corn is dwarfed and tasseling weakly. The effects of which will impact all of us who shop and drive cars.

And frankly, we’ve been spoiled by the drought and heat – it’s always sunny and dry (just like L.A. and Phoenix!) no rain to spoil your bike ride, BBQ, or outdoor gardening. And the biggest benefit: No Mosquitos.

Put this in your bookmarks: US Drought Monitor droughtmonitor.unl.edu/

The rough side of our weather is obvious. Due to July temperatures in March immediately followed by appropriate, but ultimately harming coolness, we lost most of our tree fruit production. Local orchardists turned to growing supplemental vegetable crops. There are none or not many apples, Asian pears, peaches, cherries or plums this year. No pawpaws. What we are left with is heat-island city fruit, and shrub fruits of currants, gooseberries, black raspberries, blackberries, strawberries, elderberries, wild plums. But it is a okay pear year and I will be getting some American wild persimmons. Hubba Hubba.

And so I concentrate on the fact that this climate is prime to dry just about anything – and to fermenting my year’s supply of tempeh and the koji needed for my fall miso and tamari production.

I like to ferment passively, using the wide range of microclimates of my non air conditioned house. I have no uniform temperature control in my house, in spite of having a thermostat and I like it that way. It makes for a broad spectrum of air humidity and temperature that allows me to situate the different fermenting processes appropriately.

Tempeh: a passive ferment


Tempeh is a relatively quick ferment of 8-12 hours when temps are between 85-95 degrees. Tempeh is dang tasty. It is basically beans partially digested by and knit together with mold or as some would prefer to say, a ‘mushroom’ called Rhizopus oligosporus. Because it is fermented, it is a more highly nutritious and easily digestible soy form then is tofu or soy milk or the beans themselves. It is easy enough to make and relatively easy to jump the spore onto other substrates, i.e. experimental combinations of grains and legumes. The tempeh dance is easy enough and even easier to riff off of:

Soak selected beans and grains 24 or more hours for a primary fermentation, then under cook them (soft enough to bite, but not soft enough to enjoyably eat), drain and dry the beans/grains of residual moisture with a towel and allow to cool. Toss with the tempeh starter and a touch of vinegar and pack ½”-3/4” thick into ziplock bags that you have pierced holes through with a fork. Place in a dark place and allow the summer heat to do its job. Depending on atmospheric temps, this will take anywhere between 12 and 24 hours.

The tempeh is done when it is white and caked together with mold, maybe with some grayish or dark areas near the fork holes where the mold has started sporulation. Use or freeze immediately or the spore will keep running. Delish!

Next time: Koji.

My favorite, family-owned, tempeh spore source: GEM cultures.com

Wednesday, August 22, 2012

What Do Microbes Have To Do With Homesteading?


So what are the activities that microbes make possible around the homestead? To name just four:
  • Fermentation
  • Beekeeping
  • Soil Fertility
  • Human beings
Pretty important stuff. In fact, new systems thinking, applied to our natural word, is demonstrating that things like human beings are really just symbiotic sacks of microbial life. An article in the Economist, "Microbes maketh man" discusses just how important microbes are to human health:
The traditional view is that a human body is a collection of 10 trillion cells which are themselves the products of 23,000 genes. If the revolutionaries are correct, these numbers radically underestimate the truth. For in the nooks and crannies of every human being, and especially in his or her guts, dwells the microbiome: 100 trillion bacteria of several hundred species bearing 3m non-human genes. The biological Robespierres believe these should count, too; that humans are not single organisms, but superorganisms made up of lots of smaller organisms working together.
Natural beekeeper Michael Bush has made the same argument about bees. Elaine Ingham has emphasized the importance of microbes in soil.

Mess with the complex interdependent relationships between microbes and people, soil etc. and you're asking for trouble. This, for me, is the argument against things like GMOs, Miracle Grow or conventional chemical beekeeping. We don't know enough, and probably never will know, how 100 trillion bacteria will react to our latest innovation. Best to be conservative when it comes to microbial life.

Looking forward to seeing more of this microbial paradigm shift in science.

Tuesday, August 14, 2012

Sandor Katz to Speak in Los Angeles

"Fermentation fetishist" Sandor Katz will be leading a hands on workshop here in Los Angeles on Wednesday September 19, from 7-10pm at:

Community Hall of Holy Nativity Church
6700 West 83rd, Westchester/LA 90045
$25 prepaid, $30 at the door - supports the ongoing work of the Environmental Change-Makers

Autographed copies of The Art of Fermentation available for $25

Space is limited -- Reserve your spot now!  Your check holds your place.
RSVP at http://envirochangemakers.org/events.htm

Thursday, July 19, 2012

Dr. Chase, 19th Century Mixologist


And I thought book titles were getting too long. Root Simple reader David Stentiford sent me a link to an online collection of recipe books, Feeding America: The Historic American Cookbook Project, maintained by Michigan State University. David especially wanted to call attention to a book, published in 1864, Dr. Chase's Recipes. The full title of Dr. Chase's book?
Dr. Chase's Recipes; Or, Information for Everybody: An Invaluable Collection of About Eight Hundred Practical Recipes, for Merchants, Grocers, Saloon-Keepers, Harness Makers, Painters, Jewelers, Blacksmiths, Tinners, Gunsmiths, Farriers, Barbers, Bakers, Dyers, Renovaters, Farmers, and Families Generally, To Which Have Been Added A Rational Treatment of Pleurisy, Inflammation of the Lungs, and other Inflammatory Diseases, and also for General Female Debility and Irregularities: All arranged in their Appropriate Departments.
There's certainly many recipes of interest to the modern homesteader, not to mention artisinal mixologists, in this book: rhubarb wine, bitters, spruce beers and "Lemonade--To Carry in the Pocket":
Loaf sugar1lb.; rub it down finely in a mortar, and add citric acid 1/2 oz: tartaric acid will do, and lemon essence 1/2 oz, and continue the trituration until all is intimately mixed, and bottle for use . . . A rounding tablespoon can be done up in a paper and carried convenently in the pocket when persons are going into out-of-the-way places, and added to half pint of cold water."
And, should all the sugar so loved in the 19th century rot out your teeth, Dr. Chase is kind enough to provide instructions on how to extract your own teeth with, "little or no pain."

Thursday, May 03, 2012

A Lacto Fermentation Kit Made With a Canning Jar


Chef Ernest Miller gave all of us in the Master Food Preserver class a very clever lacto-fermentation kit he designed and sells at the Farmer's Kitchen in Hollywood. As a class, we're all making a batch of sauerkraut.

Made out of a Le Parfait canning jar with a hole drilled in the lid to fit a fermentation lock, I already know this handy device will replace the large ceramic crock we have used in the past for pickle and kraut making. Chef Ernie's clever fermenter has a number of nice features when compared to my crock:
  • The fermentation lock will mean fewer mold problems 
  • A small canning jar inside the fermenter keeps pickles below the brine level
  • Transparent glass will let me see what's going on with the fermentation without having to open up the fermenter
  • Coming in a 3 liter and 1.5 liter size, these canning jar based fermenters will take up less space in the kitchen than my large ceramic crock
You can buy one of these kits and get a bite to eat at the Farmer's Kitchen, a non-profit restaurant which supports nutrition education programs and job training for Hollywood’s low-income residents. You can also easily make one yourself.

Before we conclude with a shameless cute cat outtake from the lacto-fermenter photo session, take a moment to leave a comment on your favorite fermentation vessel.


Tuesday, April 17, 2012

Mellow Yellow: How to Make Dandelion Wine


Today on Root Simple we welcome another guest post from our Midwest correspondent Nancy Klehm:

In the past week, we Midwesterners have experienced three hard frosts – killing back the growth, that emerged too early of my grapes and hardy kiwis and zapping peach blossoms. We will see if there is any fruit onset and if my vines recover.

Meanwhile, it is dandelion wine time!

I first tasted dandelion wine when I bought a bottle of it at a folksy gift shop in the Amana Colonies (yes, Amana of the appliance fame). I had wanted something to drink at my campsite that evening. When I opened the bottle, I anticipated something more magic than what met my tongue. It was cloying yellow syrupy stuff, which resembled soft drink concentrate. I poured it out next to my tent, returning it to the earth where she could compost it. I was sure that I’d never get close to it again.

That was fifteen years ago, and now I have been drinking dandelion wine for about two years. The new stuff is stuff I’ve made myself from dandelion blossoms gathered in Chicago. I’m happy to say that it is divine. I am sure now that the colonists actually keep the good stuff in their private cabinets.

Upon mentioning “dandelion wine”, Ray Bradbury usually comes to mind. However, after I heard a radio interview with him a few years back when he passionately made a case to colonize the moon so we can ditch this trashed planet and survive as a race, I got confused. Enough said.

So the point is, I am going to tell you how to make dandelion wine. I encourage you to do this because dandelions pop up everywhere and every place. They are nearly ubiquitous pioneers in our landscapes of disturbed and deprived soils. Consumed, they are a magnificent digestive, aiding the heath and cleansing of the kidneys and liver. Amongst vitamins A, B, C and D, they have a huge amount of potassium.

As a beyond-perfect diuretic, dandelion has so much potassium that when you digest the plant, no matter how much fluid you lose, your body actually experiences a net gain of the nutrient. In other words, folks – dandelion wine is one alcohol that actually helps your liver and kidneys! Generous, sweet, overlooked dandelion…

When you notice lawns and parks spotting yellow, it’s time to gather. The general rule of thumb is to collect one gallon of flowers for each gallon of wine you want to make.

Enjoy your wandering. People will think you quaintly eccentric for foraging blossoms on your hands and knees. Note: collect blossoms (without the stem) that have just opened and are out of the path of insecticides and pesticides.

So here’s how I make dandelion wine…

I pour one gallon boiling water over one gallon dandelion flowers in a large bowl. When the blossoms rise (wait about twenty-four to forty-eight hours), I strain the yellow liquid out, squeezing the remaining liquid out of the flowers, into a larger ceramic or glass bowl. I compost the spent flowers (thanks dandelion!).

Then I add juice and zest from four lemons and four oranges, and four pounds of sugar (4-4-4 = E.Z.). Okay, now here’s what I think is the best part: I float a piece of stale bread, sprinkled with bread yeast, in the mixture. This technique is used in Appalachian and some European recipes.

Then I toss a dishtowel over it so the mixture can both breathe and the crud floating around my house stays out. I continue stirring the wine several times a day until it stops fermenting. This takes about two weeks or so.

When I am certain it has stopped “working”, I strain, bottle and cork it up and bid it farewell until months later. In fact I wait until the winter solstice, when I can revisit that sunny spring day by drinking it in.

Thursday, April 05, 2012

Introducing the Dehydrated Kimchi Chip


Our focus this week has been all things Japanese, but now we're taking a detour to Korea...or at least to kimchi:

What would be the fermentation equivalent of finding a new planet in our solar system, cold fusion and a unified field theory all wrapped into one new discovery? That tasty snack breakthrough could very well be the dehydrated kimchi chip. Oghee Choe and Connie Choe-Harikul of Granny Choe's Kimchi Co.'s just won the Good Food Day LA cabbage cooking contest with their kimchi chip over the weekend. I got to taste one of those kimchi chips and I can say that they deserved the award.

Why make a kimchi chip? In a press release Harikul says, "We always have loads of kimchi at home, on account of the family business, so we started dehydrating our original spicy kimchi to halt fermentation when a batch was about to turn overripe."

How do you make kimchi chips at home? It's simple, according to Harikul, "We use an American Harvest Snackmaster dehydrator that was given to us by a fellow Freecycler. Lay the kimchi out on two trays and dry it on high for 12 hours. Easy peasy."

Harikul and Choe have some suggestions for cooking with kimchi on their website. And they were nice enough to give us a recipe for kimchi that we included in our book Making It: Radical Home Ec for a Post-Consumer World.

Saturday, August 27, 2011

Summer Urban Homestead Failures: Exploding Beer Bottles


Somehow in last week's roundup of the summer's failures I blocked out of my memory the most exasperating: exploding beer bottles.

I think I may have had a contaminated siphon hose which passed on some nasty, yeasty bacterial bug to every single bottle of two batches of beer I had made this summer. Three of those bottles over-carbonated to the point that they became beer grenades and exploded. One blew up on the kitchen counter and the other two in the garage. Having had a bottle explode in my hand a few years ago (wild fermented ginger beer--a bad idea) I can tell you that bottle grenades aren't funny.

So having had three bottles explode and all the other bottles I opened showing signs of over-carbonation, I had the dilemma of what to do next. String my bow and shoot arrows at them from a distance? Call in the homebrew bomb squad?

I decided to don a heavy jacket (in 90ºF + temperatures) and safety goggles and uncap each one in the sink. The second to last bottle gave me a cooling beer shower.

Time to clean our messy kitchen and go on a sanitation campaign.

Friday, August 26, 2011

Gadget Love: The Johnson Temperature Controller


A friend of mine gave me a chest freezer recently and I augmented it with a handy gizmo, a Johnson temperature controller. The temperature controller allows me to run the freezer at any temperature between 30 and 80ºF. It works by cycling on and off the power to the freezer as needed. You just stick the copper probe in the freezer and adjust the dial to the desired temperature. So far I've thought of the following uses:
  • Proof bread overnight at 54ºF. I used to proof my dough in my refrigerator, but the chest freezer, running at this higher temperature thanks to the temperature controller, results in a more active proofing.
  • Make lagers (which ferment at low temperatures).
  • Make ales in hot weather. The house gets too hot to make beer in the summertime. Now I can make a batch or two without having to worry about the weather. 
  • Use the chest freezer as a backup when I need to repair the gasket on our Scandinavian refrigerator YET AGAIN!
Not wanting to be a profligate energy user I only use the chest freezer periodically.

Now if only I could lower the temperature of the whole house which, thanks to the first heatwave of the summer, is now warm enough to make yogurt!  

    Monday, June 27, 2011

    The Beer Archaeologist

    Via Boing Boing, a long article on ancient brews at Smithsonian.com--well worth reading for anyone who loves beer, wine and history.

    Saturday, June 25, 2011

    Easy to Make & Delicious Fermented Veggies


    Inspiration hit at Camp Ramshackle and I finally made fermented vegetables. I loosely followed the Golden recipe from The Versatile Vegetable by Miranda Barrett and Colleen Pollard with cabbage, golden beets, carrots, celery, ginger, lemon and garlic. I omitted the Granny Smith apple because every person/book I consulted said use only the freshest apples and my stash had been sitting for quite some time.

    I made a stop at Culture Club in Pasadena and spoke with super helpful Elaina who set me up with a Pickl-It jar, some Caldwell's Vegetable Starter Culture and some guidance (reiterating to use only the freshest apple).


    I shredded up the vegetables, stirred in the starter and left the vegetables to ferment for ten days. When I pulled the jar out and popped the lid, I had a brief flash from the Monty Python's The Meaning of Life when the Grim Reaper visits the farm house to inform the dinner guests that they died from the salmon mousse. I told my family I loved them and took a forkful. A delicious forkful and then other. I live to tell the tale.

    I am enjoying the last of my first batch and plan on starting another. I even brought some for a camping dinner for friends on Santa Cruz Island. I'm happy to say not only did all the dinner guests survive, they also thought it was delicious.

    Wednesday, May 11, 2011

    No-Knead Artisinal Bread Part I


    You can make a decent loaf of bread with one of the many popular no-knead recipes on the interwebs. With just a little bit more effort you can make a much better loaf of bread with a "levain" (or "sourdough starter" in less yuppiefied parlance).

    For about ten years, I used to bake the loaf I blogged about here and put in our first book The Urban Homestead. Lately, however, I've completely changed the way I bake thanks to meeting Mark Stambler and Teresa Sitz of the Los Angeles Bread Bakers.

    I'll post a specific recipe once my method crystallizes a bit more. In the meantime, this is the general way I've been baking. All the mixing and first fermentation can take place in a plastic tub or large bowl.

    1. The night before I mix my dough I take some starter, add flour and water to create the "levain". Starter is made by mixing dough and water and letting nature do her thing. I'll blog about the process in detail in a future post. Right now I'm working with a starter that has the consistency of bread dough, but I'm going to switch to a more liquid starter to avoid the dough messes in the kitchen that cause marital strife.

    2. In the morning I mix the final dough, carefully measuring ingredients on a digital scale. While I use a stand mixer fitted with a dough hook, I'm trying to wean myself of its use. Kneading, it turns out, is unnecessary labor and can be replaced by simply folding the dough a few times during the initial fermentation period.

    3. After mixing the dough I let it rest for around 20 minutes to allow flour and water to integrate.

    4. Following the rest period I mix in the salt.

    5. The dough rises for 2 1/2 hours. During this first fermentation period I pour the wet sticky dough out onto a work surface every 50 minutes and quickly fold the dough in half two or three times.

    6. At the end of the first rise I shape the dough into either a batard or a boule. At some point I'll make a video on how to do this.

    7. Once shaped, the boule or batard goes into the refrigerator covered with a floured piece of canvas, in the case of a batard, or plopped in a proofing basked in the case of a boule. The dough can stay in the fridge for 24 to 48 hours. During this second, slow, fermentation period the dough develops a more acidic, complex flavor, plus it allows for more flexibility in terms of your baking schedule. When you want a loaf, all you do is heat up the oven, pull the bread out of the fridge and toss it in the oven. There's no need, it turns out, to bring the dough to room temperature before baking.

    8. To get a decent crust in a home oven I recommend baking in a dutch oven as in the no-knead method. Pre-heat both dutch oven and stove, toss the loaf in the dutch oven and bake for 20 minutes. After 20 minutes remove the top of the dutch oven and continue baking until done (usually another 20 to 25 minutes).

    A note on water: chlorine and chloramine inhibit starters. I have a carbon filter on our house water which I thought removed both chlorine and chloramine. However, I discovered that I got much better results when using bottled, distilled water. After pouring through multiple aquarium enthusiast internet forums (not particularly exciting when you don't keep fish) I figured out that my cheap carbon filter removes some, but not all of the chloramine in our water supply. At some point I'll do some tests to confirm this. In the meantime, I'll stick with bottled water.

    I should note that the road to bread baking nirvana is littered with hockey puck loaves and existential angst. Push through the wall of frustration and you emerge on the other side an alchemist, with the power to turn flour into loaves, lead into gold and Dan Brown into Shakespeare. Well, maybe not that last bit.

    Monday, December 06, 2010

    Is Kombucha Safe?


    We love to ferment things, with one notable exception: kombucha. During the last kombucha craze, in the mid-90s, we picked up a "SCOBY" blob and dutifully fed it tea and sugar until we stumbled upon an article written by mycologist Paul Stamets, "The Manchurian Mushroom: My Adventures with "The Blob." In that article Stamets tells a convoluted story of having a kombucha culture tested by a lab. He didn't tell the lab what it was.The lab was very excited about the results on this mystery substance, and Stamets soon finds himself "sitting in a board room of a pharmaceutical company with lawyers and contracts discussing the particulars of patents, sub-licensing agreements, market territories, and dollars running into the millions—if FDA approval was granted for a novel drug."

    Then the folks in the meeting turn to Stamets and ask him to reveal the identity of this culture:
    I told them that, as best as we had been able to determine, from analyses by several independent mycologists, that the Blob was a polyculture of at least two yeasts and two bacteria, living synergistically.
    The silence was deafening.
    "Say what?"
    Perplexed looks crossed their faces, soon followed by exasperated expressions of deep disappointment. Which of the organisms are producing the potentially novel antibiotic? Was it one or several? Was it one in response to the presence of another organism? Was it one in response to several organisms? The sheer numbers of permutations would complicate trials and given the FDA's disposition, a polyculture is de facto contaminated.
    The meeting was abruptly adjourned.

    So kombucha does indeed have medicinal properties--including "novel antibiotic" properties-- but therein lies the problem. Stamets concudes,
    Those who might benefit from Kombucha need a credible and experienced professional who could best prescribe and administer it. I do not see the advantage of taking Kombucha by people in good health. Given the detrimental effects seen from prolonged exposure to antibiotics, the repeated, long term use of Kombucha may cause its own universe of problems. I wonder about those people who have adverse reactions to antibiotics? What about those with sensitivity to the microorganisms in Kombucha? I personally believe it is morally reprehensible to pass on this colony to sick or healthy friends when, to date, so little is known about its proper use. At present there are no credible, recent studies as to the safety or usefulness of Kombucha, despite decades of hype.
    Stamets also expreses concern over contamination. A German study found three out of 32 samples of kombucha cultures taken from German households to be contaminated with Penicillium spp. and Candida albicans. While describing the contamination rate as "low" (nearly 1 out of 10 samples seems high to us) it goes on to recommended that immunosuppresed individuals buy commercial kombucha instead of making it at home. A literature review conducted by the Universities of Exeter and Plymouth in the UK concludes, "the largely undetermined benefits do not outweigh the documented risks of kombucha," said risks including, "suspected liver damage, metabolic acidosis and cutaneous anthrax infections."

    We're all for fermented foods, and support the home fermentation of classic pro-biotics like yogurt, sourdough and lacto fermented vegetables. The last thing we want is for people to get spooked away from home fermentation. But kombucha is different. The problem, as Stamets notes, is that kombucha's sugar and tea medium is a kind of open house for cultures, some good, some bad. Yogurt, sourdough and salt brines are very selective mediums in which to ferment things. With komucha it's much more of a crap shoot.

    Basically, like Stamets, we're intrigued with the notion of kombucha being tested as a medicine and used with care by both western medical types as well as herbalists. And even if we were guaranteed a pure culture and a solid methodology for keeping the culture uncontaminated, we'd still be too leery its antibiotic properties to consider it a casual beverage. So we just don't do the kombucha thing.

    Sunday, September 05, 2010

    Back on the Yogurt Train: How to Make Yogurt

    This is how I want my yogurt.
    Dadiah, traditional West Sumatran water buffalo yogurt, fermented in bamboo segments. Courtesy of Wikimedia. Photo by Meutia Chaeran.

    Mrs. Homegrown here:

    One reason I make a lot of my own stuff is because I'm trying to avoid plastic packaging. And as I'm sure you know, that's pretty much impossible these days--but I do what I can. Lately I've realized that one consistent source of waste plastic in our kitchen comes in the form of yogurt tubs. This is a little silly, because we know how to make yogurt. In fact, I do believe we covered it in our book.
    Thing is, back in the day when we made yogurt, it was Erik's job. When he slacked on it, I didn't even consider picking it up. Chalk it up to the mysteries of division of labor in a household.

    Anyway, we went to see Mark Frauenfelder talk about his great new book, Made by Hand, and one of things he mentioned was how much he and his family are digging making their own yogurt--and how cost effective it's been for them. He inspired me to get back on the yogurt train.

    It's so darn easy, we should all be on the yogurt train. One great thing about it is that it not only saves money, but it saves packaging, and gives you more bang for your milk buck. We only use milk for coffee around here, so sometimes our milk goes bad. Now we make most of it into yogurt and there's no waste, no excess packaging. And if we make some of that yogurt into yogurt cheese or use it instead of sour cream, that saves more packaging.

    How to Make Yogurt:

    Here's how I'm making yogurt these days--it might vary a little from Erik's methodologies in our book, but all yogurt making is basically the same. You'll need a cooler for this.
    Gather together:
    1. A cooler to keep the yogurt warm while it ferments. I'm sure there are many ways to keep yogurt warm, but I find the cooler straightforward, and that's what I'm going to describe here. We make two quarts at a time in a little six pack cooler.
    2. Very clean canning-type jars
    3. Hot water bottle (optional)
    4. Towel(s) for insulation
    5. Your last store bought container of yogurt. You need live yogurt to start the culture, only a few spoonfuls. The label should say something about containing live, active cultures. You'll need 1 Tablespoon of live yogurt for every quart of milk you're transforming.
    6. Milk, of course. Make sure your milk doesn't say "Ultra Pasturized" or UP on the label. That stuff is just nasty. Otherwise, you can use whole, 2%, 1% -- and even skim, I presume, though I've never tried it. How much milk? As much as you want. But it seems to me that for the trouble, a quart would be the minimum it would be worthwhile making. After all, it keeps a long time. 
    The procedure:
    • Heat milk gently to 180 degrees Fahrenheit. If you've got a thermometer, great. If you don't, 180F is where the milk starts to simmer. Just watch for those first tiny bubbles to start rising. When they do, turn off the heat. (Heating the milk makes for thicker yogurt. You could skip this step if you like. I would skip it if I got my hands on some nice raw milk.)
    • Let the milk cool down to about 110F. This is the only hard part--waiting for it to cool. 110F is about as hot as a hot bath. You can put your finger in it and keep it there.
    • While you're waiting, boil water to heat your jars. I like to fill my jars with boiling water, cap them, and let them sit until it's time to use them, at which point I pour the water out. I know it's not really sterilization, but it's something, and it pre-heats the jars, which is important. You could also pull the jars straight from a hot dishwasher, or actually boil them. Also, you'll want to pre-heat your cooler. Pour hot water in it as well and let it sit until the last moment. And fill up your hot water bottle, if you have one.
    • Stir in 1 Tablespoon of yogurt for every quart of milk in your pot. Use no more than that. Stir until dissolved.
    • Transfer the inoculated milk into warm jars, cap them, and stuff them into the warm cooler (which you've emptied of water). Do all this fast so you don't lose much heat. Your mission is to fill the cooler up, so there's no empty space, with some combination of jars of yogurt, towels and heating devices like hot water bottles or lacking one of those, just more jars filled with hot water. My routine is to put 2 quart jars in a six pack cooler, slide a hot water bottle between them, and pack the top of the cooler with an old towel, so that I can just barely manage to lock the lid in place.
    • The goal is to keep the yogurt very warm for about 8-12 hours. You might not be able to keep it at 110F the whole time, but it should be in that neighborhood. Certainly above body temperature. My set up described above seems to do that well enough. I've never checked the temp. inside, fearing to lose the heat. It just works.
    • After 8-12 hours the milk in the jars should look yogurty and taste yogurty. It might not appear thick enough, but remember that it is quite warm. It will thicken some after it goes in the fridge.
    • If it doesn't look yogurty at all, add a smidge more starter, rewarm the cooler and everything, and try it again for another 8 hours. Consider that your starter--your store bought yogurt--may not be alive. Either that or the cooler wasn't warm enough.

    Sunday, January 24, 2010

    Bread and Transformation


    I've not tried Reinhart's baking method (even though I once had one of his books out of the library), but I like this 2008 Ted talk on the alchemical symbolism of bread. If you're either a baking or brewing geek like me it's worth a view.

    The baking method I've used for over a decade is from Nancy Silverton's book Breads from the La Brea Bakery. You use a sourdough starter and at least half the flour must be white to get it to leaven properly. I've had great results, but would like to someday make a loaf entirely from whole wheat with a sourdough starter. Reinhart, in his book Whole Grain Breads: New Techniques, Extraordinary Flavor claims to be able to do just that and not end up with a hockey puck. If you've tried his method (and gone through his very lengthy directions) leave a comment!

    Monday, November 16, 2009

    Red Cabbage Kraut


    Homegrown Neighbor here:

    Red cabbage sauerkraut is my new favorite condiment. I put it on everything including stir-fry, pasta, eggs, salads and soups. The kraut is salty so it is a great addition. No need to add salt or soy sauce to anything- kraut will kick up the flavor.

    Then of course there is the color. Sure, I could eat ordinary green cabbage kraut. But where is the fun and excitement in that? Green cabbage turns grey and colorless when it is fermented. Red cabbage however, turns a bright shade of purplish pink. The liquid around it dyes all of your food. I like to eat it on eggs. It stains the egg whites a lovely shade of blue and purple. Plus I'm sure the bright color represents some kind of potent cancer fighting compound. Brightly colored fruits and vegetables are good for you. Artificially colored foods, not so much.
    And of course sauerkraut is a naturally fermented food. This means it contains live bacteria. Don't worry- bacteria are everywhere, you just have to cultivate the good kind. And kraut is full of lactobaccili, a beneficial bacteria in this case. I had never liked the sauerkraut I tried as a child. But now I am converted. I think if the kraut on my hot dog when I was a kid was bright pink, I would have liked it a lot better.

    This is my weird and wonderful urban farmer breakfast: raw kale, pinto beans, a spoonful of homemade pesto, eggs and kraut. Trust me, its delicious. I need a nutrition packed breakfast to go clean the chicken coop and garden all day.

    I got my kraut making ideas and recipes from Wild Fermentation: The Flavor, Nutrition, and Craft of Live-Culture Foods.

    Also, thanks to the neighbors for letting me use their sauerkraut crock. I have also made smaller batches in a simple glass bowl. So there is no specialized equipment required. Just try fermenting something delicious.

    Monday, October 05, 2009

    Kimchi Secrets Revealed

    Kimchi champion Granny Choe at Krautfest 2009 - photo from Eating L.A.

    The last time I tried to make the spicy Korean fermented cabbage dish known as kimchi it was such a disaster that Mrs. Homegrown exiled the batch to the back porch where it rotted for a good two months before we got around to sending it to the landfill. At Krautfest 2009, which we helped organize back in September, we had the great privilege of learning to make kimchi from kimchi entrepreneur Oghee "Granny" Choe. And thankfully, Pat over at Eating L.A. has put Granny Choe's recipe online for all to enjoy here. Having tasted Granny Choe's kimchi, I can tell you that it's not to be missed even for the kimchi-phobic.

    You can order Granny Choe's kimchi online at grannychoe.com.

    Granny Choe also has a nice recipe for a savory kimchi pancake here.

    Here's some photos of Krautfest 2009 via Mark Frauenfelder.

    Thursday, January 22, 2009

    Brewing Demo

    Hogarth's formula: beer=good, gin=bad

    Homegrown Evolution will be conducting an informal beer brewing demo as part of an art opening in Eagle Rock this weekend. Curated by Nate Garcia, Needle in a Haystack brings together an eclectic group of artists exploring community and public space, including our comrade Ari Kletzky of Islands of L.A., with whom we'll be interacting during the course of the show.

    At the opening, on Saturday January 24th we'll be demonstrating how to make a batch of beer with malt extract, a process that anyone can do in their own kitchen. The beer will ferment in the gallery and be served on February 28th at the closing party. We'll be setting up around 6 p.m. and we should be finished brewing by 9 p.m. or so. The event is at the Center for the Arts, Eagle Rock which is located at 2225 Colorado Boulevard.

    Stay tuned for more fermentation workshops in the near future.

    Saturday, December 13, 2008

    Making Beer in Plain Language

    "The move from a structuralist account in which capital is understood to structure social relations in relatively homologous ways to a view of hegemony in which power relations are subject to repetition, convergence, and rearticulation brought the question of temporality into the thinking of structure, and marked a shift from a form of Althusserian theory that takes structural totalities as theoretical objects to one in which the insights into the contingent possibility of structure inaugurate a renewed conception of hegemony as bound up with the contingent sites and strategies of the rearticulation of power."
    -Guggenheim Fellowship-winning professor of rhetoric and comparative literature Judith Butler via the Bad Writing Contest

    Huh? At least the terminology surrounding beer making ain't that obtuse, but it certainly could use some simplification. For novice home brewers, such as us here at Homegrown Evolution, the terminology creates an unnecessary barrier as impenetrable as a graduate school seminar in the humanities. Let's see, there's a mash, a mash tun, a wort, some sparging, malting, all the while specific gravities are measured and hopsing schedules followed. We've made beer using kits from a home brew shop and found the process relatively simple, but the thought of making an all grain batch (extracting our own fermentable sugars from the grain rather than using the extracted syrup in a kit) seemed intimidating. Thankfully comrades Ben, Scott and Eddie showed us how to do an all grain batch a few weeks ago. Here, in plain language and crappy pictures is how it works. To the possible horror of beer aficionados, we'll substitute plain English in the interest of encouraging more folks to try this:

    1. Slightly sprouted and roasted grains from a home brew shop (they've been sprouted and roasted for you) are soaked in hot water.

    2. Music, courtesy of Triple Chicken Foot, kills some time while the grain steeps.

    3. After soaking, the liquid is drained off and more hot water is added. The liquid pouring into the pot on the ground contains sugar from the grains.

    4. The extracted sugars are boiled with some hops for an hour.

    5. After boiling for an hour you cool down the liquid as rapidly as possible. Here comrade Ben uses ice and a coil of copper tubing with water from a garden hose flowing through it, to bring that temperature down.

    6. The cooled liquid is poured into a glass carboy and yeast is added. After a week or so this will be transferred with a tube into a second carboy. After about two to three weeks of fermentation some additional sugar is added (for carbonation) and the beer is bottled. After bottling I've discovered that it's best to wait for at least three weeks, to let the carbonation happen and the flavors mellow, before sitting down with a post-structuralist theory tome and popping open a cool one.

    From the pictures you can see that brewing from scratch like this takes some special equipment. You can build these items yourself, or you can skip the equipment and brew with an extract kit from your local home brew shop with little more than a large pot and a carboy. Remember that if prisoners can make wine behind bars (recipe for prison "Pruno" here), we all can certainly make an acceptable beer in our kitchens.

    For detailed info on how to brew beer and make your own brewing equipment see John Palmer's free ebook How to Brew.