Showing posts with label solar cooking. Show all posts

Monday, August 20, 2012

How To Dry Food With the Sun

Drying Apricots in Southern California--early 20th century style.

Dehydration is one of my favorite food preservation techniques. Drying food concentrates flavor and is a traditional technique in our Mediterranean climate. Best of all, drying food is one of the best applications for low-tech solar power. In many places, you can simply set food out under cheesecloth to dry in the sun.

But there's a catch to sun drying: humidity. Food dries best when temperatures are above 85º F and below 60% humidity. If you live in a desert, humidity isn't a problem. But in most other places in North America it's simply too moist to set food out under the sun. It will rot before it dries. In Los Angeles, due to the influence of the ocean, it's slightly too humid most of the year for sun drying to work well.

But there's an easy way to overcome humidity: convection, i.e. hot air rises. Most solar dehydrators take advantage of the passive movement of hot air to lower humidity enough to dry food. Here's a couple of solar dehydrators that harness this simple principle to dry food without electricity:

Appalachian Solar Dehydrator


This is the dehydrator I built with plans from Home Power Magazine. The plans and an improvement on the original plans are split between two articles in Issue #57 and Issue #69. You need to download and read through both articles before building this dehydrator. This dehydrator has performed well for us. The same design can also be modified to work as a rudimentary solar house heater. I had originally used a sheet of plastic over the collector, but have sinced replaced that plastic (which ended up spltting) with a door I was getting rid of.

Cardboard Box Dehydrator


Mother Earth News has plans for a Appalachian style dehydrator made from cardboard boxes. As long as you keep it out of the rain, this dehydrator should work just fine, and is a lot easier to make than the plywood version. I've never built one of these, but am interested in hearing from anyone who has. 

Eben Fodor Solar Food Dryer

Photo from Simply Resourceful

This design is by Eben Fordor, and is described in a book by Fodor called  The Solar Food Dryer: How to Make and Use Your Own Low-Cost, High Performance, Sun-Powered Food Dehydrator. I have not seen one of these in person, but the folks at Simply Resourceful built and blogged about their Fodor style dryer. If you've got a Fodor dryer, please leave a comment to let us know how it worked.


Solar Tunnel Food Dryer
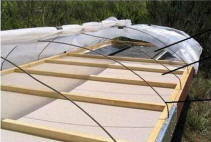

Builditsolar.com has a link to a solar dryer that's, essentially, a mini hoop house with ventilation. It's a scaled down version of the large hoop houses that small farmers use to dry fruit. Again, if you've used something like this, please comment.

Beware of Bugs

One drawback to outdoor drying is that you can often get infestations of flies and pantry moths. We've lost a lot of dehydrated tomatoes this way even though our Appalachian dryer has screens. I've even lost batches I've done in an electric dehydrator inside. Thankfully it's easy to kill larvae by sticking your dried food in the freezer at 0ºF for 48 hours. I'd recommend this step.

Further Reading

Build It Solar is one of my favorite resources. You can check out a couple of other solar dehydrator designs that are variations on the ones above on their Solar Cooking, Food Drying, Solar Stills and Root Cellars project page.

Wednesday, August 10, 2011

CooKit Solar Cooker Made Out of Wood


The nice folks at Solar Cookers International gave us permission to reprint plans for their CooKit solar cooker in our book Making It. You can access those plans, as well as many other solar cooker projects, for free, on their website here.

I've made CooKits out of cardboard and aluminum foil a couple of times. One problem is that I eventually bang up the cardboard and I've got to make a new one. This summer I had a lot of  1/4 inch plywood leftover from fixing up Mrs. Homegrown's writin' shed. Rather than send that plywood to the dump I decided to make a more permanent CooKit.


I blew up the CooKit pdf from the SCI website using Adobe Illustrator.  I did a tiled printout and taped the pieces together to create a life sized pattern. I used this pattern to cut out the plywood pieces.


I spray glued the aluminum foil to the plywood. Next, I drilled holes in all the pieces and inserted twist ties to, essentially, create little hinges so that I could fold up the CooKit when not in use.


The plywood CooKit folds much better than my cardboard versions did.


This type of "panel" solar cooker works best for things like polenta and rice. Now I've got a convenient folding panel cooker for backyard use and camping trips.

Tuesday, July 20, 2010

Summer of Solar Cookin'


Homegrown Neighbor here:
I was lucky to recently receive a really nice solar cooker from a family friend. Apparently it had been sitting in her garage for a while, and I was happy to take it off of her hands.
The model is called an SOS Sport. It is a box style cooker with a black interior and clear, insulated lid. It also has a removable reflector to help concentrate the light in the box. The reflector is helpful, but I've seen the temperature get up to nearly 200 degrees without it during the middle of the day. It came with two round 3 quart pots, so it can cook up quite a lot of food.

Summer is here and it is nice and sunny in Southern California. And way too hot to turn on an oven. So I am embarking on a summer of solar cooking fun. I've made a few peach cobblers in the solar cooker, but mostly I use it to cook beans.

I love beans. They are inexpensive, hearty and filling. I keep my pantry stocked with at least two or three different types of dried beans and lentils at all times. I'm usually away all day at work and too exhausted at the end of the day to do much cooking.
I often slump into a chair in the garden at the end of the day, gazing at the veritable cornucopia of vegetables before me, wishing someone would harvest them and make me dinner.
The solar cooker is perfect for someone like me because I can load it up in the morning, leave it all day, and when I come home I have a great meal hot and ready. So it is kind of like a crock pot or slow cooker, just using solar energy instead of electricity. I've made a lot of black beans in it, but I've also used it to cook pintos, adzukis, mung beans and white beans. I usually grab a sprig of an herb or a bay leaf from the garden to throw in the pot.

Here is what I made today:
Solar Powered Navy Beans

2 cups navy beans
a handful of celery leaves
5 garlic cloves, whole
1/4 cup pickled red onion (just sliced red onion soaked overnight in white wine vinegar- delicious with everything)
Lots of water- maybe 4-5 cups

You want to make sure to use plenty of water. Beans absorb a lot of water as they rehydrate and the solar cooker looses some moisture as it cooks. So err on the side of extra water.

I'm not much of one for measuring. The great thing about making beans, soups and stews is you can add a pinch of this and a sprig of that and adjust the flavoring as you go. It is very forgiving.

I put the pot in the solar cooker around 10 a.m. and got home around 6 p.m. The pot was still nice and warm but not too hot. The beans were the perfect eating temperature. I had a lovely dinner and I'll have leftovers for several days. I love easy meals. I'm going car camping next week and I'm thinking of taking the solar cooker with me. I think I'll try a vegetarian chili for the camping trip. I'll let you know how it turns out.

Friday, November 06, 2009

Another Panel Solar Cooker

Poyourow demoing her solar cooker design

There's no one size fits all solution when it comes to the world of solar panel cookers. All have their advantages and disadvantages. I got an email from author Joanne Poyourow, leader of the amazing Los Angeles Environmental Change Makers, with a simple and effective design she came up with.

Pouyourow's cooker comes together much faster than the CooKit design that I blogged about earlier this week. There's hardly any cuts to make and no glue needed. Her design makes use of a car sunshade which can be picked up cheap at your local 99¢ store. The sunshade is more durable than aluminum foil glued to cardboard. While you can also fashion a sunshade alone into a solar panel cooker, I've found that they don't stand up well in even a moderate wind.

Plans for Poyourow's cooker can be found here (pdf).

She also has a list of solar cooking resources here.

And yes, for most North Americans this is the wrong time of year to be blogging on this topic since, as the sun gets lower in the horizon, solar panel cooking season is almost over. But I've got a backlog of summer R&D to share. Stay tuned for the ups and downs of our summer gardening, a bike accident story and a taste test of beer made with our homegrown hops . . .

Tuesday, November 03, 2009

CooKit Solar Panel Cooker


I've been experimenting with a nice panel solar cooker for the past week and, so far, the results are impressive. Called the CooKit, it was developed in 1994 by a group of engineers and solar cooking enthusiasts associated with Solar Cookers International and based on a design by Roger Bernard.

It has a couple of nice features:
  • It produces ample heat to cook rice and simple casseroles.
  • When you fold it up it takes up no more space than an album (do I have to explain what an album is for the youngsters out there?).
  • A flat area on the base of the CooKit makes weighting it down with rocks easy. This is really important in windy places.
  • All you need to build it is a knife, cardboard, aluminum foil and glue.
As with all panel solar cookers you need an black enamelware pot wrapped in a turkey roasting bag to hold in the heat. You ain't gonna deep fry things with a panel cooker, but they are great for slow-cooked crock pot type dishes. The only disadvantage to this design is having to cut curves, but with a sharp knife it wasn't difficult. The other improvement would be a stand to lift the pot off the aluminum foil for more efficiency and to keep the cooker un-scuffed. When panel cooker season returns to LA in the springtime, you can bet I'll be making a lot of rice with this thing.

Detailed instructions for how to build a CooKit can be found here.

Also, Mrs. Homegrown and I are writing a new book and we'd like to include some plans for solar cookers (any kind). If you've got a favorite DIY model, leave a comment with a link.

Another view with curious Doberman in the foreground:

Wednesday, October 01, 2008

Build a Solar Dehydrator


Like many of you, I suspect, we've got a few too many tomatoes at this time of the year. One of our favorite ways to preserve our modest harvest is with our solar dehydrator. There's nothing like the taste of sun dried tomatoes, but unless you live in a very dry desert climate like Phoenix, Arizona you can't just set fruit out in the sun and expect it to do anything but go moldy. In most places in the world, including here in Los Angeles, the relative humidity is too high to dry things out in the sun. Solar dehydrators work by increasing air flow to dry out the food. The one we built uses a clever strategy to get air moving without the use of electric fans such as you'd find in your typical store bought electric dehydrator.

Our solar dehydrator is constructed out of plywood and consists of a heat collector containing a black metal screen housed in a box with a clear plastic top. This screen heats up on a sunny day and feeds hot air into a wooden box above it. Vents at the bottom and the top of the contraption create an upward airflow through natural convection (hot air rises). You put the food on screen covered trays in the upper box. With sliced tomatoes it takes about two full days of drying and you have to take the food indoors at night to prevent mold from growing (a minor inconvenience). We built our dehydrator several years ago and have used it each season for tomatoes, figs and for making dried zucchini chips.

You can find plans for this "Appalachian Dehydrator", designed by Appalachian State University's Appropriate Technology Program, in the February/March 1997 issue of Home Power Magazine. The February/March 1999 issue of Home Power features a refinement of this plan, but we just built the original design and it works fine. The original plans and improvements to those plans are split between two articles: Issue #57 and Issue #69. You need to download and read through both before building this dehydrator. . Alternatively, the always excellent Build it Solar website has a whole bunch of solar dehydrator designs, including a nice cardboard version. And while you're in the library there's also a book by Eben Fodor, The Solar Food Dryer.

As an added bonus to the tinkerers out there, take almost any of these designs, remove the top box, stick it in a window and you've got a passive solar room heater.

Monday, September 15, 2008

Camping and Solar Cooking

I'm a big fan of backpacking sufferfests, which often involve a long drive followed by hiking thousand of feet up and over challenging, rocky terrain. The sense of accomplishment and breathtaking scenery is always worth the effort, but something is also to be said for an alternate camping scenario we’ve taken to recently, involving loading up our cargo bike (the amazing Xtracycle) and biking to our destination, all the while carrying almost as much as we would car camping. After rolling into our campground, we’ll spend the weekend kicking back at the campsite, taking it easy and pretty much not going anywhere or doing anything. With the carrying capacity of the cargo bike, we can get fancy with the food and libations, allowing us to skip the usual dehydrated camping chow.

These sittin’ around type of trips, or even a lazy Sunday afternoon at home, are the perfect occasion to deploy a solar cooker. Best of all you can build a solar cooker yourself for pennies out of cardboard and aluminum foil. For some foods, such as rice, it’s actually easier to cook with a solar cooker than it is on a stovetop. Put some rice in a pot, place the pot in the solar panel cooker, stick it out in the sun and two hours later you have lunch.

Read the rest at The Cleanest Line via the Patagonia Company.

Sunday, June 29, 2008

Appropriate Technology

Our rocket stove, pictured above, was mentioned on BoingBoing last week and we thought we'd use the occasion for a brief roundup of similar "appropriate" technology concepts. The term appropriate technology evolved out of political economist E. F. Schumacher's book Small is Beautiful and is easier to show rather than describe. While not always low-tech, appropriate tech concepts feature elegantly simple (but not simplistic) design, efficient use of energy and are usually aimed at poor countries. What Homegrown Evolution would like to prove is that these technologies have a place in developed western countries as well. Here's three of our favorite appropriate tech ideas and websites:

1. Rocket Stoves: our brick rocket stove and a link to a video on how to make a simple metal version.

2. The glorious Solar Cooking Archive which has links to dozens of simple solar cooker plans that you can build yourself. We built our cardboard and aluminum foil Pavarti cooker with plans from the solar cooking archive.

3. AfriGadget. The subtitle of this blog says it all, "solving everyday problems with African ingenuity."

Monday, March 24, 2008

A Parvati Solar Cooker

Damn, is solar cooking easy! Put some rice in a pot, place the pot in this simple panel cooker, made with cardboard and aluminum foil, stick it out in the sun and two hours later you have lunch.

We built our "Parvati" solar cooker with plans designed by Shobha Ravindra Pardeshi that can be found here. Pardeshi, who runs an "appropriate technology" company with her husband in India has another design for a similar dish-shaped cooker here. We found both of these cookers (and many more) via the amazing Solar Cooking Archive.

For the Parvati cooker, we cut the cardboard according to the plans, and affixed the aluminum foil with spray glue. For our first pot of rice we used a black enamel pot to better absorb the heat of the sun's rays, and wrapped it in a roasting bag to increase the efficiency of the cooker. A five gallon bucket made a convenient stand and did not have to be rotated in the two hours it took to cook the rice. Longer cooking times would require re-aiming the cooker as the sun moves across the sky. Temperature in the pot quickly went over 180º F, the point at which food begins to cook. The two hour cooking time is much longer than it would take on a conventional stove, but with a solar cooker there is no danger of burning, making the process, in our opinion, easier than stove-top cooking. Consider a solar cooker a kind of low-powered crock pot for lazy and cheap people--good for things like rice, beans, soups and stews, but not good for sauteing. Just remember the oven mitts--this thing gets hot!

When the sun gets higher in the sky, as we move into summer, this cooker will reach even higher temperatures. We don't remember where we read this but some folks say that panel cookers like this one cook best when your shadow is shorter than you are which, here in Los Angeles, is right about now. We tried this cooker back in January and it performed well, but did not get above 140º F, which is not hot enough to cook.

Perhaps here around the Root Simple compound we'll get around to turning our Parvati Solar Cooker into a low rent attraction. Just add some ostriches and we'll repeat this early 20th century tourist trap in nearby Pasadena (click to biggify):