Showing posts with label build it. Show all posts

Wednesday, May 18, 2011

Side Yard Hops Trellis

A little hard to see in these crapular photos: the new south side hops trellis.

I love looking out our bedroom window in the summer at the hops I've trained up the east side of the house. And I also like the beer I've made with those hops, so much so that I decided to expand my hops growing project to the south side of the house.

Otherwise useless, the narrow side yard on the south side of the house is the perfect place for a vertical plant like hops. To accommodate the bines (what you call a plant like hops that attaches itself to a support without suckers or tendrils) I put some pulleys on the eaves of the house so that I can lower the bines to harvest the hops without having to climb a ladder.  I attached some twine to metal cables that run through the pulleys. Hops stick to twine like Velcro and grow so fast you can almost watch them climb. I train them into a "V" shape and cut down all but the strongest two bines from each mound in the spring.

Year three of the front porch hops: Cascade and Nugget.

Two years ago I started Cascade and Nugget hops in self watering pots placed by the porch on the east side of the house. This year I transferred those bines to the ground and they seem to be doing well. Cascade, especially, grows like a weed here. While I proved to myself that you can grow hops in self irrigating pots, I think they will do better in the ground.

The new varieties on the side of the house are Golden and Chinook. Since this blog also doubles as my garden diary I'll note that the Golden is on the southeast and the Chinook on the southwest. It's important to keep the bines labeled so when it comes time to make beer you know which variety is which. When I planted the Cascade and Nugget in the ground I got them mixed up. They look and smell different when mature so I'm pretty sure I can tell the difference come harvest time. But, never having grown Chinook or Golden, I don't want to forget which one is which.

Here's how you have to harvest hops without a fancy pulley system:

Saturday, March 05, 2011

Self-Watering Containers in Mother Earth News


We're proud to announce that Mother Earth News online is excerpting the project, How to Build a Self-Watering Container from our book, The Urban Homestead.

We heart Mother Earth News. If you haven't visited their site, do so. You'll find a treasure trove of homesteady-type information to peruse.

(Here's a hint about that article: there are illustrations, but they're not embedded in the text. Look for the link to the "Image Gallery.")

Monday, February 07, 2011

Ikea Hack: Ancient Greek Couch


Call me pretentious and crazy. When it came time to replace our dog-damaged living room couch I decided to recreate an ancient Greek/Roman couch using scavenged and inexpensive materials. A broken child's bed, some cheap table legs from Home Depot and an Ikea cushion make for a quick and easy project.

If I were to make two more of these couches and a low table I'd have the complete ancient dining room or "triclinion." What could I do with a triclinion? Glad you asked. At the triclinion, guests reclined on  couches in a specific seating order. Woman and men ate separately. You brought your own humanure potty with you which also served as a projectile when philosophical arguments got out of hand. And the ancient Greeks even had professional party crashers with colorful nicknames such as, "the lobster."


Reviews on my couch are mixed. Mrs. Homegrown deems it uncomfortable unless laying horizontal. And the historical recreation on the cheap aesthetic runs the risk of devolving into the horrors of the modern day toga party such as the one below:

Photo by Keithusc
Nevertheless, it's a great couch from which to make pronouncements, blog posts and "thoughtstylings" from. And it's well past time to host that homesteading symposium!

Sunday, October 24, 2010

Volvo Camper by John Ross

Volvo Camper (in front of a vintage Spartan trailer)
Spotted in the Museum of Jurassic Technology's parking lot--a Volvo-based camper created by über tinkerer/genius John Ross. Ross started with a 1,200 gallon underground water cistern like the ones below:


He insulated the tank with polyisocyanurate foam-board and covered the whole thing with a $70 tent to block out light. You access the tank through a hole in the roof of the Volvo. A vented heater doubles as a stove. Ross told me how easily it went together--just two hours to secure the tank to the car--much faster than building something from scratch.And no mortgage!

You can watch the Volvo camper in action here.

Monday, October 11, 2010

One of our favorite activities: Depaving


Taking out concrete with a sledgehammer may not be everyone's idea of a great time, but believe me, Erik is having a great time in this picture. Any opportunity to get rid of a few feet of ugly concrete or asphalt,  and replace it with soil and plants, is not an opportunity to be missed. Depaving increases growing room for green things and it also gives more points of access for rain to enter the ground and renew the water tables--rather than being lost down into the sewers. Think about your home--do you have sidewalks that can be replaced with mulched paths? Can you reduce the size of your driveway? How much of your backyard is paved?

What Erik is doing here is pretty simple. He's taking out a chunk of our back patio, ripping it down to soil. The next step is to build a big planter box above the hole. This way, our planter box becomes a raised bed rather than a simple container. While it's possible to garden in containers, it's always better, if at all possible, to open the bottom to soil.

We're pretty fearless about messing with our back patio because it's ugly, cracked and worn out.  Any yuppie worth their salt would have replaced it out years ago, but we've had more pressing repairs to do. You can see we built a sort of deck/arbor thing there behind Erik, but the larger area of the patio has long been a sort of unattractive work-zone/no-man's land. A non-space.  Reclaiming it is part of our backyard renovation, and building a raised bed at the edge of the patio is part of that plan. This new bed will give us 200 square feet of new growing space, pulled from an area that did nothing before but collect junk.

The cement work on the patio is so poor that it's easy for us to take out with simple tools. In this case Erik first defined the area of removal by slot cutting the concrete with a hand-held circular saw fitted with a blade called a "Masonry Cut-Off Wheel."  (If our patio were made of better concrete, we'd have to rent a gas powered, water cooled saw with a diamond studded blade . These are available at equipment rental joints.)  The cool thing is that once you make that neat cut, you can bash around inside the lines with a sledgehammer and (hopefully) the cement will not crack outside the lines.


Here you can see the slot cut lines at the bottom and right. Erik has pounded this area with the sledge hammer, and is prying up thin layers of cement with a crowbar. Our patio was covered with archaeological layers of skim coats--so in our case, the work is a matter of taking out thin layer after thin layer. A more solid patio would be taken out in big chunks. At any rate, Erik kept hammering away--while I helpfully "documented"--until he hit the sad and sorry soil that's been trapped beneath the concrete for perhaps 90 years. That soil will revive. That's the amazing things. Soon enough moisture and worms will move in and it will live once more.

We would have liked to have recycled the broken chunks of concrete to use elsewhere, but its poor quality meant that it fractured into tiny chunks too small to use as "urbanite."

Stay tuned to see the new raised bed.

Sunday, October 03, 2010

Grow a Fence

Image from Mother Earth News
Why build a fence when you can grow one? Permaculturalist Harvey Ussery has an article, "Living Fences How-to Advantages and Tips" in the latest Mother Earth News that describes several plants and strategies for creating living barriers that do more than just keep the livestock in. Hedges such as Osage orange (Maclura pomifera) provide fodder as well as fencing. Others, such as black locust fix nitrogen into the soil. For  USDA zones 8 to 9 Ussery suggests Jujube (Ziziphus jujuba). I'll add that prickly pear cactus (Opuntia ficus-indica) also makes a nice edible fence in warm and dry climates.

Read this article and more on the voluminous Mother Earth News website.

Wednesday, May 12, 2010

More Furniture in 24 Hours


With our stained and Doberman-thrashed thrift store furniture about to end up on the sidewalk, my thoughts have turned to what to replace it with on a limited budget. Naturally, I'm thrilled when the interweb answers my conundrum with yet another 1970s era plywood furniture building manual. This one comes courtesy of a design blog called Ouno, who put up a flickr set of a few pages and plans from a book called More Furniture in 24 Hours by Spiros Zakas and students at the Parsons School of Design.The space bench looks kinda not-so comfortable, but one shouldn't be sitting around when there's a chicken coop to clean or a possible trip to Studio 54.

Monday, January 19, 2009

Make a Garden Work Table from a Pallet

Pallets are a ubiquitous building material, your free lumber yard in tough times. Homegrown Evolution patched together the garden work table above for use with seedlings and storing pots and watering cans. Hopefully the picture is all you need to put one together yourself.

Some tips for working with pallets:

1. We prefer projects that don't involve disassembling the pallet. The nails in pallets aren't meant to be removed. Trying to take one apart with a crowbar will, in most cases, result in a lot of split, useless wood. A Sawzall reciprocating saw would work better if you must take one apart. For the table above we simply cut the pallet in half with a circular saw and handsaw.

2. Use screws not nails and predrill all holes. Pallet wood is very brittle and splits easily.

For some other design ideas check out:

This nice coffee table. Note that you simply use the whole pallet.

And this cool idea: an art/architecture collective Municipal Workshop has a nice way of avoiding the problem of pulling pallets nails. They cut pallets apart and use all the small pieces of wood like tiles. Here's some more info on their "Autotron Unit", pictured above.

Friday, December 26, 2008

A Tensegrity Table

Tensegrities are an attractive structure that can be built with rods and string or wire. The term is Buckminster Fuller's combination of "tension" and "integrity", though Fuller probably did not invent the concept. Having seen a coffee table that used a tensegrity as a base, I decided to see if I could make a similar table, only out of scavenged materials (scavenging seems appropriate in these crummy economic times!).

To make your own tensegrity table, molecular biomechanics professor Dr. William H. Guilford has some very nice step-by-step instructions here. My version is slightly different, but frankly Guilford's design is probably more stable. I used some electrical conduit tubing left over from remodeling the house, some rope and a stop sign that I found laying in a driveway (note the "anarchy" graffiti - is that "stop anarchy" or a pro-anarchy statement?). Putting the tensegrity together was a bit more time consuming and frustrating than I expected, but once I got my head around the geometry of the concept and learned how to tug the rope, my slightly wonky scrap tensegrity miraculously seemed to assemble itself.

Tensegrities make a nice project for using up short scrap materials and can be stacked to form a tower. An example of a very tall tensegrity structure is sculptor Kenneth Snelson's "Needle Tower", installed at the Hirshhorn in Washington D.C. While more of a traditionalist when it comes to architectural forms, tensegrities make a nice addition to the Hoemgrown Evolution design vocabulary and I'm contemplating a tensegrity bean trellis for the backyard . . .

Tuesday, October 07, 2008

Make a Rain Barrel

There's a lot of advice floating around the internets about how to make a rain barrel. Most barrel pundits suggest drilling a hole in the bottom of a barrel and installing a faucet, a kind of connection called a "bulkhead fitting". Unfortunately such improvised fittings have a tendency to leak. My favorite way to make a rain barrel is to take a 55 gallon drum, use the preexisting fittings on the top and turn it upside down, a process explained nicely here (complete with a list of parts), by B. Chenkin who will also sell you a kit at Aquabarrel.com.

To get started, you get a ubiquitous 55 gallon drum with two threaded "bung" holes that look like this:

A good source for this kind of barrel is your local car wash. Just make sure that the barrel you scavenge didn't have nasty chemicals in it. You punch out the center of one of the bungs, as shown, and insert a threaded PVC fitting. A few more PVC parts from the sprinkler section of your hardware store, a brass hose fitting with a valve, and you'll have this:


Glue that up with some PVC cement, wrap the threads with teflon tape, and you're almost ready to collect rainwater. But first, turn the barrel upside down, drill a hole for the down spout another hole to insert an overflow pipe made out of a threaded 3" waste pipe fitting:

The last step is to prop the barrel up on some wood or concrete blocks to give some clearance for your hose connection and some extra elevation for a gravity assist to help push the water through a garden hose.

The overflow connection is another reason I like Chenkin's design. It's important to keep rainwater away from your foundation especially when, like us, you live on a hill. The picture at top shows our barrel installed with the overflow pipe connected to a pipe that runs down to the street. Los Angeles' building code required us to run our rainwater out to the street, where it helps wash pollution into the LA River and the ocean (see creekfreak for more on LA's pesky water issues). At least we'll be channeling some of that water, via the barrel, to our new fruit trees. Those of you with flat yards could simply connect up an overflow pipe that would take the water at least ten feet from the foundation.

In Southern California, where rain never falls between May and October, a 55 gallon drum won't meet much of our irrigation needs, though Chenkin's design does allow you to chain multiple barrels together. What we really need is an enormous cistern, something with a capacity in the neighborhood of around 10,000 gallons. Ideally houses here, as in the ancient Roman world, would have been built with huge underground holding tanks. A small rain barrel like this makes more sense for those of you who live in places with rain throughout the year, where a small amount of collected rainwater could be used to bridge a gap in rainstorms. I put this rain barrel together as a test and because I was tired of looking a blue drum that sat in the backyard for a year giving our patio a methamphetamine lab vibe.

Again, for complete instructions and a list of parts visit Chenkin's ehow page or, if you're not adept at perusing the isles of the local hardware store, buy a kit from him through Aquabarrel.

[Editors note: due to spamming (are rain barrel enthusiasts really that excited about internet pharmaceuticals?) we've had to shut down comments for this post.]

Thursday, October 26, 2006

Build Your Own Furniture

We live in a 4 by 8 world. This is why we can't get all that excited about things like geodesic domes, straw bale and rammed earth houses. All of these innovative architectural ideas may have great potential, but when it comes time to buy supplies at the lumber yard, the overly creative builder will soon realize the difficulty of utopian designs in a world of 4 by 8 sheets of plywood and drywall. That geodesic shape is hip, but what do you do with the rest of the plywood sheet once you cut it out?

The same limitation applies to making furniture. Thankfully a generation of designers back in the 60s and 70s left a few highly useful and groovy how-to books on making your own suburban-workshop-modernist furniture with a humble 4 x 8 sheet of plywood. The amazing art/architecture collective Simparch tipped us off to the world of plywood modernism how-to books and we at Homegrown Evolution recommend the stunning Sunset Magazine produced Furniture You Can Build, which is sadly way out of print and very expensive on Amazon, but available at the L.A. Public Library. Most of the designs in this book would work well with found materials and scraps. What we appreciate most about this book and others like it, that we will discuss in future posts, is the economical use of common materials.

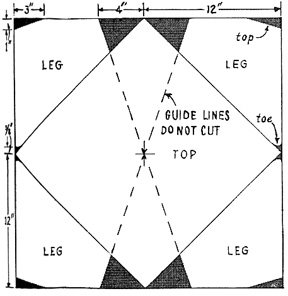
A good example of this efficiency are these handsome stools -- one sheet of plywood will make eight stools. Here are the instructions from the Sunset book:
Simple, versatile, and inexpensive -- that's the quickest way to summarize the virtues of these handy plywood stools, They could hardly be easier to build and are surprisingly inexpensive. Except for the nails and glue, every part of the eight stools shown in the picture at the top left came from one standard 4 by 8-foot panel of 1/2-inch plywood, the same as the panel shown behind them. As the cutting pattern shows, a 2-foot square of plywood yields one stool, and only the shaded areas are wasted.
Each stool is 17 inches square and stands approximately 10 1/2 inches high. If you wish to use a cushion, you can glue and nail a 1/2 by 1-inch hardwood frame around the top's edges, which will give a 1/2-inch high rim to keep the cushion in place.
To start, draw the cutting pattern carefully on heavy paper and transfer it to each 2-foot plywood square with carbon paper or pin pricks. If making several stools, you can have the lumber yard cut your plywood to uniform 2-foot squares. Cut the legs and top from each square with a saw.
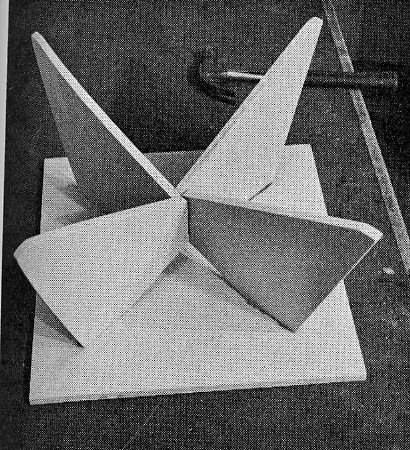
As the underside view shows, each leg abuts on and is nailed to the inner end of the next leg. Assemble with glue and just two 4-penny nails in each leg. Before the glue dries, turn the assembled legs right side up on a smooth surface and attach the top, As you glue and nail on the top (use 6-penny finishing nails), the legs will level themselves evenly. Finish the stools as you prefer: with paint, varnish, or stain wax.