Showing posts with label preparedness. Show all posts

Friday, November 02, 2012

What Preparedness Lessons Did You Learn From Hurricane Sandy?


We're interested in hearing from our east coast readers about how they rode out Hurricane Sandy. How did the storm impact you? How did your preparations work out? Is there anything you would do differenlty next time?

Hurricane Sandy was a reminder to us to take a look at our preparedness. We may not have monster storms here in Los Angeles, but we certainly are overdue for a big earthquake. It's been a long time since we've taken a look at our supplies and emergency equipment. I'm considering a drill--living without power/gas/water for a few days to see what we can improve.

Update. On the Root Simple Facebook page reader Josh Barton left the following account:
I'm in the St.George area of Staten Island, about a 7 minute walk to the water. I live at the top of a hill, so I wasn't worried about flooding, but I think I should buy a raft just in case it doors ever flood in the lower parts (Esp if I move somewhere else. So it'd be good to research what areas were flooded during Irene and Sandy).

During the storm I had my phone and tablet attached to chargers until the peer went out for me at 9pm.

Because my windows face north, and the wind was blowing north, my windows were on good shape, thankfully. In the future, this is something I will always have to look in to. Before the storm I looked up how fat wind needs to travel to break windows and then I constantly checked the wind speed via the weather on my phone.

After the power went out, I hooked my phone up to a battery backup (ZaggSparq 2.0) and then went to bed shortly afterwards.

My first mistake was leaving the phone on overnight. I should have turned it off to conserve power. It used up more power than I was expecting, so I had about 2 full charges left after that.

I own a bike, thankfully, so my first priority was to go to the ferry terminal so I could either charge up there our go in to the city and find a Starbucks our Barnes & Noble to plug in to. I wasn't expecting to see the ferry terminal closed with no ETA on when it would open! That meant I was stranded inn Staten Island since I don't have a car and buses weren't running. That was a major blow for me.

The next day I decided to check out this deli I always pass on my way hone because I knew they had free wifi and I saw they had a cafe level (I've never been in there before). Thankfully, they were open, had power, and wifi!

From this I learned a few more things:

1) don't assume power will be restored anytime soon. I should have bought an emergency radio/flashlight with a hand crank generator that a phone can be plugged in to. Until I find that deli, I was concerned I would lose touch with my mother and a few close friends (I know no one on this island and very few in NYC).

2) Make note of places that have outlets. Since I was able to get on Facebook, I was able to see what others were doing for power (public libraries, and a few people grouped around a chase ATM with an outlet)

3) when going to somewhere that has an outlet, bring a power strip! Do not fall upon the mercy of waiting or being restricted to how many outlets you can use (I wanted to charge my phone, tablet, phone backup charger, and batteries).

4) either prepare emergency food ahead of time or keep an emergency food supply. Based on how Tonga have been in NYC, I'd say a week's worth of food is good.

5) something I've wanted for a while, but never had the funds for (or forgot about) is a solar powered generator. That sure would have made my life a lot easier this week!

6) have an evacuation plan. I have no idea how to get out of Staten Island by bus. I always take the ferry because it's close and convenient.

7) what happened in Breezy Point, Queens (a 6 alarm fire that destroyed a block of houses) could happen anywhere. Make sure that the stuff that's priceless too you us kept safe. Very safe. I'm lucky compared to some people!

Before moving to NYC, survival was a concern for me. It's not as easy as when you're in a house and you have more room and you can install solar panels or keep a large generator on hand. Despite this concern, I think I failed by 50%. The two big things I did right though was I have a Berkey gravity filter, so in the event there was no water, I could have easily gotten untreated water from a stream (you could also get water from a fire hydrant. A few days before the storm I saw someone filing up buckets of water from a hydrant for unknown reasons), I had an alternative means of transportation so if need be, I cold have traveled a large distance, and I was good on food.

In the future, I hope to be better prepared. I got off easy and was able to learn from this.

I typed all this out on my phone, so hopefully predictive text didn't mangle any words

Wednesday, October 10, 2012

Prepper Cat


I predict we might just have a new internet meme here: please say hello to Prepper Cat. The image comes from an outfit selling a "Cat Evacuation Kit." Prepper Cat looks crabby enough to be on an episode of Doomsday Preppers.

I think it's a good idea to have a pet evacuation plan. But Prepper Cat looks like he might just be a feline mall ninja.

Thanks to John Zapf for the link.

Wednesday, August 29, 2012

Learn How To Can For Free


Want to learn how to can? The National Center For Home Food Preservation has a free online course. Offered by the University of Georgia, the course covers canning of both high and low acid foods along with a general introduction to food preservation. While the class is free, you need to register here.

Happy canning!

Monday, August 20, 2012

How To Dry Food With the Sun

Drying Apricots in Southern California--early 20th century style.

Dehydration is one of my favorite food preservation techniques. Drying food concentrates flavor and is a traditional technique in our Mediterranean climate. Best of all, drying food is one of the best applications for low-tech solar power. In many places, you can simply set food out under cheesecloth to dry in the sun.

But there's a catch to sun drying: humidity. Food dries best when temperatures are above 85º F and below 60% humidity. If you live in a desert, humidity isn't a problem. But in most other places in North America it's simply too moist to set food out under the sun. It will rot before it dries. In Los Angeles, due to the influence of the ocean, it's slightly too humid most of the year for sun drying to work well.

But there's an easy way to overcome humidity: convection, i.e. hot air rises. Most solar dehydrators take advantage of the passive movement of hot air to lower humidity enough to dry food. Here's a couple of solar dehydrators that harness this simple principle to dry food without electricity:

Appalachian Solar Dehydrator


This is the dehydrator I built with plans from Home Power Magazine. The plans and an improvement on the original plans are split between two articles in Issue #57 and Issue #69. You need to download and read through both articles before building this dehydrator. This dehydrator has performed well for us. The same design can also be modified to work as a rudimentary solar house heater. I had originally used a sheet of plastic over the collector, but have sinced replaced that plastic (which ended up spltting) with a door I was getting rid of.

Cardboard Box Dehydrator


Mother Earth News has plans for a Appalachian style dehydrator made from cardboard boxes. As long as you keep it out of the rain, this dehydrator should work just fine, and is a lot easier to make than the plywood version. I've never built one of these, but am interested in hearing from anyone who has. 

Eben Fodor Solar Food Dryer

Photo from Simply Resourceful

This design is by Eben Fordor, and is described in a book by Fodor called  The Solar Food Dryer: How to Make and Use Your Own Low-Cost, High Performance, Sun-Powered Food Dehydrator. I have not seen one of these in person, but the folks at Simply Resourceful built and blogged about their Fodor style dryer. If you've got a Fodor dryer, please leave a comment to let us know how it worked.


Solar Tunnel Food Dryer


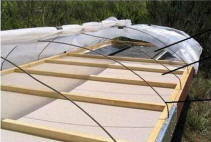
Builditsolar.com has a link to a solar dryer that's, essentially, a mini hoop house with ventilation. It's a scaled down version of the large hoop houses that small farmers use to dry fruit. Again, if you've used something like this, please comment.

Beware of Bugs

One drawback to outdoor drying is that you can often get infestations of flies and pantry moths. We've lost a lot of dehydrated tomatoes this way even though our Appalachian dryer has screens. I've even lost batches I've done in an electric dehydrator inside. Thankfully it's easy to kill larvae by sticking your dried food in the freezer at 0ºF for 48 hours. I'd recommend this step.

Further Reading

Build It Solar is one of my favorite resources. You can check out a couple of other solar dehydrator designs that are variations on the ones above on their Solar Cooking, Food Drying, Solar Stills and Root Cellars project page.

Thursday, August 16, 2012

Doomsday Preppers: Exploitative, Uninteresting, Unreal "Reality"


Doomsday Preppers, a series on the National Geographic channel, is part of a cloud of meaningless cable drivel that envelopes our national psyche like the smog that hangs over Los Angeles. In many ways Doomsday Preppers is indistinguishable from countless other low rent reality TV shows. Does anyone really sit down and watch this endless parade of house flippers, dance moms and custom motorcycle enthusiasts? Or is it all a kind of background, tranquilizing, electronic wallpaper?

I bring up Doomsday Preppers because many of its subjects are engaged in precisely the types of activities we write about on this blog and in our books: growing food, keeping livestock, building solar ovens, preserving food etc. And I finally got a chance to see the first episode and a few segments from later shows.

Of the three "compounds" profiled in the first episode, the most interesting was the family of Dennis McClung in Mesa, Arizona and the Kobler and Hunt families, who share a rural homestead. McClung has built an amazing tilapia farm in an old swimming pool in their backyard. They also have chickens and goats and have integrated the livestock into the greenhouse/tilapia project. It would have been interesting to see how the system McClung created works as a whole. But the producers were more interested in filming the family putting on gas masks and making duck weed smoothies. The Kobler and Hunt families operate what seems like a pretty normal rural homestead. What is unusual is their social arrangement: two families living together. It would have been interesting to explore that relationship. Instead the producers gave us endless scenes of the family shooting AR-15s.

Memo to the National Geographic folks: the internet has been bringing educational video content into living rooms for many years now, showing us how to actually grow tilapia, keep goats, etc. McClung, in fact, has his own website, gardenpool.org, which shows all the things I wanted to see on the TV show. Doomsday Preppers, on the other hand, has no redeeming educational content.

Living in Los Angeles, I know many people who work on reality TV shows. They have told me that, essentially, everything is staged and most details are simply made up. In Doomsday Preppers, the participants were forced to say that they were preparing for specific scenarios such as coronal mass ejections, rapid deflation or other variations on the zombie apocalypse. Producer Alan Madison puts words in his subjects mouths and commits the greatest sin of documentary film making, holding his subjects up for ridicule. In a comment on a review of Doomsday Preppers, McClung says,
I was the first person on the show. My family was edited out of context and coached to appear as if we believe in an imminent doomsday. We don't. I am highly disappointed in [producer, director] Alan Madison and Sharp Entertainment for producing a B.S. "reality" show and tarnishing the Nat Geo name.
Film maker Werner Herzog often plays loose with the details of his documentaries. He calls the practice the "ecstatic truth." He deploys the ecstatic truth when he thinks he needs to tell a story in a more compelling way than the actual facts of the situation allow. As a journalist, Mark Twain was also a fan of the ecstatic truth.

McClung's swimming pool aquaponics setup.

Doomsday Preppers is a kind of unecstatic truth. It bends the facts, exploits its subjects and tells an uninteresting story. Doomsday Preppers delivers the unconscious message of its cynical producer, that you are crazy if you don't just "act normal", consume and shop. It holds its subjects up for ridicule because they are self-actuated people and, hence, "different". The people profiled (victimized would be a better word) on Doomsday Preppers are actually getting up off the couch and doing something: growing food, building communities and making sensible preparations. My heart goes out to the people victimized by the producers of this show.

Thankfully, with inexpensive video cameras and editing software, we can make our own educational television. Many have already unplugged mass media and many more will follow. Good-bye National Geographic.

Tuesday, July 24, 2012

Book Review: More Other Homes and Garbage Designs for Self-Sufficient Living


If I could have only one book on my zombie apocalypse bookshelf it would be this one. Though it has to be one of the worst book titles ever, More Other Homes and Garbage: Designs for Self-Sufficient Living, by Standford University professors, Jim Leckie, Gil Masters, Harry Whitehouse and Lily Young has everything you need to set up your off-grid compound. This book, first published in 1975 and revised in 1981, grew out of a heady period in appropriate technology research and DIY hippie experimentation that took place in the late 1960s and 1970s. In some ways it's the rural version of the original urban homesteading book, The Integral Urban House: Self Reliant Living in the City.Both books, not coincidentally, share the same publisher.

Feeding the digestor on the homestead. An illustration from More Other Homes and Garbage.

More Other Homes and Garbage covers alternative architectural materials, passive cooling and heating, home power generation, solar water heating, methane digesters, sewage reuse and disposal, water supply, small scale agriculture and aquaculture. All topics are covered in great detail with, as is expected for a group of engineer/authors, lots of formulas and tables. While some material is out of date (Art Ludwig has taken greywater well beyond what's in this book), most of the 374 pages of More Other Homes and Garbage are still very useful.

I especially like the can-do DIY tone of the introduction which describes a middle ground between "terminal pessimism" and "technophilic optimism." What's depressing, in fact, is that a lot of the topics in this book have not received much attention until very recently. The frivolous 80s and 90s were simply not the time for More Other Homes and Garbage. Thanks to the great recession, however, this book is relevant again. Get your copy before vengeful Mayan time travelers zap the interwebs in December.

Update July 31, 2012
A Root Simple reader, Lisa, pointed out that you can download this book for free here. Thanks Lisa! 

Wednesday, June 27, 2012

Composting at the NATO Protests in Chicago


Have you ever gone to a concert or a convention or some other large event and marveled at the staggering amounts of waste generated? I've been particularly wishing more of that waste was composted. And what do you know? Just as I was thinking about this, guest Root Simple blogger Nancy Klehm happened to send me a post on this very subject. If only every event had a compost tsar! Here's Nancy:

I am obsessed with urban soil health, so when I got a phone call in mid May from Steven of the Seeds of Peace Collective, I realized a soil ship had floated in. Seeds of Peace is a collective of accomplished cooks and trained street medics, based in Missoula, who provide delicious home cooked food in support of non-violent social movements. They were in Chicago to set up a free community kitchen to serve thousands of NATO conference protestors. Steven said they needed my assistance with their food waste as they had already overwhelmed a small urban garden’s compost bin.

It was late, so I waited until morning and drove my pickup to their site – a parking lot between a community center and an auto parts store. The scene was impressive: a maroon biodiesel school bus with windows dressed in curtains screen printed with frying pans and butcher knives and the largest wok and cast iron pan I have ever seen. A purple tent stretched from the bus into the lot overhanging a to-code outdoor kitchen with multiple burner stoves, wash sinks, prepping area and boxes of produce, mostly organic. At least 12 people stood prepping food for the day. Gallons and gallons of salad and stir fry ingredients were being tossed and mixed in 30 gallon coolers with small wooden oars.


Every day for a week, I picked up the 100 or so gallons of food waste a day and provided them with extra large garbage cans to pour their waste into. Their kitchen was three miles from the rallying area. Once the food was prepared, they would pack a flat bed with it and a few tables and trundle off to the park to serve their healthy, delicious food free of charge.


One pick up was an entire garbage can of delicious looking chickpea and sweet potato curry that had fermented in the sun due to the police blocking their passage to the Park. It made me cry to compost that delicious looking curry. I had to use a couple of bales of straw and dumpstered cardboard from my carbon stockpile to take care of so much nitrogenous waste. Over the past month, the pile, well integrated and covered with a thick layer of straw reached thermophilic temperatures and now is in its mesophilic stage. Most of the food is just residual moisture now and the pile has dropped in volume by at least 20% due to composting and evaporation. So much future soil!

Thanks Steven, Sarah, Patrick and the rest of you of the Seeds of Peace Collective. May you meet with strong hearts and hands on the road.

Tuesday, May 08, 2012

Disconnect to Reconnect: Ditching the “Flushie” for a Composting Toilet

Image from the Wikimedia Commons

We're lucky to have another guest post by Nancy Klehm (see a nice interview with her on foraging here). Nancy visits us at the Root Simple compound at least once a year. What follows is an account of a plumbing misadventure she had on her last visit. 

To give you some context, ever since we've remodeled our bathroom and switched to a low-flow toilet we've had periodic backups. We think there is a low spot just within reach of our turlet snake. The toilet flushes OK most of the time, but at least once a week I've got to deploy that damn snake.

Here's Nancy:

I don’t use a flushie often, I made the decision to ‘go dry’ years ago, adopting the bucket toilet + sawdust system as it pairs nicely with my composting obsession and food growing habit.

I stayed at Erik and Kelly’s back in February. Their low flush toilet and antique piping can’t seem to handle even the most modest bodily donation. Once a flushing attempt proves unsuccessful, and immediately following the ‘oh no…’ guilty grimace, a light-hearted blame game plays out and then according to homestead rules, Erik snakes the toilet. The closet augur is kept on the front porch (to greet visitors?). Erik augers for a few minutes, flushes successfully, marches the tool back outside to air out and we settle back into our routines relieved that our burdens are flowing into the larger mystery of pipes and their soupy contents to the municipal waste treatment plant miles away.

But with Erik and Kelly out of town on one of the weekends during my stay, the daily chores of feeding the kittens, letting out the single hen to roam the yard and snaking, if so needed, fell on me. And yes, the toilet clogged and no, I did not assume the blame. I am regular enough (2-3x/day) as are Erik and Kelly for the record [editor's note: the editors demur from either acknowledging or disavowing the hypothetical frequency of their natural propensities.] to avoid creating such monsters and yet, the flushie needs snaking every day soon after the post-caffeine effect.

Using a closet augur looked pretty self-explanatory, but I decided to check in with YouTube University and watch ‘the pros’ do it. I was fortunate to find a true pro: Ramona’s Plumbing, a D.I.Y. plumbing site with 36 videos uploaded of Greg Chick, a licensed plumber in flipflops who walks you through fixing problems on a variety of topics including faucets, showers and yes, toilets.


I watched a 10:37 minute video of Greg dislodging a ‘soft blockage’ of intentionally placed, wadded paper towel. He was sensible and upbeat, but the bowl in the video was clean. The one I was working on was not. My tool was the poor cousin of the streamlined one Greg was using. So I opened the window wide, and with a burning candle and a wad of mugwort smoldering on the back of the tank, I swung the augur into the bowl and batted a foul. I closed the door and grabbed the phone. Fortunately, I managed to reach Erik and he coached me through my next attempt. My heart-rate jumped ugghing that augur coil into the tank. I yanked it out. There was a sloop. I flushed. Pooping in a bucket with sawdust ultimately feels more sanitary, sane and more manageable as very little can go wrong with such a simple system.

And, when I sat with cup of tea to write this, I had just snaked the toilet for the 6th time in three days. Sure I was glad to learn a new tool and this skill, as well as earn some more insight into the workings of water toilets and yet, snaking a toilet is one of the more compelling arguments for why I ‘go dry’.

Considerations for abandoning your flushie (and switching over to the bucket):
  • Your body’s nutrient should be returned to the Source and by that I mean Mama Earth. This has always been the way. Now is the opportunity to revisit this connection. 
  • Pooping into sawdust allows you to observe your waste, an indicator of healthy body function. This is commonly understood in the medical community be it Western, Aruvedic or Chinese.
  • Human waste is a source of healthy soil if properly composted. (subset of consideration #1) It is sane and safe to compost your human waste if you are a competent (read: very experienced) composter of other organic waste and have the place to do so that will not create a nuisance (aka SMELL) for your neighbors or family. 
  • Waste should not foul potable aka drinkable water. Waste treatment plants use chemical and loads of energy (gas and electricity). Electricity by the way, depending how it is generated also uses large amounts of fresh water. 
  • Greywatering your house is a much more enjoyable way to stretch into your plumbing fantasies than dealing with a clogged flush toilet. 
  • Your water bill will plummet. Toilet’s account for 30% of our daily water useage. 
  • It’s quiet. No one knows you are ‘using it’ even if you are on the phone. 
In other words, Disconnect to Reconnect, folks.

Since I haven’t been able to convince the most thoughtful people I know to join the dry movement, I am investing in a closet augur and taking this show on the road.

 <<>>

For more information on humanure composting, visit www.humanurehandbook.com

Wednesday, March 28, 2012

A Rocket Stove Made From a Five Gallon Metal Bucket


The principle behind a rocket stove is simple--rather than cooking on an open fire, you burn wood in an insulated chimney. Rocket stoves are highly efficient and easy to make. They run on twigs, so you can avoid cutting down a whole tree just to cook dinner.

We've had a rocket stove made out of brick in our backyard for several years. The post we wrote on it in 2007 is--oddly--the most frequently searched post on this site. I figured that since there was so much interest in the topic it would be good to offer one that didn't require masonry work. Better yet, I figured that it should be portable, so I made it out of a five gallon steel paint bucket. (eta: for your googling pleasure, it seems retailers call these cans "steel pails" rather than buckets). The project took less than an hour to complete and I'm very pleased with the final result. We created a pdf with full instructions that you can download at the Internet Archive. What follows are some photos showing the building process:


Using a piece of 4" vent pipe and a 90º elbow, I made the chimney. See the pdf for the exact dimensions.


I traced the outline of the vent pipe on to the lid of the bucket and cut this hole out with a jig saw. Tin snips would also have worked.


Using the vent pipe as a guide again, I cut out a 4" hole near the bottom of the bucket.


I used one part clay (harvested from the yard) to six parts vermiculite as my insulation material. Mixed with water, the clay holds the vermiculite together. I could also have used dry wood ash, but I had the vermiculite and clay on hand so that's what I went with.


With the vent pipe in place, I packed the insulation into the bucket and let it dry for a few days before putting the lid on.


I found a barbecue grill at Home Depot that rests on the top of the bucket to support a pot.


Next you want to get yourself a tin can, take off both ends and open it up with tin snips. Cut a piece to serve as a shelf in the mouth of the pipe. It should be about 4" long--so it sits forward in the mouth of the vent. The rear part of the vent, where the fire burns, is open. The twigs rest on top of the shelf, the lower half is for drawing air.


The last step was to add the new Root Simple stencil to the back.

Some fire tips from the little lady, our resident pyro:

A rocket stove isn't like a campfire--you don't throw on a big log and kick back. Cooking on it is intense and concentrated, best suited for boiling or frying. The best fuel source is twigs, small ones--I prefer pencil-sized twigs, and I never try to burn anything thicker than a finger.

To start a fire just shove some paper or other tinder under the shelf toward the back of vent. Lay some very thin twigs, pine needles or other combustibles on the shelf. Light the paper and watch it go. Start adding larger twigs to establish the fire. Of course, twigs burn fast and hot, so you have to keep adding more fuel. Also, the twig are burning from the back (the fire is concentrated in the bend) so as the fire consumes the sticks, you just keep shoving the unburned parts to the rear.

There's a balance between choking the vent with too much wood and having too sparse a fire. After a few minutes of playing with it you'll get the hang of things. If you're doing it right, there should be no smoke, or almost none. These things burn clean.


Let us know if you like the pdf and if you would like to see more similar instruction sheets (maybe in an ebook format) of these types of projects. There's also a good book on using rocket stoves as heaters:  Rocket Mass Heaters: Superefficient Woodstoves YOU Can Build by Ianto Evans and Leslie Jackson.

Thursday, February 02, 2012

The Chinese Wheelbarrow


From the very cool Low-tech Magazine, the Chinese wheelbarrow:
The Chinese wheelbarrow - which was driven by human labour, beasts of burden and wind power - was of a different design than its European counterpart. By placing a large wheel in the middle of the vehicle instead of a smaller wheel in front, one could easily carry three to six times as much weight than if using a European wheelbarrow.
 Read the rest here. So who will be the first to make one of these with an old bicycle wheel?

Monday, December 19, 2011

Hay Boxes or Fireless Cookers

Illustration from The Fireless Cook Book

Mrs. Homegrown here:

Jessica from Holland sent us a letter recently praising our work, but very, very gently scolding us not including the hay box, a groovy old energy saving technology, in our book. We do stand corrected! And her enthusiasm for hay boxes has reignited our interest, too.

We actually considered hay boxes for Making It, but didn't end up building one for a variety of reasons, including just plain running out of time. But I have to admit one of the primary reasons was that natural gas here is really inexpensive, so the cost savings of starting and finishing a pot of soup on the stove, vs. starting a pot of soup on the stove and finishing it in a box, just wasn't compelling enough for me to make a lifestyle change. This is a silly excuse--water is also inexpensive here, but I'm obsessed about saving that resource. I guess a lot of what we choose to do just comes down to our various quirks and passions.

I'm thankful to Jessica for reminding me of the hay box. I believe that my New Year's resolution will be to meditate on the sources and real costs (in terms of the environment, human health, etc.) of gas and electricity, and work on new ways to conserve energy. The hay box, or fireless cooker, may be one of these strategies.

What the heck is a hay box?

Sorry if I'm leaving some of you out of the loop. A hay box aka fireless cooker is a very old fuel saving technology, which perhaps has its origins in Scandinavia.  It is simply an insulated box that you put a hot pot of food into, and leave it all day (or all night) to finish cooking. It's the forerunner of the crockpot.

This cooking technique isn't limited to hay boxes. The same concept is used by people who put oats and boiling water into a Thermos at bedtime and enjoy the finished oatmeal in the morning, or by campers who wrap their sleeping bags around a cooking pot so they'll have hot food when they get back to camp.

As far as I can tell, no one is selling fireless cookers made in the old style, but they are quite easily fabricated at home--or improvised in emergencies. However, if you are in a buying mood, a very similar technology exists in something called thermal cookware. These are essentially giant Thermoses--I'm including a link to a random example of one on Amazon here.

Why would you want to build a fireless cooker?
  • To save time at the stove
  • To have food ready when you get up, or come home from work
  • To save energy, because you're a do-gooder.
  • To save energy, because energy is expensive/unreliable where you live.
  • To learn this technology well so you'll know how to use it in case of emergencies. (A fireless cooker combined with something that can boil water, like a camp stove or a rocket stove, would be a great combo for any emergency, long or short.)
Okay, so how do you build one?

It's really simple. You're just insulating a pot. There are many ways to do it, including simply bundling the pot up in a bunch of quilts. But if you're going to do this regularly, you probably want a more stable system than that. You'll want to build a box.

First, though, you should probably start with your pot and build from there. This technique works best when the pot is full, so you'll want to choose a soup pot/dutch oven sort of pot that is the right size for you and your family. It should have a lid, obviously, and should be made of something can come and go off the stove top--i.e. no ceramic.

 Once you've chosen your pot, you'll need a box to keep it in. This box should allow enough space for at least 4" of insulation all around your pot. (We'll talk about the insulation next.) So the pot height/pot width plus at least 8"= the minimum dimensions of your box.

The cooker could be anything sturdy with a lid, but the tighter built, the better. A big cooler would work great. I've just had a crazy inspiration that one of those newfangled ottomans that are hollow inside for stashing away your junk when company comes would also work nicely!

You can make a "two holer" if you want to have the ability to cook more than one dish at a time. In that case you might be able to build one in a hall bench or a big toy chest or trunk. If you can't scavenge anything, you could build a wooden box with a hinged lid. A well-insulated, box-style solar oven can do double duty as a fireless cooker, too. Whatever you choose, the box should have a lid that either latches or can be weighed down so it closes securely.

If your box is not built pretty much airtight--say it's pieced together out of wood--you should seal it up before you insulate it. In old manuals they recommend gluing a layer of  paper all over the interior. You might choose to use tin foil or a Mylar space blanket. A space blanket would help reflect heat no matter what your box is made of.

Then you need to choose an insulating material.

Early 20th century options, as per old books:
  • Hay or straw, cut fine
  • Sawdust
  • Wool (they mention this is the best material)
  • Southern moss
  • Ground cork (it seems fruit used to be shipped in this!)
  • Softwood shavings ("excelsior")
Contemporary recycled options:
  • Styrofoam or foam. Carving a pot-shaped hole into a block that fit your chest would be the best, but scraps could work, too.
  • Shredded paper. At last, something to do with all those bills!
  • Cotton or polyester batting taken from old pillows or quilts. 
  • Wool in the form of cast off sweaters and blankets, perhaps shredded?
  • This might sound nuts, but if you cut down a bunch of weeds, let them dry and chop them up, they would work as well as hay. Straw has that nice hollow stem construction which probably holds heat better than hay, but some weeds have the same sort of stems.
  • Note: I'd discourage using fiberglass insulation for safety reasons. It's nasty to work with and you don't want to risk any of it getting in your food.
    Fill the box up all the way with insulation. The box should be filled to the top, but the material shouldn't be packed so tightly that there's no airspace. Tiny air pockets are where the magic happens.

    Next, make a permanent nest for your pot in the box by hollowing out a pot-shaped hole in the insulation material. Line that hole, as well as the top surface of the insulation, with a one big piece of fabric. Secure that fabric to around the edges of the box with staples or something. That will allow you to lift the pot in and out easily and will also keep bits of insulation out of your food.

    The final insulation step is to make or find a cushion sized to fill all the empty space in the box from the top of your pot to the closed lid. It should be fat enough that you have to use a little pressure to close the lid. There should be no open space at the top of the box. And again, the lid must latch or otherwise secure tightly. In the image at the top you can see the two cushions that come with that set up.

    It's often easier to understand something just by looking at pictures. If you do an image search for hay box, you'll see lots of them, many improvised quickly. Whereas searching fireless cooker brings up more antique images.

    A fireless cooker from a 19th century German catalog, image courtesy Wikimedia.

    Cooking with the Hay Box

    Okay, this is all very theoretical for me because I haven't done it yet, but this is what I know, and I hope those with experience will comment to help us newbies out.

    The cooker is perfect for anything you'd associate with a crockpot, like pot roasts and other stewed meats, soups and stews and chile, bean dishes and also hot cereals, polenta, whole grains and rice.

    First, it's pretty much impossible to offer up exact cooking times. It's going to vary by both quantity of food and the construction of your box. In short, you're going to have to play with it.

    But the gist of it is that you start your cooking on the stove. If, for instance, you're doing an initial saute, you'd do that first, then you'd add all your ingredients and liquids and bring it up to a simmer (for how long may vary by recipe--the old cook book I'm consulting most often recommends 10 minutes boiling on the stove for meaty dishes, but if I suspect for non-meat things you could just bring it to a boil and then take it off immediately) then move it to the box to finish cooking. A good box should hold heat for 8 hours. The actual cook time will be less--how much less will vary by dish. But it will not burn or overcook and it will keep warm until you're ready to eat.

    I've heard that in general you would use less water than with stove top cooking because there's no evaporation.
     
    Here's some of Jessica's tips:
    Suggestion: put the beans/lentils/wheat/rice/peas in a thermos flask together with the absorbable amount of boiling water/stock. Do this in the morning. In the evening you have a thermos with still warm and well-cooked food. With just a few seconds of boiling water. Think of the hours per month that you can turn off the stove and still have warm, cooked food!
     ...
    It works fine with other things as well:
    Eggs: put pan with eggs and boiling water in, take out of hay chest after 10 minutes (or more, or less, depending on your experience.
    Vegetables: take out of hay chest after 110 to 125% of ordinary cooking time. Experiment! Don't use a lot of water.
    Stock... why not?


    It even works with things like meat balls and chicken wings. Have the meat on high fire until the outside develops the right crust or color, then keep in hay chest for xx time until inside is 'done',

    Mr. Google can lead you to various resources on this technology, but my favorite resource so far is this old book: The Fireless Cook Book by Margaret Mitchell (1909), which is actually both a construction manual and a cookbook--a wonderful crusty old cookbook with recipes for things like Mock Turtle Soup. You can read it online at Archive.org, or download a pdf or even as an e-reader file--for free!

    Do you have any recipes, tips or techniques to share? Please do!


    An obligatory nanny-state warning: If food drops below 140F (60C) for an hour or more, bad bacteria can move in. You might want to take the temperature of your food when you pull it out of the box and see where it is. If it has dropped below that temperature, put it on the stove and rewarm it to at least 165F(74C).

    Wednesday, December 14, 2011

    CoEvolution Quarterly Online

    While hunting down old appropriate technology resources on the Internet, I was delighted to find the winter 1978 issue of CoEvolution Quarterly, put out by the folks behind the Whole Earth Catalog. This issue of CoEvolution profiled Robert Kourik (which CoEvolution spells "Kourick") who practiced permaculture before Bill Mollison gave it a name:
    [Kourick] is developing methods of growing edible and ornamental plants together for maximum beauty, minimum upkeep, and a self-sustaining yield of food.

    He does it by concentrating on growing perennials that do not need to be replanted each year and annuals that reseed themselves spontaneously. He uses ground cover plants that fertilize other plants, such as the beautiful pastel-flowering lupin which puts nitrogen in the soil. . . Kourick's goal is to develop what he calls a "self-reliant" garden that produces all of the nutritional needs of each plant. "The gardener," he says, "can then supply his own nutritional needs by adapting his diet to the garden's produce."
    Amen is all I can say to that. A garden that requires fewer inputs is exactly what I'm working on right now.


    In the same article Kourik mentions incorporating fruit trees, kept pruned small, into his gardens,
    Robert Kourick believes that tree crops can be a mainstay of any garden, and he has discovered a plant breeder in Modesto, whom he calls the "new" Luther Burbank. This man is Floyd Zaeger [I think that should be "Zaiger"] who has developed genetic dwarf fruit trees that are strong on adaptive qualities and perfect for Kourick's garden.
    Floyd Zaiger, incidentally, is the person who developed several of the fruit varieties I mentioned in yesterday's blog post including the pluot, the aprium and the necta-plum. He developed these varieties through a herculean breeding program involving hand pollinating something like 150,000 trees.

    Robert Kourik went on to write an excellent series of books, Drip Irrigation for Every Landscape, Roots Demystified, and Designing and Maintaining Your Edible Landscape Naturally

    You can read CoEvolution Quarterly and the Whole Earth Catalog for free on the Interwebs at wholeearth.com or download individual pdfs for $2. One of these days I'll put up a separate page of links to more free appropriate tech and prepping resources when I get the time.

    Wednesday, December 07, 2011

    Earthquake Proofing the Pantry


    So I finally got around to earthquake proofing the pantry. All it took was a bunch of four foot bungee cords which seemed to have just about the right amount of stretch to span our seven foot shelves. You could probably use the same four foot bungee cords to span an even longer shelf. I used eye hooks to anchor the ends of the cords.

    Looking at the picture, the height of the cords on some of the shelves might not be optimal (looks like some of the jars could slip under in a good shaking). But, all in all, I'm pleased with the results.

    Wednesday, October 05, 2011

    Scott's Pepsi-G Stove


    If you've ever backpacked any distance you'll appreciate the need to reduce weight, taken to its logical extreme by the sort of folks who cut their toothbrushes in half. This ultra-light subculture, to our benefit, seems to be populated by engineering types who like to create useful lists and detailed instructions. And, even if you don't backpack, these innovative ideas can be used in your emergency preparedness plans.

    One of my favorite ultra-light backpacking gadgets is the Pepsi can stove, which has reappeared on the interwebs, after a prolonged absence, here.

    To make a Pepsi stove you take the bottom of a 12 oz Pepsi can and the bottom of a Guinness Draught can and, after a series of precise cuts and pin pricks you end up with a nifty cooking stove that uses denatured alcohol or methanol (both easily obtained at any hardware store) as fuel.


    Efficiency-wise, if you consider the ratio of weight to heat output, you're better off with a commercial backpacking stove and fuel canisters. But such stoves are expensive and the fuel canisters are only available at camping and sporting goods stores. The nice thing about the Pepsi can stove is that it's almost free to make and you can find the fuel at any hardware store. I keep both a Pepsi can stove and a MSR backpacking stove in my backpack. That way I've got a backup in case one fails to work.

    Mrs. Homegrown here:

    I thought I'd toss in a little more detail for those of you unfamiliar with the concept. A Pepsi can stove is tiny and very light weight, good for two things--ultralight backpacking and as a simple cooking device for what some people call a bug out bag--emergency gear that is ready to grab and go.

    I've taken one with me backpacking, as my only stove. It works fine, but it is limited in its capabilities. It can boil a cup or so of water at a time, enough to make one person a hot drink, or enough water to rehydrate a pouch of something. You certainly can't make pancakes over one, and if you have a family to serve, you might want to consider carrying more than one of these stoves.

    My camping set up included the stove, a sawed off Foster's can (you know, those extra large beer cans) as a cooking pot, a circle of chicken wire to balance the Foster's can upon over the stove, and a bit of foil to block wind. It all tucked inside the Foster's can for transport and weighted hardly anything. Oh, and I kept the fuel in one of those plastic collapsible water bottles.

    As Erik says, a lightweight camping stove and proper fuel canister is a much more flexible and powerful option, but little Pepsi can stoves can't be beat for price or weight.

    Here's our 2006 post on the same subject--along with a nice photo of ours burning.

    Tuesday, October 04, 2011

    Emergency Supplies: It's all about the lids


    Above you see one five gallon bucket transformed into a toilet, and another into a food storage container, by virtue of specialty lids.

    The toilet seat lid I have here is called Luggable Loo Seat Cover and, miraculously, it is made in Canada. I bought it at REI.

    The other lid is called a Gamma Seal, and it is USA made. Do I see a trend, here? Anyway, this I found at an Army surplus store. The Gamma Seal is a two part lid that fits most 3-7 gallon buckets. One part of the lid is an adapter ring that snaps on the rim bucket. ("Snaps" is a euphemism for "Fits on after straining, swearing, hammering and finally calling for the husband." In the end, Erik held it down while I beat it--er--I mean, snapped it into place.)  The lid itself spins and seals with a gasket. This gives it a nice, bug and moisture proof seal for all sorts of storage needs, transforming your ordinary buckets into superbuckets.

    Sunday, August 28, 2011

    Free Preparedness E-Books

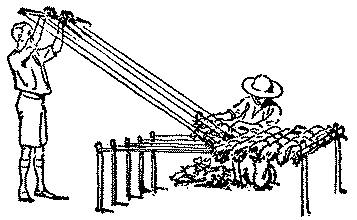
    Camp loom, for making mats and mattresses from the 1911 edition of the Boy Scout Handbook
    Through a circuitous bit of aimless interweb searching I came across a huge list of downloadable urban homesteading/gardening/survivalist manuals on a site called hardcorepreppers.com. Unfortunately, this site is so popular that it seems to be down every time I've checked. But thanks to Google's caching feature I was able to access a list of those documents. Here's a curated set of just a few of those links (through the letter "f") that I found interesting. I can't vouch for the reliability of any of this information but at least it's entertaining. And if you have any other favorite free e-book sources please leave a link in the comments. At some point I'll direct the Root Simple staff to add these and more to our resource page.

    Food and Gardening
    Bulk Sprouter
    Bread Without an Oven
    Building Soils for Better Crops
    Colorado State University--Drying Vegetables
    Collecting, Cutting and Handling Potato Seed
    Everything Under The Sun: Food Storage for the Solar Oven

    Medicine
    Making Chinese Herbal Formulas Into Alcohol Extracts 
    The Ayurveda Encyclopedia Natural Secrets to Healing Prevention and Longevity
    How to Make Cannabis Foods and Medicines
    The Sacred Formulas of the Cherokees

    Energy
    Biogas
    Biomass Stoves
    Build your own Rocket Stove
    Camp Stoves and Fireplaces

    Transportation
    Bicycle Know How

    Zombie Apocalypse Skills (or "ZAS" since everything associated with the zombie apocalypse needs an acronym)
    50 Emergency Uses for Your Camera Phone
    Map Reading and Land Navigation
    Boy Scouts Handbook 1911 Edition
    Bug out Bag
    5 Ways to Win a Fight 
    Guerilla Warfare by Che Guevara 
    Cold Weather Survival
    Field Expedient Direction Finding

    Sunday, June 19, 2011

    Paper Fire Brick Maker


    Another highlight from John Zapf's compound, an African-made paper fire brick mold. You soak the newspaper, press it into the mold, let the brick dry out and you've got fuel for a fireplace. More info on the process here.

    Saturday, June 18, 2011

    Emergency Toilet Sanitation

    The Humanure Handbook: A Guide to Composting Human Manure, Third EditionI was asked by our local neighborhood council to talk about emergency turlets for their public safety committee. Doing some preliminary research about what our government suggests concerns me.

    FEMA and, it seems, all the state and local agencies I looked into rely on a poop in a bag, throw in some enzymes or bleach and throw it into a pit approach. In a short term emergency, a day or two let's say, this might work fine. But if the emergency stretched out longer I can see some potential problems. And the cynic in me sees an opportunity for a contractor to sell toilet and enzyme kits to government agencies.

    So what's wrong with pooping in a bag? First off, it's disgusting, something I know from backpacking. I have a feeling people might avoid latrines set up with "poop bags" and go do their business behind a bush. And I have a feeling that the government experts suggesting this approach have never tried it themselves.

    Secondly, those pits full of bags could become a serious biohazard should rats, let's say, start pulling the bags apart or should the pit get flooded.

    As an alternative to the "poop bag" I was impressed with Joseph Jenkin's humanure approach that he explains in a series of videos he shot in Haiti after the earthquake. You can see those videos here. Essentially what Jenkins did in Haiti was to forage carbon material ("bagasse" or sugar cane waste) and use that as a cover material in the latrines. This eliminates smells and maggots. He also set up a large humanure compost pile in a refugee camp using the same bagasse material as the carbon source. The hot temperatures in the compost pile kill hazardous microorganisms in human poo. As long as you've got a carbon source you can keep Jenkins' sanitation system going indefinitely. With the FEMA approach you've got a problem when you run out of those bags and proprietary enzyme mixtures.

    One problem with Jenkins' approach could be finding a carbon source in an urban area, but I think that's solvable (suggestions invited!). You also need water for the compost pile but it need not be potable.

    I'm no sanitation expert and am interested in opinions on this topic, particularly those who have worked in emergency situations or in impoverished communities. What I like about Jenkins' approach is that it relies more on knowledge (how to compost, set up a latrine) than equipment. The job then is to spread that knowledge. Learning how to compost should be a skill everyone knows how to do.


    Jenkins' Humanure Handbook: for purchase or free pdf download.

    Saturday, May 14, 2011

    Pop Quiz Answer


    The answer to yesterday's pop quiz: as our friend Nic Sammond put it, "Your shelving was designed by Tokyo Electric Power?" Alas, I can't pass the blame off on anyone but myself. When the big one hits, we'll have a giant salsa bowl of pickles, jams and broken glass.

    It's well past time to install some bungee cords across the shelves.

    And we'll make our quizzes a little harder next time. 

    Friday, May 13, 2011

    Friday Pop Quiz


    Our pantry. So what's the main thing wrong with this picture? Hint--we're in California. Leave a comment. We'll provide an answer tomorrow.

    Wish we could offer a prize, like an all expenses paid trip to Vernon, CA. But, alas, we have a tight budget here at Root Simple. You'll get bragging rights.